Singer 2010 Superb Instruction Manual 2 - Page 29
Operating, Machine, Fonctionnement, machine, Funcionamiento, maquina
 |
View all Singer 2010 Superb manuals
Add to My Manuals
Save this manual to your list of manuals |
Page 29 highlights
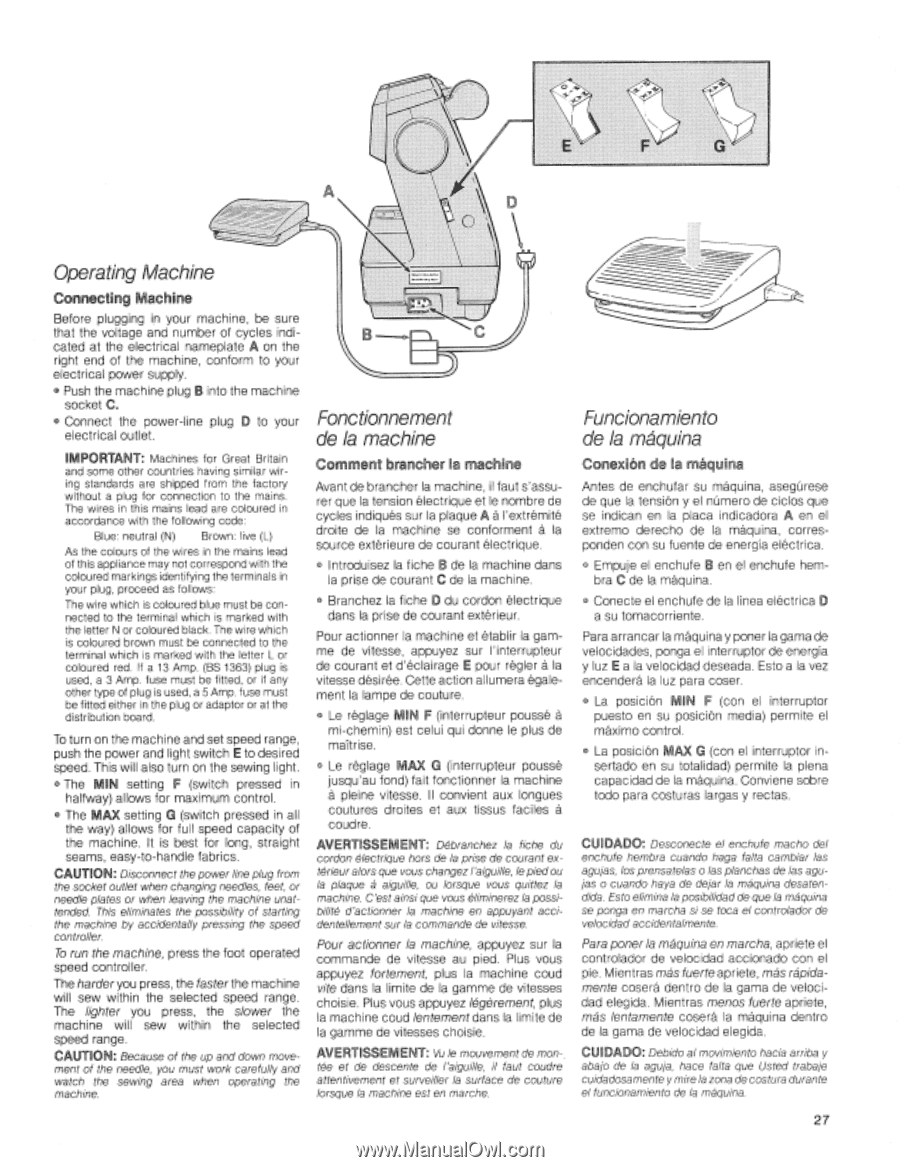
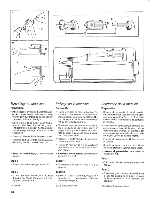
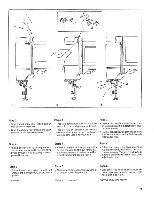
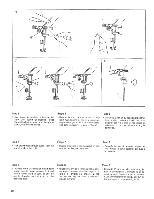
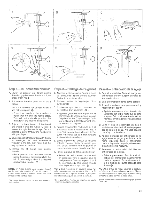
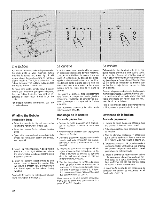
r\ I Operating Machine Connecting Machine Before plugging in your machine, be sure that the voltage and number of cycles indicated at the electrical nameplate A on the right end of the machine, conform to your electrical power supply. ® Push the machine plug B into the machine socket C. ® Connect the power-line plug D to your electrical outlet. IMPORTANT: Machines for Great Britain and some other countries having similar wiring standards are shipped from the factory without a plug for connection to the mains. The wires in this mains lead are coloured in accordance with the following code: Blue: neutral (N) Brown: live (L) As the colours of the wires in the mains lead of this appliance may not correspond with the coloured markings identifying the terminals in your plug, proceed as follows: The wire which is coloured blue must be connected to the terminal which is marked with the letter N or coloured black. The wire which is coloured brown must be connected to the terminal which is marked with the letter L or coloured red. If a 13 Amp. (BS 1363) plug is used, a 3 Amp. fuse must be fitted, or if any other type of plug is used, a 5 Amp. fuse must be fitted either in the plug or adaptor or at the distribution board. To turn on the machine and set speed range, push the power and light switch E to desired speed. This will also turn on the sewing light. ® The MIN setting F (switch pressed in halfway) allows for maximum control. ® The MAX setting G (switch pressed in all the way) allows for full speed capacity of the machine. It is best for long, straight seams, easy-to-handle fabrics. CAUTION: Disconnect the power line plug from the socket outlet when changing needles, feet, or needle plates or when leaving the machine unattended. This eliminates the possibility of starting the machine by accidentally pressing the speed controller. To run the machine, press the foot operated speed controller. The harder you press, the faster the machine will sew within the selected speed range. The lighter you press, the slower the machine will sew within the selected speed range. CAUTION: Because of the up and down movement of the needle, you must work carefully and watch the sewing area when operating the machine. Fonctionnement de la machine Comment brancher la machine Avant de brancher la machine, i t faut s'assurer que la tension electrique et le nombre de cycles indiques sur la plaque A a l'extremite droite de la machine se conferment a la source exterieure de courant electrique. O I ntroduisez la fiche de la machine dans la prise de courant C de la machine. • Branchez la fiche Gt du cordon electrique dans la prise de courant exterieur. Pour actionner la machine et etablir la gamme de vitesse, appuyez sur l'interrupteur de courant et d'eclairage E pour regler a la vitesse desiree. Cette action allumera egalement la lampe de couture. ® Le reglage MIN F (interrupteur pousse mi-chemin) est celui qui donne le plus de maTtrise. • Le reglage G (interrupteur pousse jusqu'au fond) fait fonctionner la machine a pleine vitesse. II convient aux longues coutures droites et aux tissus faciles a coudre. AVERTISSE E T: Debranchez la fiche du cordon electrique hors de la prise de courant exterieur alors que vous changez l'aiguille, le pied ou la plaque a aiguille, ou lorsque vous quittez la machine. C'est ainsi que vous eliminerez la possibilite d'actionner la machine en appuyant accidentellement sur /a commande de vitesse. Pour actionner la machine, appuyez sur la commande de vitesse au pied. Plus vous appuyez fortement, plus la machine coud vice dans la limite de la gamme de vitesses choisie. Plus vous appuyez legerement, plus la machine coud lentement dans la limite de la gamme de vitesses choisie. AVERTISSEMENT: Vu le mouvement de mon-, tee et de descente de l'aiguille, it faut coudre attentivement et surveiller la surface de couture lorsque la machine est en marche. Funcionamiento de la maquina Conexion de la maquina Antes de enchufar su maquina, asegOrese de que la tension y el nOmero de ciclos que se indican en la placa indicadora A en el extreme derecho de la maquina, corresponden con su fuente de energia electrica. • Empuje el enchufe en el enchufe hembra C de la maquina. • Conecte el enchufe de la linea electrica D a su tomacorriente. Para arrancar la maquina y poner la gama de velocidades, ponga el interruptor de energia y luz E a la velocidad deseada. Esto a la vez encendera la luz para coser. • La posicion MIN F (con el interrupter puesto en su posicion media) permite el maxim° control. ® La posicion MAXG (con el interrupter insertado en su totalidad) permite la plena capacidad de la maquina. Conviene sobre todo para costuras largas y rectas. CUIDADI: Desconecte el enchufe macho del enchufe hembra cuando haga falta cambiar las agujas, los prensatelas o las planchas de las agujas o cuando hays de dejar la maquina desatendida. Esto elimina la posibilidad de que la maquina se ponga en marcha si se toca el controlador de velocidad accidentalmente. Para poner la maquina en marcha, apriete el controlador de velocidad accionado con el pie. Mientras mas fuerte apriete, mas rapidamente cosera dentro de la gama de velocidad elegida. Mientras menos fuerte apriete, mas Ientamente cosera la maquina dentro de la gama de velocidad elegida. Debido al movimiento hacia arriba y abajo de la aguja, hace falta que Usted trabaje cuidadosamente y mire la zona de costura durante el funcionamiento de la maquina. 27
-
 1
1 -
2
-
3
-
4
-
5
-
6
-
7
-
8
-
9
-
10
-
11
-
12
-
13
-
14
-
15
-
16
-
17
-
18
-
19
-
20
-
21
-
22
-
23
-
 24
24 -
 25
25 -
 26
26 -
 27
27 -
 28
28 -
 29
29 -
 30
30 -
 31
31 -
 32
32 -
 33
33 -
 34
34 -
35
-
36
-
37
-
38
-
39
-
40
-
41
-
42
-
43
-
44
-
45
-
46
-
47
-
48
-
49
-
50
-
51
-
52
-
53
-
54
-
55
-
56
-
57
-
58
-
59
-
60
-
61
-
62
-
63
-
64
-
65
-
66
-
67
-
68
-
69
-
70
-
71
-
72
-
73
-
74
-
75
-
76
-
77
-
78
-
79
-
80
-
81
-
82
-
83
-
84
-
85
-
86
-
87
-
88
-
89
-
90
-
91
-
92
-
93
-
94
-
95
-
96
-
97
-
98
-
99
-
100
-
101
-
102
-
103
-
104
-
105
-
106
-
107
-
108
-
109
-
110
-
111
-
112
-
113
-
114
-
115
-
116
 |
 |