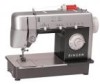
Singer CG-500 Commercial Grade Instruction Manual 2
Singer CG-500 Commercial Grade Manual
 |
View all Singer CG-500 Commercial Grade manuals
Add to My Manuals
Save this manual to your list of manuals |
Singer CG-500 Commercial Grade manual content summary:
- Singer CG-500 Commercial Grade | Instruction Manual 2 - Page 1
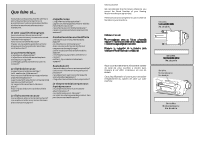
PartNumber/Pieza Nº./PièceNº: 358456-001 PrintedinBrazil/ImpresoenBrasil/ ImpriméauBrésil- Eng./Spa./Fren. Instruction Book 5 & 10 Stitches 5 y 10 Puntos 5 et 10 Points - Singer CG-500 Commercial Grade | Instruction Manual 2 - Page 2
,youdiscover the many advantagesandtheeaseofoperationbygoingthroughthisinstructionbook,stepbystep,seated atyourmachine. To ensure that you are always provided with the most modern sewing capabilities, the manufacturerreservesthe right to change the appearance, design oraccessories - Singer CG-500 Commercial Grade | Instruction Manual 2 - Page 3
? Le f i l e s t - i l p a s s é d a n s l a f e n t e d u support? Sautedepoint Lamachineest-ellecorrectementenfilée? Le t i s s u e s t - i l b i e n m a i n t e n u p a r l e p i e d presseur? Lacatégorieet lagrosseurdel'aiguille sont-ellesbienadaptées? L'aiguillen'est-ellenitordue,niépointée? Le - Singer CG-500 Commercial Grade | Instruction Manual 2 - Page 4
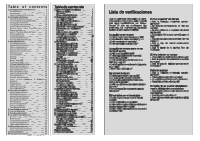
Table of contents 1.GettingToKnowYourMachine 4 PrincipalParts 4 Accessories 6 ImportantSafetyInstructions 8 2.GettingReadyToSew 10 OperatingtheMachine 10 ChoosingandChangingNeedles 10 ChangingPresserFeet 12 Changing theNeedlePlate 14 AttachingtheFeedCover 14 Removing and - Singer CG-500 Commercial Grade | Instruction Manual 2 - Page 5
instructions. Ifyou stillhave a problem Isneedlestraightandsharp? Fabric does not move properly under presser foot Ispresserfootcorrectlyattachedto machine? Ispresserfootlowered? I s s t i tc h l e 59 Equilibragedespoints 59 Point droitextensible 61 Pointric remplacer l e support de canette 77 - Singer CG-500 Commercial Grade | Instruction Manual 2 - Page 6
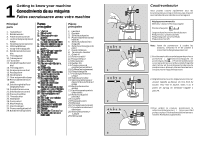
1 Getting to know your machine Principal parts 1. Handwheel 2. Bobbinwinder 3. Patternselectorlever 4. Horizontalspoolpinand holder 5. 6. Selecteurdelargeurde point 7. Guide-filàfente 8. Tensiondu devidoir 9. Guide-fil 10.Releveurdefil 11.Plaquedeface 12.Bloctension 13.Guides-fils 14. - Singer CG-500 Commercial Grade | Instruction Manual 2 - Page 7
Attachingabutton Flatbuttonscanbesewnonquicklyandeasily using theplainzig-zagstitch.Aspecialbutton sewing foot(H),maybepurchasedfromyour retailer. Recommendedsettings StitchSelection:Zig-zagstitch(B) Needle Position: StitchWidth:TosuitButton Foot:ButtonSewing(H) NeedlePlate:GeneralPurpose (A) - Singer CG-500 Commercial Grade | Instruction Manual 2 - Page 8
your sewing machinearedesignedtosimplifyyour sewing and increase the versatility of your machine. Theletterinacircleadjacenttotheillustrated il peut être nécessaire d'ajuster la largeur du point. Installationducouteau Fixézlecouteauenvousassurantquele"bras" ducouteau tientautourdelavisàmaindela l' - Singer CG-500 Commercial Grade | Instruction Manual 2 - Page 9
: ! Selectoneofthefollowingstitches:Zigzag, SlantOveredgeorOveredge. ! Setwidthandlengthaccordingtoyoursewing machine manual. After the side cutter is attached, the ZigZag,SobrepuestaLateraloSobrepuesta. ! Seleccione la puntada de acuerdo al manual de su máquina.Después de que el recorta-lados - Singer CG-500 Commercial Grade | Instruction Manual 2 - Page 10
Important Safety Instructions HOWTOREDUCERISKOFFIRE,ELECTRICSHOCKORPERSONALDAMAGE. •Thismachinehasbeendesignedforcommercial,schoolanddomesticuse. •This machine should never complémentairesdansvotremagasinSINGER. 1. Plaque à aiguille point droit (C) etpied presseurpointdroit(D): Ces accessoires - Singer CG-500 Commercial Grade | Instruction Manual 2 - Page 11
retailer. 1. Straight stitch presser foot (D) and needle plate (C) are used together when straightstitchinglightweightfabricsorwhen your fabric or sewing procedure requires closecontrol. 2. Buttonsewingfoot(H) isusedtoholdany two-hole or four-hole button securely for stitching. 3. Lintbrush - Singer CG-500 Commercial Grade | Instruction Manual 2 - Page 12
electrician t o i n s t a l l t h e p r o p e r o u t l e t . D o n o t modifythepluginanyway. Runningthemachine To turn on machine and sewing light, press upperportion "I" ofpowerswitch(4).Toturnoff machine andlight,presslowerportion "O" of powerswitch. Torunthemachineandcontrolspeed,pressthe - Singer CG-500 Commercial Grade | Instruction Manual 2 - Page 13
éclairevotretravail,appuyezsur l'interrupteur "I" (4).Pouréteindre,appuyezpour amenerl'interrupteur(4)surlaposition "O".Pour mettre en marche la machine, appuyez sur le rhéostat(5);plusvousappuyerez,pluslavitesse delamachineaugmentera.Pourarrêter,levezle pied. Note: Poserunmorceaudetissuentrelepied - Singer CG-500 Commercial Grade | Instruction Manual 2 - Page 14
foot with shank, hook shank around the presser bar and tighten presserfootscrew. 12 Nettoyerlamachine Votre machine va vous rendre de nombreux services pendant de longues années. Pour garantir son fonctionnement, consacrez quelquesminutesàsonnettoyage. Lessurfacesextérieurespeuventêtrenettoy - Singer CG-500 Commercial Grade | Instruction Manual 2 - Page 15
is designed to give you many years of dependable service. To ensure this reliability, take a few minutes to keep the machineclean. The machine surfaces and covers can be cleanedwhennecessary,withadamp,soft clothandamildsoap. Remove lintandflufffromexposedparts,and withalintbrushcleantheseparts - Singer CG-500 Commercial Grade | Instruction Manual 2 - Page 16
; cetteplaquedevraêtreremiseenplaqueaprès avoir changé l'ampoule, avant de mettre la machineenmarche. Pour cette machine, utilisez une ampoule à bayonettede15wattsmaximum. • Dévissezlavis(1)delaplaquedeface. •Retirezlaplaqueenlatirantverslagaucheet verslebas. • N'essayezpasdedévisserl'ampoule - Singer CG-500 Commercial Grade | Instruction Manual 2 - Page 17
replace the face plate by guiding front top cornerunderandbehindlowestfrontcorner oftopcover.Pushbottomoffaceplateupand SINGER. enlevezlaplaqueàrepriser. Pour dégagerlebras-libre Lebras-librefacilitelacouturetubulaire. Pour transformer votre machine en bras-libre, soule vez l e b o r d d r o i - Singer CG-500 Commercial Grade | Instruction Manual 2 - Page 18
, thread and needle table The needle and thread you choosewilldependuponthe fabricbeingsewn. Thetablebelowisapractical guide to needle and thread selection. Always refer to it before beginning a sewing project. Besuretousethesamesize and type of thread in both needleandbobbin. Heavy-duty thread - Singer CG-500 Commercial Grade | Instruction Manual 2 - Page 19
Before cleaning or adjusting the machine,removeplugfromthesocketoutlet. •Raisepresserfootandneedle. • Openslideplate Turn handwheeltowardsyoutocheckto makesureitisproperlyreplaced. •Replace needle plate (see instruction on page14). • Insertbobbinandcloseslideplate. 76 Lacompositiondestissuspeutêtre: - Singer CG-500 Commercial Grade | Instruction Manual 2 - Page 20
. •Mettezenplaceleporte-bobineauxiliairedans l'orifice situé sur le dessus de la machine, commeillustré. •Enfilez normalement la machine avec le secondfil. • Passez dans les autres guides-fils, sauf le dernier,etenfilezlechasdel'aiguilledroite. • Placezlesfilssouslepiedpresseur. •Baissez doucement - Singer CG-500 Commercial Grade | Instruction Manual 2 - Page 21
8 Twin needle sewing Costura con aguja doble Twinneedlesewingproducestwoparallellines ofclosely-spaceddecorativestitching.Youcan sewwitheitheroneortwothreadcolors. Yourmachineisnotsupliedwiththetwinneedle orspoolpin.Thesemaybeobtainedfromyour local retailerasoptionalaccessories. - Singer CG-500 Commercial Grade | Instruction Manual 2 - Page 22
onpage26. 20 Couture avec le bras-libre (Machine Avec10points) Votrecoutureserasimplifiéeenutilisantlebraslibre de votre machine pour les ouvrages tubulaires. Manches • Surpiquer des sentersouslepiedpresseur. Pointd'arret • Ces points renforcent les emplacements qui subissentdefortestractions. - Singer CG-500 Commercial Grade | Instruction Manual 2 - Page 23
10 StitchMachine) Fabrichandling,whensewingtubularandhard reach garment areas, is simplified and m a d e easierwhenyouusethefree-armfeatureofyour sewingmachine. Sleeves •Free-arm sewing takes the difficulty out of topstitching, sleeves, finishing waistbands and trouser legs. Projects rotate smoothly - Singer CG-500 Commercial Grade | Instruction Manual 2 - Page 24
machine 1. Place s p o o l o n s p o o l pin. Use the correct spool pin holder to hold 2 spoolfirmlyinplace. 2. Lift the presser foot, and turn the hand wheel towards you until the take-up lever reaches its highest 6 position. 1 3. Leadthreadpassingitfirstunderthe thread guide points - Singer CG-500 Commercial Grade | Instruction Manual 2 - Page 25
neutral position after all the buttonholesonthegarmenthavebeensewn. 70 Enfilage de la machine 1. Placez la bobine ou la fusette sur le porte-bobine Tirez le fil et passez-le premièrement dans la fente inférieure du guide-fil et ensuite par la rainure supérieure, de la gauche vers la droite, faisant - Singer CG-500 Commercial Grade | Instruction Manual 2 - Page 26
èressurdespièces tubulaires, utilisez le bras-libre de votre machine. •Marquez l'emplacement des boutonnières 2 commeindiquésurvotrepatron. (1). • Tournezlesélecteurdelongueurpouramener 3 lesymbole(1)lèvredelaboutonnièrefaceau point(•). • Descendez l'aiguille dans le tissu - Singer CG-500 Commercial Grade | Instruction Manual 2 - Page 27
-to-reach areas convert machine bed to free-arm sewing. • Mark buttonhole position Raiseneedleoutoffabric. • Turnbuttonholedialtothebuttonholesymbol (2)forthesecondstep. • Makeatleastfourstitches,endingatpoint(4). 68 8. Pour passer le fil dans le guide-filspiral, commen-cez p a r l a g a u c h e , e - Singer CG-500 Commercial Grade | Instruction Manual 2 - Page 28
6mm (1/4 pouce) à peine de la couture faufilée. 3.Placez la couture sous le pied presseur de sorte que les points droits tombent sur le faufilageetlespointszig-zagsverslalisièrede lacouture1ainsiqu'illustré. 2e méthode-Imitationdesurjet 1.Taillezetajustezlevêtement,toutenallo uant 1,6cm(5/8pouce - Singer CG-500 Commercial Grade | Instruction Manual 2 - Page 29
your fabric and garment. RemembertouseaCatalog2045ball-point (yellow band) needle if you are sewing a 2 syntheticknit. Requiredsettings StichSelection: after stitching and trim away excess fabrictoproduceanarrowseamedge.When seam supports the garment, omit the trimmingstep. 66 Remonter le - Singer CG-500 Commercial Grade | Instruction Manual 2 - Page 30
of the stitch length selector. • Forreversestitching,pushinthebuttonand hold in place. The machine will stitch in reverseonlyaslongasyoukeepthebutton pushedin. 28 Point nid d'abeille Utilisez ce point pour faire dessmocks, pour coudre et réparer des tissus extensibles. Les smockssontdespointsd - Singer CG-500 Commercial Grade | Instruction Manual 2 - Page 31
decorative stitching across evenly spaced gathersoffabric. Togatherfabric •Slightlyloosenneedlethreadtension. •Sew rows of straight long (5) stitches, 1/4" (6mm)apart tournezlevolant pourfaireremonterl'aiguille. Le sélecteur de largeur de point de votre machine doit être sur la position ( ) pour - Singer CG-500 Commercial Grade | Instruction Manual 2 - Page 32
Adjusting thread tension Whenanevenamountoftensionisexertedon boththreads,asmoothevenstitch,knownasa balancedstitch,isproduced. Correcttensionisimportantbecausetoomuch ortoolitlewillweakenyourseamsorcauseyour fabric to pucker. Makeatestsamplewiththe fabricandthreadyouplantouseandexamine it. Aperfect - Singer CG-500 Commercial Grade | Instruction Manual 2 - Page 33
• Placetrimmedseamunderthefootsothatthe straightstitchesfallonthebastedseamline andzig-zagstitchesfallovertheseamedge. 12 3 4 5 62 1 3 1 Réglagedelatension Lorsque la ten réglée, le point se noue dans l'épaisseurdutissu. Latensionestimporte;sielleesttroplâcheou tropserrée, la couture plissera et - Singer CG-500 Commercial Grade | Instruction Manual 2 - Page 34
Pinbastingandhandbastingareeasywaysto make temporary seams before machine sewing. • To pin baste, (1),the5/8" (16mm)seamallowance,isextendedonto theslideplate. 32 Point droit Extensible (Machineave10points) Lorsquevousutilisezletriplepointdroitexten- siblepour lescouturesqui subissentdefortes - Singer CG-500 Commercial Grade | Instruction Manual 2 - Page 35
threadendsasthefirstfewstitchesaremade. • Guidethefabriclightlyasyousew,lettingthe machine make the backward and pointspourpouvoirlesretirerfacilementaprès lacouture. Pourpiquerdroit Servez-vous des lignes guides de la plaqueà aiguillepourpiquerdroit. • Laplusutiliséedeceslignes(1)estcellequi - Singer CG-500 Commercial Grade | Instruction Manual 2 - Page 36
Starting a seam Placefabricunderpresserfoot½"(12mm)from rearoffabric.Aligntherightedgewithoneofthe seamguidelinesontheneedleplate.Lowerthe presserfoot. Backstitch to the edge of the fabric for reinforcementbypushinginthereversebutton, locatedthecenterofthestitchlengthdial.Hold - Singer CG-500 Commercial Grade | Instruction Manual 2 - Page 37
ofpattern. • Moveselector tothelefttobringstitchesof thepatterntogether. 58 Débuter une couture Positionnezletissusouslepiedpresseur. Alignezleborddroitlelongdelaligne-guide choisie,baissezl'aiguilledanslalignede piqûreà1cmdubordsupérieur.Baissezle piedpresseur. Appuyezsurleboutondemarchearri - Singer CG-500 Commercial Grade | Instruction Manual 2 - Page 38
,work from thecenterofthefabrictotheoutside edgeandguidefabricwithbothhands. 36 12 3 4 5 12 3 4 5 Points extensibles A D B C E Enplusdupointdroitetdupointdezig-zag,votre machineréaliseunevariètéd'autrespoints. Pointsextensibles Lespointsextensiblessontutiliséspourcoudre A D tricots - Singer CG-500 Commercial Grade | Instruction Manual 2 - Page 39
5 Flexi-stitch patterns Inadditiontostraightandzig-zagstitches,your machine can produce a variety of other patterns. Flexi-stitches Thesestitchpatternsareusedforsewingknits and otherstretch fabrics. Flexi-Stitchpatterns aremadebythesidetosidemovementofthe needle along with thebackward and forward - Singer CG-500 Commercial Grade | Instruction Manual 2 - Page 40
tement en quatre partieségales.Placerl'élastiquesurletissuet les épingler ensemble sur ces points e n l e s alignantsurlebordsupérieurduvêtement. •Fixerl'élastiqueautissu par quelques points droits.Puiscoudreentendantl'élastiqueentre lesépingles à l'aidedes deux mainspourle tenir fermement devant et - Singer CG-500 Commercial Grade | Instruction Manual 2 - Page 41
both sides close to the stitchinglinesand remove. 54 12 3 4 5 12 3 4 5 Faufil Préparationdelamachine: ! Point:Droit ! Largeurdepoint:Droit ! Longueurdepoint:5.0 ! Pied:Usagegénéral ! SélecteurdeTension:Réglerà1 Mode D'emploie: 1 Suivantlefaufilagedevotrecouture,enleverlefil en - Singer CG-500 Commercial Grade | Instruction Manual 2 - Page 42
pour les renforcer. •Coupezlesfilsaurasdutissu. •Sinécessaire,passezunedeuxièmefois. •Coupezsurl'enverslerenfortdetoileaurasde lapiqûre. Arrets Un point de zig-zag multiple rapproché vous permettra de fixer solidement les brides de ceinture,surtoutdansdestissusépaiscommele Jean. Réglagesrecommand - Singer CG-500 Commercial Grade | Instruction Manual 2 - Page 43
Remontezl'aiguilleenpositionhaute. •Placezlesélecteurdelargeurdepointsurla positionpointdroit( ).Cettepositionpermet ledéplacementfaciledusélecteurdepoint. •Glissez le sélecteur de point au centre du groupedepointsdésirés(A-E). Sélecteurde positiond'aiguille Avant de déplacer ce sélecteur, assurez - Singer CG-500 Commercial Grade | Instruction Manual 2 - Page 44
causingloopsinyourpattern.Tightentension byturningdialtoahighernumber. Your machine isequippedwithautotension. Whenstraightstitching,rarelywill thetension needadjusting pour régler la tension et la longueur de point. Latensiondevraêtreplus lâchequelanormale. •Coupezenprévoyantunecouturede1,6cm. - Singer CG-500 Commercial Grade | Instruction Manual 2 - Page 45
l'envers du travail (3). Pour resserrer la tension, tournez l e d i s q u e v e r s u n chiffreplusélevé. Votre machine est équipée d'une tension automatique.Il n'est pasnécessairederégléla tensionpourlacouturedroite.Pourtousautres points il fautaugmenterou diminuer la tension pourunpointréussis. 43 - Singer CG-500 Commercial Grade | Instruction Manual 2 - Page 46
Zig-zag stitch TheZig-ZagStitch can be usedwhen sewing seams, appliqueing, monogramming or for decorativesewing. RecommendedSettings StitchSelection:Zig 12 3 4 5 Pointinvisible Le point caché vous permet de coudre les ourletsdetissusmoyensépaisetjersey.Coudre au point caché requiert un peu de - Singer CG-500 Commercial Grade | Instruction Manual 2 - Page 47
the guide, as shown. •Lower the presser foot and begin sewing, Spécial(J) Plaqueàaiguille: Universelle(A) Lepointdebourdonestunesériedepointsde zig-zag rapprochés. Ce point permet les applications, lesfinitionsd'ourletsetlabroderie demonogrammes. •Faites un essai pour choisir - Singer CG-500 Commercial Grade | Instruction Manual 2 - Page 48
appliquéaupointInvisible Bourdon Galonné PréparationdelaMachine: ! Point:Zigzag ! LargeurdePoint:Variable (Réglezàlalargeurducordonnet) ! é Bourdon et Appliqué Invisible PréparationdelaMachine: ! Point:ZigzagouInvisible ! LargeurdePoint:1.5mm ! LongueurdePoint:0.5-1.5pourZigzag, 2-3pourInvisible
-
 1
1 -
 2
2 -
 3
3 -
 4
4 -
 5
5 -
 6
6 -
 7
7 -
8
-
9
-
10
-
11
-
12
-
13
-
14
-
15
-
16
-
17
-
18
-
19
-
20
-
21
-
22
-
23
-
24
-
25
-
26
-
27
-
28
-
29
-
30
-
31
-
32
-
33
-
34
-
35
-
36
-
37
-
38
-
39
-
40
-
41
-
42
-
43
-
44
-
45
-
46
-
47
-
48
 |
 |

Instruction Book
PartNumber/Pieza Nº./PièceNº: 358456-001
PrintedinBrazil/ImpresoenBrasil/
ImpriméauBrésil- Eng./Spa./Fren.
5 & 10 Stitches
5 y 10 Puntos
5 et 10 Points