Singer Heavy Duty 44S Heavy Duty 44S Stitch Applications Guide - Page 11
The Cording Foot
 |
View all Singer Heavy Duty 44S manuals
Add to My Manuals
Save this manual to your list of manuals |
Page 11 highlights
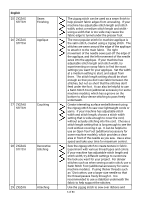
English STITCH 44 MULTI-STEP ZIGZAG STITCH Elastic Insertion 45 MULTI-STEP ZIGZAG STITCH Attaching Trims 46 MULTI-STEP ZIGZAG STITCH Seam Finishing 47 MULTI-STEP ZIGZAG STITCH Bartacks 48 MULTI-STEP ZIGZAG STITCH Edge Joining dimension to your projects. The Cording Foot (additional accessory for some machine models) has grooves on top that help guide thin yarns or cords as you stitch over them. The stitch "catches" the cords to secure them to the fabric surface. It is helpful to use a tear-away stabilizer underneath as you sew to help prevent fabric puckering. The multi-step zigzag sews 3 small stitches each time it goes left to right and right to left, making this stitch strong yet flexible. Use it to easily sew elastic onto fabric. For elastic that is 1/4" - 3/8" wide, place the elastic through the opening of the All-Purpose Foot. This will help keep the elastic from slipping from left to right as you sew. Hold the elastic from in front and in back of the presser foot, stretching the elastic as you do so. Use the multi-step zigzag stitch to attach ribbons and trims. It's an easy way to embellish projects. It is helpful to use an Open Toe Foot (additional accessory for some machine models), which provides a clear view of the sewing area. For machines with adjustable stitch length or stitch width, set the stitch length and stitch width according to the look you want for your project. The multi-step zigzag stitch can be used as a seam finish to help prevent fabric edges from unraveling. For machines with adjustable stitch length and stitch width, select a medium stitch length and width and sew along the raw edge of the fabric to finish the edge. A bartack is a series of stitches used to reinforce high-stress areas of garments such as belt loops, pockets, zippers, etc. The multi-step zigzag sews 3 small stitches each time it goes left to right and right to left. When stitch length is set to "0", or if the machine's feed teeth are either covered or disengaged, the stitch can be used to sew bartacks, Two fabrics can be joined together using a multistep zigzag stitch. First, turn under and press the edge of both fabrics. An Edge Joining Foot (additional accessory for some machine models) can be used a a guide for the fabrics. Place the folded edges next to each other, one on each side of the foot's center guide, and place a piece of lightweight stabilizer underneath the area where they join. Select the multi-step zigzag stitch. For machines with adjustable stitch length or stitch 11 of 80
-
 1
1 -
2
-
3
-
4
-
5
-
 6
6 -
 7
7 -
 8
8 -
 9
9 -
 10
10 -
 11
11 -
 12
12 -
 13
13 -
 14
14 -
 15
15 -
 16
16 -
17
-
18
-
19
-
20
-
21
-
22
-
23
-
24
-
25
-
26
-
27
-
28
-
29
-
30
-
31
-
32
-
33
-
34
-
35
-
36
-
37
-
38
-
39
-
40
-
41
-
42
-
43
-
44
-
45
-
46
-
47
-
48
-
49
-
50
-
51
-
52
-
53
-
54
-
55
-
56
-
57
-
58
-
59
-
60
-
61
-
62
-
63
-
64
-
65
-
66
-
67
-
68
-
69
-
70
-
71
-
72
-
73
-
74
-
75
-
76
-
77
-
78
-
79
-
80
 |
 |
