Singer One Instruction Manual 19 - Page 23
Width, adjustment, ADJUST, PRESSER, PRESSURE
 |
View all Singer One manuals
Add to My Manuals
Save this manual to your list of manuals |
Page 23 highlights
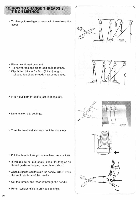
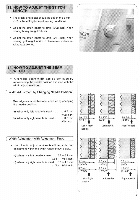
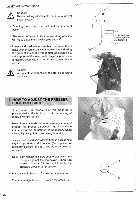
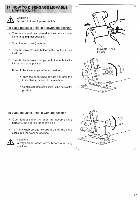
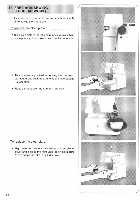
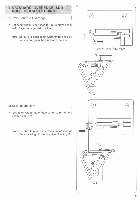
Width adjustment knob A Caution: Before making adjustments, be sure to turn off power switch • Opening the looper cover will make adjustment easier. • Placement of upper knife in nonworking position will make adjustment easier.(see page 25) • Loosen width adjustment knob set screw with hex head wrench furnished with the machine and using the graduations on the throat plate as a guideline, set edge (A) of the seam width finger support plate to desired seam width. Then firmly tighten the set screw. A Caution: Always close looper cover before operating machine. 15. HOW TO ADJUST THE PRESSER FOOT PRESSURE • The presser foot pressure of this machine is preadjusted at the factory to suit the sewing of medium weight fabrics. • Most of the materials do not require adjustment of presser foot pressure however, there are some instances where adjustment is necessary when sewing lightweight and heavyweight fabrics. • In such case, insert screwdriver through access hole (A) in top cover and into slot (B) in pressure regulating screw and turn regulating screw as required. Note: Turn regulating screw counterclockwise until it stops against the top cover. Then turn screw clockwise 6 turns which will be the standard presser bar pressure. • For lightweight fabric ... Decrease the pressure • For heavyweight fabric ... Increase the pressure 22 4.5 3.5 / Rolled hem I (When shipped from factory.) 3.0 mm
-
 1
1 -
2
-
3
-
4
-
5
-
6
-
7
-
8
-
9
-
10
-
11
-
12
-
13
-
14
-
15
-
16
-
17
-
 18
18 -
 19
19 -
 20
20 -
 21
21 -
 22
22 -
 23
23 -
 24
24 -
 25
25 -
 26
26 -
 27
27 -
 28
28 -
29
-
30
-
31
-
32
-
33
-
34
-
35
-
36
-
37
-
38
-
39
-
40
-
41
-
42
-
43
-
44
-
45
-
46
-
47
-
48
 |
 |
