Sony CMT-HPX7 Operating Instructions
Sony CMT-HPX7 Manual
 |
View all Sony CMT-HPX7 manuals
Add to My Manuals
Save this manual to your list of manuals |
Sony CMT-HPX7 manual content summary:
- Sony CMT-HPX7 | Operating Instructions - Page 1
Instructions Owner's Record The model and serial numbers are located on the rear of the unit. Record the serial number in the space provided below. Refer to them whenever you call upon your Sony dealer regarding this product. Model No Serial No CMT-HPX10W CMT-HPX9 CMT-HPX7 ©2004 Sony - Sony CMT-HPX7 | Operating Instructions - Page 2
user to the presence of important operating and maintenance (servicing) instructions in the literature accompanying the appliance. CAUTION The use are cautioned that any changes or modification not expressly approved in this manual could void your authority to operate this equipment. Note to CATV - Sony CMT-HPX7 | Operating Instructions - Page 3
CMT-HPX10W only NOTICE FOR THE CUSTOMERS IN THE U.S.A. If you have any questions about this product, you may call; sony customer Information Service Center 1-800-222-7669 or http://www.sony.com/ The Number below is for the FCC related matters only. Regulatory Information Declaration of Conformity - Sony CMT-HPX7 | Operating Instructions - Page 4
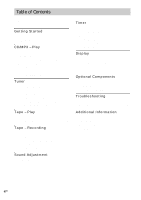
tracks on a tape 18 - CD-TAPE Synchro Recording Recording on a tape manually 18 - Manual Recording Sound Adjustment Adjusting the sound 19 Timer Falling asleep to music 19 components......... 23 Transmitter 24 (CMT-HPX10W only) Troubleshooting Problems and remedies 26 Messages 29 Additional - Sony CMT-HPX7 | Operating Instructions - Page 5
How to use this manual • The instructions in this manual are for model CMT-HPX10W, CMT-HPX9 and CMTHPX7. Check your model number by looking at the top of the unit. In this manual, CMTHPX7 is used for illustration purposes unless stated otherwise. Any difference in operation is clearly indicated in - Sony CMT-HPX7 | Operating Instructions - Page 6
has not been correctly finalized. For more information, see the operating instructions for the recording device. • Discs recorded on CD-R/CD-RW recorded in multisession that have not ended by "closing the session" are not supported. • The system may be unable to play MP3 format files that do not - Sony CMT-HPX7 | Operating Instructions - Page 7
Getting Started Getting Started Hooking up the system Perform the following procedures 1 to 4 to hook up your system using the supplied cords and accessories. AM loop antenna Right speaker FM lead antenna Left speaker 2 3 1 4 1 Connect the speakers. Connect the right and left speaker cords to - Sony CMT-HPX7 | Operating Instructions - Page 8
Plug type B Extend the FM lead antenna horizontally AM loop antenna Plug type C North American models: Connect using the white side Other models: Connect using the brown side Extend the FM lead antenna horizontally AM loop antenna Note To prevent noise pickup, keep the antennas away from the system - Sony CMT-HPX7 | Operating Instructions - Page 9
Getting Started Setting the clock Use buttons on the remote for the operation. 1 Press ?/1 to turn on the system. 2 Press CLOCK/TIMER SET. 3 Press ./> repeatedly to set the hour. 4 Press ENTER. 5 Press ./> repeatedly to set the minute. 6 Press ENTER. The clock starts working. To adjust the clock 1 - Sony CMT-HPX7 | Operating Instructions - Page 10
of the disc tray. When opening the disc tray, it may catch and cause malfunction. • You cannot store 8 cm discs in the DISC 1 - 5 slots. For instructions on how to remove these discs, see page 27. • Do not use a disc with tape, seals or paste on it as this may cause malfunction - Sony CMT-HPX7 | Operating Instructions - Page 11
Playing a disc - Normal Play/Shuffle Play You can play audio CDs and discs with MP3 audio tracks. Current disc Track number Loaded discs Playing time 1 Press CD (or FUNCTION repeatedly) until "CD" appears. 2 Press PLAY MODE in stop mode repeatedly until the mode you want appears in the display. - Sony CMT-HPX7 | Operating Instructions - Page 12
time an MP3 audio track is recorded, you may encounter such problems as disabled playback, sound interruptions and noise. • When playing VBR (variable bit rate) MP3 audio track - When you perform Fast Forward or Rewind (Manual Search) Tip When disc access takes a long time, set "CD POWER" and "ON - Sony CMT-HPX7 | Operating Instructions - Page 13
CD/MP3 - Play Creating your own program - Program Play You can make a program of up to 25 steps from all the discs in the order you want to play them. You can synchro record the programed tracks onto a cassette tape (page 18). Use buttons on the remote for the operation. 1 Press CD (or FUNCTION - Sony CMT-HPX7 | Operating Instructions - Page 14
TUNED" does not appear and the scanning does not stop Set the frequency of the desired radio station as described in steps 2 and 3 of "Manual tuning preset" (page 14). 4 Press TUNER MEMORY. A preset number flashes. Perform steps 5 and 6 while the preset number flashes. Tip Press TUNING MODE to stop - Sony CMT-HPX7 | Operating Instructions - Page 15
in the display. 3 Press +/- (or TUNING +/- on the unit) repeatedly to select the desired preset station. Listening to non-preset radio station - Manual Tuning 1 Press TUNER/BAND repeatedly to select "FM" or "AM". 2 Press TUNING MODE repeatedly until "AUTO" and "PRESET" disappear from the display - Sony CMT-HPX7 | Operating Instructions - Page 16
a station (Automatic Tuning). • To record the radio programs, use manual recording (page 18). Using the Radio Data System (RDS) (European model the Radio Data System? Radio Data System (RDS) is a broadcasting service that allows radio stations to send additional information along with the regular - Sony CMT-HPX7 | Operating Instructions - Page 17
Tape - Play Loading a tape 1 Slide the lid open with your hand. 2 Insert a tape. With the side you want to play/record facing up To remove the tape, lift up the tape from the side as shown in the illustration. 3 Slide the lid close with your hand. Playing a tape You can use TYPE I (normal). 1 - Sony CMT-HPX7 | Operating Instructions - Page 18
"Creating your own program" (page 13). Recording on a tape manually - Manual Recording You can record just the portions you like from a CD from the optional component connected to the MD/VIDEO jacks. • WIRELESS (CMT-HPX10W only): To record from the optional component connected to the transmitter - Sony CMT-HPX7 | Operating Instructions - Page 19
Tape - Recording/Sound Adjustment/Timer Sound Adjustment Adjusting the sound You can adjust the bass and treble to enjoy more powerful sound. Generating a more dynamic sound (Dynamic Sound Generator X-tra) Press DSGX on the unit. To cancel the DSGX, press DSGX on the unit again. Adjusting the bass - Sony CMT-HPX7 | Operating Instructions - Page 20
Waking up to music - Play Timer You can wake up to music at a preset time. Make sure you have set the clock (see "Setting the clock" on page 9). Use buttons on the remote for the operation. 1 Prepare the sound source you want to play. • CD: Load a disc. To start from a specific track, make a program - Sony CMT-HPX7 | Operating Instructions - Page 21
Timer Timer recording radio programs - Rec Timer To timer record, you must first preset the radio station (see "Presetting radio stations" on page 14) and set the clock (see "Setting the clock" on page 9). Use buttons on the remote for the operation. 1 Tune in the preset radio station (see " - Sony CMT-HPX7 | Operating Instructions - Page 22
Display Turning off the display - Power Saving Mode The clock display can be turned off to minimize the amount of power consumed during standby (Power Saving Mode). Press DISPLAY repeatedly while the system is off until the clock display disappears. To cancel Power Saving Mode Press DISPLAY while - Sony CMT-HPX7 | Operating Instructions - Page 23
Optional Components Hooking up optional components To enhance your system, you can connect optional components. Refer to the operating instructions provided with each component. From the audio output jacks of an optional analog component Optional analog component Display/Optional Components A MD - Sony CMT-HPX7 | Operating Instructions - Page 24
Transmitter (CMT-HPX10W only) Hooking up the transmitter (North American model only) 1 Set the transmitter by the following procedures. Select either AUDIO IN A or AUDIO IN B hook - Sony CMT-HPX7 | Operating Instructions - Page 25
For details on how to hook up and place this system, refer to the operating instructions of the MDR-RF820RK. To listen to audio using this system, see "Listening to PHONES jack of the main unit. For details, refer to the operating instructions of the MDR-RF820RK. • Turn down the volume on the main - Sony CMT-HPX7 | Operating Instructions - Page 26
problem in the troubleshooting checklist below and take the indicated corrective action. If the problem persists after doing all of the above, consult your nearest Sony If "CANT LOCK" still appears, contact your Sony dealer or local authorized Sony service facility. "- -:- -" appears in the display. - Sony CMT-HPX7 | Operating Instructions - Page 27
Troubleshooting Play does not start. • Eject the disc and check whether a disc extend it fully. • Keep the antennas away from the system and other components. • Consult your nearest Sony dealer if the supplied AM antenna has come off the plastic stand. • Try turning off surrounding electrical - Sony CMT-HPX7 | Operating Instructions - Page 28
• Turn on the connected component. • Refer to the operating instructions supplied with the connected component and start playing. • Press FUNCTION is distorted. • Set the volume of the connected component lower. Transmitter (CMT-HPX10W only) There is no sound. • Check the connection of the optional - Sony CMT-HPX7 | Operating Instructions - Page 29
Troubleshooting Messages One of the following messages may appear or flash in the pressed PLAY MODE during playback. SET CLOCK You tried to select the timer with the clock not set. Wireless (CMT-HPX10W only) AUTO SCAN You can adjust the settings so that you hear clear audio sound. Other NOT IN - Sony CMT-HPX7 | Operating Instructions - Page 30
any further. • AC power cord must be changed only at the qualified service shop. On placement • Do not place the system in an inclined position out any disc. If you have any questions or problems concerning your system, please consult your nearest Sony dealer. Notes on discs • Before playing, clean - Sony CMT-HPX7 | Operating Instructions - Page 31
refer to the instructions of the demagnetizing cassette. Specifications Main unit (HCD-HPX10W/HCD-HPX9/ HCD-HPX7) Amplifier section 1 kHz, 10% THD) Music power output (reference): 100 + 100 W HCD-HPX9 for CMT-HPX9 North American model: Continuous RMS power output (reference): 80 + 80 W (6 ohms at - Sony CMT-HPX7 | Operating Instructions - Page 32
Wow and flutter 4-track 2-channel, stereo 50 - 13,000 Hz (±3 dB), using Sony TYPE I cassettes ±0.15% W. Peak (IEC) 0.1% W. RMS (NAB) ±0.2% W. 300 × 208 mm Mass Approx. 2.7 kg net per speaker SS-CHPX7 for CMT-HPX7 Speaker system 2-way, bass-reflex type Speaker units Woofer: 11 cm dia., cone - Sony CMT-HPX7 | Operating Instructions - Page 33
European model See the specifications in the operating instructions for the MDR-RF820RK. General Power requirements Adjustable with voltage selector Power consumption CMT-HPX10W North American model: Other models: CMT-HPX9 North American model: Other models: CMT-HPX7 European model: Other models: - Sony CMT-HPX7 | Operating Instructions - Page 34
system that are mentioned in the text. Illustration number r FM MODE qh (16, 27) R R Name of button/part Reference page Main unit (CMT-HPX10W/CMT-HPX9) ALPHABETICAL ORDER A - O ALBUM +/- ws (11, 13) Cassette compartment 4 CD SYNC qg (18) DISC 1 - 5, +1 wf (11, 13) DISC SKIP 5 (11, 13) Disc - Sony CMT-HPX7 | Operating Instructions - Page 35
Remote control ALPHABETICAL ORDER A - O ALBUM +/- qs (11, 13) CD qj (11, 13, 15) CLEAR qf (13) CLOCK/TIMER SELECT 2 (20, 21, 26) CLOCK/TIMER SET 3 (9, 20, 21) DISC SKIP 0 (11, 13) DISPLAY w; (16, 22) ENTER 9 (9, 13, 20, 21) EQ qd (19) FM MODE 4 (16, 27) FUNCTION 6 (11, 13, 15, 17, 23) P - Z PLAY - Sony CMT-HPX7 | Operating Instructions - Page 36
ved å se på strekkode-etiketten på toppen av esken. Sony Corp H 1999/5 URL): http://www.compliance.sony.de/ N B A I Français Par la présente, Sony Corp. déclare que cet appareil est conforme aux exigences essentielles et aux autres dispositions pertinentes de la directive 1999/5/CE
-
 1
1 -
 2
2 -
 3
3 -
 4
4 -
 5
5 -
 6
6 -
 7
7 -
8
-
9
-
10
-
11
-
12
-
13
-
14
-
15
-
16
-
17
-
18
-
19
-
20
-
21
-
22
-
23
-
24
-
25
-
26
-
27
-
28
-
29
-
30
-
31
-
32
-
33
-
34
-
35
-
36
 |
 |
©2004 Sony Corporation
4-255-291-
13
(2)
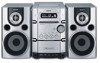
Micro Hi-Fi
Component
System
Operating Instructions
Owner’s Record
The model and serial numbers are located on the rear of the unit. Record the serial number
in the space provided below. Refer to them whenever you call upon your Sony dealer
regarding this product.
Model No. ______________
Serial No. ______________
CMT-HPX10W
CMT-HPX9
CMT-HPX7