Sony D-NE320 Operating Instructions - Page 21
Changing Sound Quality, Selecting the sound quality, quality
 |
View all Sony D-NE320 manuals
Add to My Manuals
Save this manual to your list of manuals |
Page 21 highlights
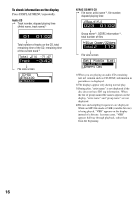
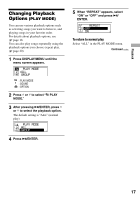
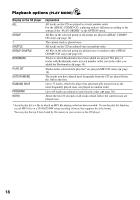
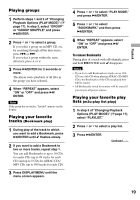
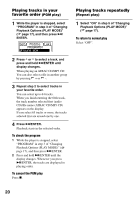
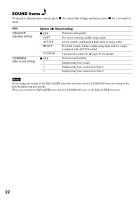
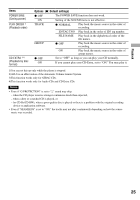
Playback Changing Sound Quality For details about the setting of SOUND items, see page 22. Selecting the sound quality You can set up the "EQUALIZER" setting and/or "CLEARBASS" setting. If you set both at the same time, you can enjoy more bass sound along with the sound quality you want. 1 Press DISPLAY/MENU until the menu screen appears. 2 Press or to select " SOUND." 3 After pressing /ENTER, press or to select the item you want to set up and press /ENTER. 4 Press or to select an option and press /ENTER. Customizing sound quality You can adjust sound quality for each frequency range individually, checking the shape of the wave on the display. 1 Select "EQUALIZER" in step 3 and "CUSTOM" in step 4 of "Selecting the sound quality". "Low" is displayed first. There are 3 frequency ranges; "Low" (low range audio), "Mid" (middle range audio), and "High" (high range audio). 2 Press or for 2 seconds or more to select the frequency range. 3 Press or repeatedly to select the shape of the wave. There are 3 shapes stored in memory for each frequency range. Low Mid High Frequency range 4 Press or to select the sound volume. The sound volume can be adjusted in 7 levels. Sound volume Low Mid High 5 Repeat steps 2 to 4 to make adjustments for the remaining 2 frequency ranges. 6 Press /ENTER. To return to the previous screen Press . To cancel the adjustment operation Press for 2 seconds or more. Notes • If the sound is distorted by your sound settings when you turn up the volume, turn the volume down. • If you feel a difference in sound volume between the "CUSTOM" sound setting and other sound settings, adjust the volume to your preference. Continued 21
-
 1
1 -
2
-
3
-
4
-
5
-
6
-
7
-
8
-
9
-
10
-
11
-
12
-
13
-
14
-
15
-
 16
16 -
 17
17 -
 18
18 -
 19
19 -
 20
20 -
 21
21 -
 22
22 -
 23
23 -
 24
24 -
 25
25 -
 26
26 -
27
-
28
-
29
-
30
-
31
 |
 |
