Sony DSC-RX1 Instruction Manual - Page 17
Top side, Shutter button 46, Exposure compensation dial, C Custom button 30, Power switch 43 - accessories
 |
View all Sony DSC-RX1 manuals
Add to My Manuals
Save this manual to your list of manuals |
Page 17 highlights
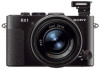
Top side Identifying parts Before use A Shutter button (46) B Exposure compensation dial (23) C C (Custom) button (30) D Power switch (43) E Mode dial (51) F Multi interface shoe* • Some of the accessories may not be inserted fully and protrude backward from the multi interface shoe. However, if the accessory reaches the front end of the shoe, the connection is completed. G Image sensor position mark H Flash** I Microphone*** * For details on compatible accessories for the multi interface shoe, visit the Sony web site, or consult your Sony dealer or local authorized Sony service facility. You can also use accessories that are compatible with the accessory shoe. Operations with other manufacturers' accessories are not guaranteed. The camera functions for viewfinder are available only when using the FDA-EV1MK viewfinder accessory (sold separately). ** To raise the flash, first check that you are not blocking the flash with your fingers or other objects, and then slide the (flash pop-up) switch. When you are not using the flash, push it back into place with a finger. Take care not to pinch your finger when closing the flash. *** Do not cover this part while recording movies. Doing so may cause noise or lower the volume. GB 17
-
 1
1 -
2
-
3
-
4
-
5
-
6
-
7
-
8
-
9
-
10
-
11
-
 12
12 -
 13
13 -
 14
14 -
 15
15 -
 16
16 -
 17
17 -
 18
18 -
 19
19 -
 20
20 -
 21
21 -
 22
22 -
23
-
24
-
25
-
26
-
27
-
28
-
29
-
30
-
31
-
32
-
33
-
34
-
35
-
36
-
37
-
38
-
39
-
40
-
41
-
42
-
43
-
44
-
45
-
46
-
47
-
48
-
49
-
50
-
51
-
52
-
53
-
54
-
55
-
56
-
57
-
58
-
59
-
60
-
61
-
62
-
63
-
64
-
65
-
66
-
67
-
68
-
69
-
70
-
71
-
72
-
73
-
74
-
75
-
76
 |
 |
