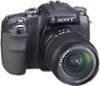
Sony DSLR-A100K Read This First - Page 13
The Number of images that can be recorded, Holding the camera, User's Guide, Troubleshooting
 |
View all Sony DSLR-A100K manuals
Add to My Manuals
Save this manual to your list of manuals |
Page 13 highlights
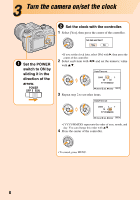
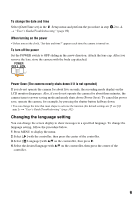
The Number of images that can be recorded Once you insert a recording medium into the camera and set the POWER switch to ON, the number of images that can be recorded (should you continue to shoot using the current settings) is displayed on the LCD monitor. To identify items on the LCD monitor t "User's Guide/ Troubleshooting" (page 22) • The number of images that can be recorded on a recording medium differs depending on the capacity of the recording medium, the image size setting, and the image quality setting. t "User's Guide/ Troubleshooting" (page 27) • If "--E-" flashes after shooting, the write-protect switch of the "Memory Stick Duo" is set to the LOCK position. Set the switch to the recording position. • If "0000" is flashing in red, the recording medium is full. Replace the recording medium with another one, or delete images in the current recording medium (pages 10, 18). • Since the data amount of each image is different, the remaining number of recordable images may not change after shooting. • Preparing a spare recording medium is recommended when you intend to shoot many images, such as when you are on a trip. Holding the camera Hold the camera steady to avoid blurring of images due to hand movement. Turning on the Super SteadyShot function is also recommended (page 14). • Grip the camera firmly with your right hand, keep your elbows at your side, and support the lens with the palm of your left hand. • Step out with one foot to stabilize your upper body. Leaning against a wall or putting your elbow on a table will also provide support. • When shooting in dark light without the flash, shooting in macro, or using a telephoto lens, camera shake that cannot be compensated for by the camera tends to occur. In such cases, turn off the Super SteadyShot function and use something to stabilize the camera, such as a tripod. 13
-
 1
1 -
2
-
3
-
4
-
5
-
6
-
7
-
 8
8 -
 9
9 -
 10
10 -
 11
11 -
 12
12 -
 13
13 -
 14
14 -
 15
15 -
 16
16 -
 17
17 -
 18
18 -
19
 |
 |
