Sony DSLR-A100K Read This First - Page 6
Attaching a lens, Remove the body cap from the camera and the rear cap, from the lens.
 |
View all Sony DSLR-A100K manuals
Add to My Manuals
Save this manual to your list of manuals |
Page 6 highlights
Attaching a lens 1 Remove the body cap from the camera and the rear cap from the lens. Body cap Rear cap • Do not leave the interior of the camera exposed to dust or water droplet, and do not touch or damage the interior. 2 Attach the lens. Orange index marks Mount the lens by aligning the orange index marks on the lens and camera. Turn the lens clockwise until it clicks into the locked position. • When attaching a lens, do not press the lens release button. • Do not use force when attaching a lens. • When shooting without the flash, using a lens hood is recommended to prevent unnecessary light from affecting your images. For details on attaching the lens hood, refer to the operating instructions supplied with the lens. 6
-
 1
1 -
 2
2 -
 3
3 -
 4
4 -
 5
5 -
 6
6 -
 7
7 -
 8
8 -
 9
9 -
 10
10 -
 11
11 -
 12
12 -
13
-
14
-
15
-
16
-
17
-
18
-
19
 |
 |

6
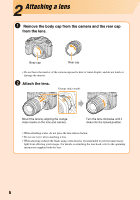
Attaching a lens
1
Remove the body cap from the camera and the rear cap
from the lens.
• Do not leave the interior of the camera exposed to dust or water droplet, and do not touch or
damage the interior.
2
Attach the lens.
• When attaching a lens, do not press the lens release button.
• Do not use force when attaching a lens.
• When shooting without the flash, using a lens hood is recommended to prevent unnecessary
light from affecting your images. For details on attaching the lens hood, refer to the operating
instructions supplied with the lens.
Body cap
Rear cap
Mount the lens by aligning the orange
index marks on the lens and camera.
Turn the lens clockwise until it
clicks into the locked position.
Orange index marks