Sony DSX-GS80 Operating Instructions
Sony DSX-GS80 Manual
 |
View all Sony DSX-GS80 manuals
Add to My Manuals
Save this manual to your list of manuals |
Sony DSX-GS80 manual content summary:
- Sony DSX-GS80 | Operating Instructions - Page 1
provided below. Refer to these numbers whenever you call upon your Sony dealer regarding this product. Model No. DSX-GS80 Serial No. To cancel the demonstration (DEMO) display, see page 8. For the connection/installation, see page 13. Pour annuler l'affichage de démonstration (DEMO), reportez-vous - Sony DSX-GS80 | Operating Instructions - Page 2
DE QUÉBEC. This equipment has been tested and found to comply with the limits for installation. This equipment generates, uses, and can radiate radio frequency energy and, if not installed and used in accordance with the instructions manual could void your authority to operate this equipment. 2GB - Sony DSX-GS80 | Operating Instructions - Page 3
://www.sony.com/electronics/ support Contact: Sony Customer Information Service Center at 1-800-222-7669 Write: Sony Customer Information Service Center 12451 Gateway Blvd., Fort Myers, FL 33913 Supplier's Declaration of Conformity Trade Name: SONY Model: DSX-GS80 Responsible Party: Sony Electronics - Sony DSX-GS80 | Operating Instructions - Page 4
manual or contact the manufacturer of your vehicle or your vehicle dealer, before you install or a fire alarm This unit supports security capabilities that comply with the BLUETOOTH standard problems concerning your unit that are not covered in this manual, consult your nearest Sony dealer. 4GB - Sony DSX-GS80 | Operating Instructions - Page 5
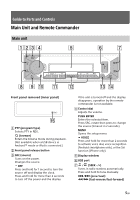
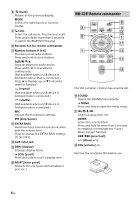
Guide to Parts and Controls Main Unit and Remote Commander Main unit Front panel removed (inner panel) PTY (program (iPhone only). Display window USB port / (SEEK -/+) Tunes in radio stations automatically. Press and hold to tune manually. / (prev/next) / (fast-reverse/fast-forward) 5GB - Sony DSX-GS80 | Operating Instructions - Page 6
open the setup menu Selects a setup item, etc. ENTER Enters the selected item. Press and hold for more than 2 seconds to establish or terminate the "Sony | Music Center" function. / (prev/next) +/- (album +/-) VOL (volume) +/- Remove the insulation film before use. 6GB - Sony DSX-GS80 | Operating Instructions - Page 7
Basic Operations Detaching the Front Panel You can detach the front panel of this unit to prevent theft. 1 Press and hold OFF until the unit turns off, press the front panel release button , then pull the panel towards you to remove. Pairing with a BLUETOOTH Device When connecting a BLUETOOTH - Sony DSX-GS80 | Operating Instructions - Page 8
order of audio files Folder (album) Audio file (track) Updating the Firmware To update the firmware, visit the support site on the back cover, then follow the online instructions. Note During the update, do not remove the USB device. Initializing the Unit Initializing the unit will erase the - Sony DSX-GS80 | Operating Instructions - Page 9
this accessory with an Apple product may affect wireless performance. If you have any questions or problems concerning your unit that are not covered in this manual, consult your nearest Sony dealer. Maintenance Replacing the lithium battery (CR2025) of the remote commander When the battery becomes - Sony DSX-GS80 | Operating Instructions - Page 10
FLAC (.flac) Bit depth: 16 bit, 24 bit Sampling rate: 44.1 kHz, 48 kHz Supported file system: FAT16, FAT32 Wireless Communication Communication System: BLUETOOTH Standard version 3.0 Output: BLUETOOTH Standard Power Class 2 (Max. Conducted +1 dBm) Maximum communication range*1: Line of sight approx - Sony DSX-GS80 | Operating Instructions - Page 11
dimensions: Approx. 182 mm × 53 mm × 160 mm (7 1/4 in × 2 1/8 in × 6 3/8 in) (w/h/d) Mass: Approx. 1.0 kg (2 lb 4 oz) Package contents: Main unit (1) Remote commander (1): RM-X231 Parts for installation Inc. and any use of such marks by Sony Corporation is under license. Other trademarks and trade - Sony DSX-GS80 | Operating Instructions - Page 12
LIABLE FOR ANY DIRECT, INDIRECT, INCIDENTAL, SPECIAL, EXEMPLARY, OR CONSEQUENTIAL DAMAGES (INCLUDING, BUT NOT LIMITED TO, PROCUREMENT OF SUBSTITUTE GOODS OR SERVICES; LOSS OF USE, DATA, OR PROFITS; OR BUSINESS INTERRUPTION) HOWEVER CAUSED AND ON ANY THEORY OF LIABILITY, WHETHER IN CONTRACT, STRICT - Sony DSX-GS80 | Operating Instructions - Page 13
. • Use only the supplied mounting hardware for a safe and secure installation. Note on the power supply lead (yellow) When connecting this unit be higher than the sum of each component's fuse amperage rating. Note on installing in cars with a start-stop system The unit may restart when starting the - Sony DSX-GS80 | Operating Instructions - Page 14
Connection Subwoofer*1 *3 *3 *3 Power amplifier*1 Satellite radio tuner (SiriusXM)*1*7 *5 *10 *1 Smartphone*8, iPod/ iPhone*9, USB device White White/black striped Gray Gray/black striped Green Green/black striped Purple Purple/black striped Red Blue/white striped Orange/white striped Black - Sony DSX-GS80 | Operating Instructions - Page 15
information on how to install the SiriusXM Connect Vehicle tuner, consult the installation guide included with the tuner. ) or antenna (aerial) booster, or with a manually-operated telescopic antenna (aerial). To AMP REMOTE IN problems concerning the connection, consult the dealer for details. 15GB - Sony DSX-GS80 | Operating Instructions - Page 16
airbags or any other shock-absorbing equipment is in your car, contact the store where you purchased this unit, or the car dealer, before installation. Notes • When mounting on the dashboard, remove the visor clip carefully from the microphone , then attach the flat-mount base to the microphone - Sony DSX-GS80 | Operating Instructions - Page 17
to make the registration. When the registration completes, the steering wheel remote control becomes available. Notes on installing the connection cable RC-SR1 (not supplied) • Refer to the support sites on the back cover for details, then connect each lead properly to the appropriate leads. Making - Sony DSX-GS80 | Operating Instructions - Page 18
(7 1/4 in) 53 mm (2 1/8 in) Mounting the unit in a Japanese car You may not be able to install this unit in some makes of Japanese cars. In such a case, consult your Sony dealer. TOYOTA to dashboard/center console Bracket Existing parts supplied with your car Bracket NISSAN to dashboard - Sony DSX-GS80 | Operating Instructions - Page 19
power connection and replace the fuse. If the fuse blows again after replacement, there may be an internal malfunction. In such a case, consult your nearest Sony dealer. 19GB - Sony DSX-GS80 | Operating Instructions - Page 20
. Pour plus de détails, reportez-vous à la section « Raccordement/Installation » (page 13). La plaque signalétique indiquant la tension d'alimentation, services proposés par des tiers Les services proposés par des tiers peuvent être modifiés, suspendus ou clôturés sans avis préalable. Sony - Sony DSX-GS80 | Operating Instructions - Page 21
en garde SONY NE PEUT EN le constructeur ou le concessionnaire de votre véhicule avant d'installer ce produit dans votre véhicule. Appels d'urgence Cet appareil sent, dans un hôpital, un train, un avion ou une station-service - à proximité de portes automatiques ou d'un avertisseur d'incendie • Cet - Sony DSX-GS80 | Operating Instructions - Page 22
Guide des pièces et commandes Appareil principal et télécommande Appareil principal Sans la façade (panneau interne) PTY (type d'émission) Permet de sélectionner PTY en - Sony DSX-GS80 | Operating Instructions - Page 23
/ (SEEK -/+) Permet de syntoniser automatiquement des stations de radio. Appuyez sur la touche et maintenez-la enfoncée pour syntoniser des stations manuellement. / (précédente/suivante) / (retour rapide/avance rapide) (retour) Permet de retourner à l'affichage précédent. MODE Permet de sé - Sony DSX-GS80 | Operating Instructions - Page 24
, etc. ENTER Permet de valider l'élément sélectionné. Appuyez sur la touche et maintenez-la enfoncée pendant plus de 2 secondes pour activer ou désactiver la fonction « Sony | Music Center précédente/suivante) +/- (album +/-) VOL (volume) +/- 6FR - Sony DSX-GS80 | Operating Instructions - Page 25
*. Une fois le pairage effectué, demeure allumé. * Si la saisie d'un code d'authentification est requise sur le périphérique BLUETOOTH, saisissez [0000]. Installation de la façade Pairage avec un périphérique BLUETOOTH Lorsque vous connectez un périphérique BLUETOOTH pour la première fois, un - Sony DSX-GS80 | Operating Instructions - Page 26
du micrologiciel Pour mettre à jour le micrologiciel, visitez le site d'assistance à l'adresse indiquée sur la couverture arrière, puis suivez les instructions en ligne. Remarque Pendant la mise à jour, ne retirez pas le périphérique USB. Initialisation de l'appareil L'initialisation de l'appareil - Sony DSX-GS80 | Operating Instructions - Page 27
fil. Si vous avez des questions ou des problèmes concernant cet appareil qui ne sont pas abordés dans ce mode d'emploi, contactez votre détaillant Sony le plus proche. Entretien Remplacement de la pile au lithium (CR2025) de la télécommande Lorsque la pile est faible, la portée de la télécommande - Sony DSX-GS80 | Operating Instructions - Page 28
Caractéristiques techniques Section radio FM Plage de syntonisation : 87,5 MHz à 107,9 MHz Sensibilité utile : 8 dBf Rapport signal/bruit : 73 dB Séparation : 50 dB à 1 kHz AM Plage de syntonisation : 530 kHz à 1 710 kHz Sensibilité : 26 μV Lecteur USB Interface : Port USB1 (avant) : USB (haute - Sony DSX-GS80 | Operating Instructions - Page 29
Dimensions de montage : Environ 182 mm × 53 mm × 160 mm (7 1/4 po × 2 1/8 po × 6 3/8 po) (l/h/p) Poids : Environ 1,0 kg (2 lb 4 oz) Contenu de l'emballage : Appareil principal (1) Télécommande (1) : RM-X231 Composants destinés à l'installation sous licence uniquement par Sony Corporation. Les autres - Sony DSX-GS80 | Operating Instructions - Page 30
DES DOMMAGES DIRECTS, INDIRECTS, ACCESSOIRES, SPÉCIAUX, EXEMPLAIRES OU CONSÉCUTIFS (Y COMPRIS, SANS EN EXCLURE D'AUTRES, L'APPROVISIONNEMENT DE BIENS OU DE SERVICES DE REMPLACEMENT; LA PERTE D'UTILISATION, DE DONNÉES OU DE PROFITS; OU L'INTERRUPTION D'ACTIVITÉS COMMERCIALES) QUELLES QU'EN SOIENT LA - Sony DSX-GS80 | Operating Instructions - Page 31
pièces ne comprend pas tout le contenu de l'emballage. • Le manchon de montage et l'anneau de finition sont fixés en usine. Avant l'installation de l'appareil, utilisez les clés de déblocage pour détacher le manchon de montage de l'appareil. Pour plus de détails, reportez-vous à la section - Sony DSX-GS80 | Operating Instructions - Page 32
Raccordement Caisson de graves*1 *3 *3 *3 Amplificateur de puissance*1 Récepteur radio satellite (SiriusXM)*1*7 Blanc Rayé blanc/noir Gris Rayé gris/noir Vert Rayé vert/noir Violet Rayé violet/noir Rouge Rayé bleu/blanc Rayé orange/blanc Noir Jaune Noir Jaune *5 *10 Téléphone intelligent*8, *1 - Sony DSX-GS80 | Operating Instructions - Page 33
plus d'informations sur la manière d'installer le récepteur SiriusXM Connect Voiture, consultez le guide d'installation fourni avec le récepteur. *8 Pour raccorder efficaces RMS ou supérieure. L'utilisation des haut-parleurs pleine gamme Sony XB est recommandée. *12 Lorsque l'intensité en ampères du - Sony DSX-GS80 | Operating Instructions - Page 34
• Pendant le fonctionnement à pleine puissance, un courant de plus de 15 A circule dans le système. Par conséquent, assurez-vous que les fils à raccorder aux bornes +12 V et GND de cet appareil soient au moins de calibre 14 (AWG14) ou qu'ils possèdent une zone sectionnelle supérieure à 2 mm² (3/32 - Sony DSX-GS80 | Operating Instructions - Page 35
du tableau de bord avec un chiffon sec. Utilisation de la télécommande filaire Lors de l'utilisation de la télécommande du volant L'installation du câble de raccordement RC-SR1 (non fourni) est requise avant l'utilisation. 1 Pour activer la télécommande du volant, sélectionnez [STEERING] [EDIT - Sony DSX-GS80 | Operating Instructions - Page 36
loquets des deux côtés du manchon de montage sont bien pliés de 2 mm (3/32 po) vers l'intérieur. • Pour les véhicules japonais, consultez « Installation de l'appareil dans un véhicule japonais » (page 19). ATTENTION Ne touchez pas au côté gauche de l'appareil pendant le retrait du tableau de bord - Sony DSX-GS80 | Operating Instructions - Page 37
hicule japonais Cet appareil ne peut pas être installé dans certaines voitures japonaises. Dans ce cas, consultez votre détaillant Sony. TOYOTA vers le tableau de bord/la console centrale Support Pièces existantes fournies avec la voiture Support NISSAN vers le tableau de bord/la console - Sony DSX-GS80 | Operating Instructions - Page 38
- Sony DSX-GS80 | Operating Instructions - Page 39
- Sony DSX-GS80 | Operating Instructions - Page 40
techniques sur ce produit, rendez-vous sur le site Web suivant : https://www.sony.com/am/support If you have any questions/problems regarding this product, try the following: 1 Read Troubleshooting in Help Guide (online manual). 2 Please contact (U.S.A. only); Call 1-800-222-7669 URL https://www
-
 1
1 -
 2
2 -
 3
3 -
 4
4 -
 5
5 -
 6
6 -
 7
7 -
8
-
9
-
10
-
11
-
12
-
13
-
14
-
15
-
16
-
17
-
18
-
19
-
20
-
21
-
22
-
23
-
24
-
25
-
26
-
27
-
28
-
29
-
30
-
31
-
32
-
33
-
34
-
35
-
36
-
37
-
38
-
39
-
40
 |
 |
5-006-640-
12
(1)
DSX-GS80
FM/AM
Bluetooth® Car Audio
Owner’s Record
The model and serial numbers are located on the
bottom of the unit.
Record the serial number in the space provided below.
Refer to these numbers whenever you call upon your
Sony dealer regarding this product.
Model No. DSX-GS80
Serial No.
Operating Instructions
GB
Mode d’emploi
FR
To cancel the demonstration (DEMO) display, see
page 8.
For the connection/installation, see page 13.
Pour annuler l’affichage de démonstration (DEMO),
reportez-vous à la page 7.
Pour le raccordement/l’installation, reportez-vous à
la page 13.