Sony DVP-S365 Operating Instructions (CD/DVD Component) - Page 12
Channel Surround Hookups, When you connect an audio component with a built
 |
View all Sony DVP-S365 manuals
Add to My Manuals
Save this manual to your list of manuals |
Page 12 highlights
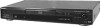
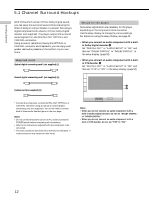
Getting Started 5.1 Channel Surround Hookups With DVDs which contain DTS or Dolby Digital sound, you can enjoy the surround sound while producing the effect of being in a movie theater or a concert hall using a digital component with a built-in DTS or Dolby Digital decoder (not supplied). The player outputs the surround sound signals from the DIGITAL OUT OPTICAL and COAXIAL connectors. Using a receiver (amplifier) having the OPTICAL or COAXIAL connector and 6 speakers, you can enjoy even greater real audio presence in the comfort of your own home. Required cords Optical digital connecting cord* (not supplied) (1) Coaxial digital connecting cord* (not supplied) (1) S video cord (not supplied) (1) Setups for the player Some setup adjustments are necessary for the player depending on the components to be connected. Use the setup display to change the various settings. For details on using the setup display, see page 43. • When you connect an audio component with a builtin Dolby Digital decoder A Set "DIGITAL OUT" in "AUDIO SETUP" to "ON" and then set "DOLBY DIGITAL" to "DOLBY DIGITAL" in the setup display. (page 52) • When you connect an audio component with a builtin DTS decoder B Set "DIGITAL OUT" in "AUDIO SETUP" to "ON" and then set "DTS" to "ON" in the setup display. (page 52) AUDIO SETUP AUDIO ATT: OFF AUDIO DRC: STANDARD DOWNMIX: DOLBY SURROUND DIGITAL OUT: ON DOLBY DIGITAL: DOLBY DIGITAL DTS: ON * Connect the component via the DIGITAL OUT OPTICAL or COAXIAL connector using an optical or coaxial digital connecting cord (not supplied). You do not need to connect both of these cords. See the figure on the next page. Notes • Do not connect the power cord to an AC outlet or press the POWER switch before completing all connections. • Refer to the instructions supplied with the component to be connected. • The cord connectors should be fully inserted into the jacks. A loose connection may cause hum and noise. To set, press , then ENTER . To quit, press DISPLAY . Notes • When you do not connect an audio component with a built-in Dolby Digital decoder, do not set "DOLBY DIGITAL" to "DOLBY DIGITAL." • When you do not connect an audio component with a built-in DTS decoder, do not set "DTS" to "ON." 12
-
 1
1 -
2
-
3
-
4
-
5
-
6
-
 7
7 -
 8
8 -
 9
9 -
 10
10 -
 11
11 -
 12
12 -
 13
13 -
 14
14 -
 15
15 -
 16
16 -
 17
17 -
18
-
19
-
20
-
21
-
22
-
23
-
24
-
25
-
26
-
27
-
28
-
29
-
30
-
31
-
32
-
33
-
34
-
35
-
36
-
37
-
38
-
39
-
40
-
41
-
42
-
43
-
44
-
45
-
46
-
47
-
48
-
49
-
50
-
51
-
52
-
53
-
54
-
55
-
56
-
57
-
58
-
59
-
60
-
61
-
62
-
63
-
64
-
65
-
66
-
67
-
68
 |
 |
