Sony FWD-32LX1 Operating Instructions (Flat Panel Display) - Page 30
Resizing and Positioning the Picture, Adjusting the Size, Position, or the Pixels of the Picture - b manual
 |
View all Sony FWD-32LX1 manuals
Add to My Manuals
Save this manual to your list of manuals |
Page 30 highlights
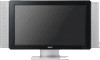
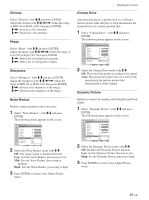
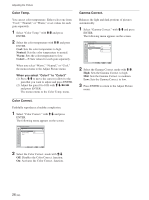
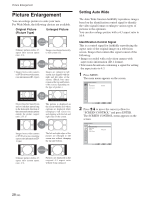
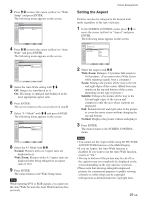
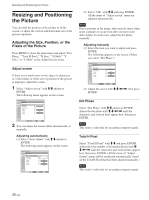
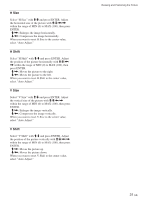
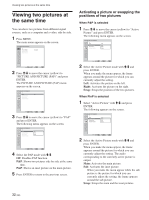
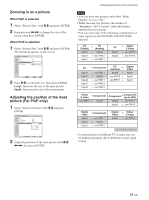
Resizing and Positioning the Picture Resizing and Positioning the Picture You can shift the position of the picture to fit the screen, or adjust the vertical and horizontal size of the picture separately. Adjusting the Size, Position, or the Pixels of the Picture Press MENU to show the main menu and adjust "Dot Phase," "Total H Pixel," "H Size," "H Shift," "V Size," or "V Shift" on the Adjust Screen menu. Adjust screen If there is too much noise on the edges of characters or vertical lines or if the size or position of the picture is improper, adjust the screen. 1 Select "Adjust screen" with M/m and press ENTER. The following menu appears on the screen. SCREEN CONTROL Adjust Screen Auto Adjust Dot Phase: Total H Pixel: H Size: H Shift: V Size: V Shift: 28 1344 50 50 50 50 Select Set ENTER Exit MENU 2 You can adjust the screen either automatically or manually. Adjusting automatically (1) Select "Auto Adjust" with M/m and press ENTER. The following menu appears on the screen. SCREEN CONTROL Adjust Screen Auto Adjust Dot Phase: Total H Pixel: H Size: H Shift: V Size: V Shift: Cancel 2O8K 1344 50 50 50 50 Select Set ENTER Exit MENU (2) Select "OK" with M/m and press ENTER. All the items of "Adjust screen" menu are adjusted automatically. Note Due to patterns in the image, there may be times when noise continues to occur even after you have used Auto Adjust. In such cases, adjust the dot phase manually. Adjusting manually (1) Select the item you want to adjust and press ENTER. The following appears on the screen. (When you select "Dot Phase") SCREEN CONTROL Adjust Screen Auto Adjust Dot Phase: Total H Pixel: H Size: H Shift: V Size: V Shift: 28 1344 50 50 50 50 Select Set ENTER Exit MENU (2) Adjust the screen with M/m/
-
 1
1 -
2
-
3
-
4
-
5
-
6
-
7
-
8
-
9
-
10
-
11
-
12
-
13
-
14
-
15
-
16
-
17
-
18
-
19
-
20
-
21
-
22
-
23
-
24
-
 25
25 -
 26
26 -
 27
27 -
 28
28 -
 29
29 -
 30
30 -
 31
31 -
 32
32 -
 33
33 -
 34
34 -
 35
35 -
36
-
37
-
38
-
39
-
40
-
41
-
42
-
43
 |
 |