Sony FWD-32LX1 Operating Instructions (Flat Panel Display) - Page 38
On/Off Timer Function, Setting the Security Lock, To activate the Security Lock
 |
View all Sony FWD-32LX1 manuals
Add to My Manuals
Save this manual to your list of manuals |
Page 38 highlights
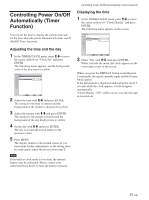
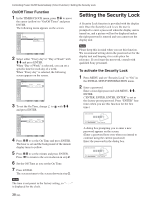
Controlling Power On/Off Automatically (Timer Function) / Setting the Security Lock On/Off Timer Function 1 In the TIMER/CLOCK menu, press M/m to move the cursor (yellow) to "On/Off Timer" and press ENTER. The following menu appears on the screen. TIMER/CLOCK Clock Set Clock Display: On/Off Timer Off Every day Day of Week Select Set ENTER Exit MENU 2 Select either "Every day"or "Day of Week" with M/m and press ENTER. When "Day of Week" is selected, you can set a specific time for each day of a week. When "Every day" is selected, the following screen appears on the screen. TIMER/CLOCK On/Off Timer Every day: On Time 000 :: 0000 Off Time 000 :: 0000 Select Set ENTER Exit MENU 3 To set the On Time, change to with M/m and press ENTER. TIMER/CLOCK On/Off Timer Every day: On Time 000 :: 0000 Off Time 000 :: 0000 Select Set ENTER Exit MENU 4 Press M/m to set the On Time and press ENTER. The hour is set and the background of the minute display turns to yellow. 5 Press M/m to set the minute and press ENTER. Press < to return to the screen shown in step 2. 6 Set the Off Time as you set the On Time. 7 Press ENTER. The screen returns to the screen shown in step 2. Setting the Security Lock A Security Lock function is provided with the display unit. Once the Security Lock is set, the user is prompted to enter a password when the display unit is turned on, and a picture will not be displayed unless the right password is entered and you cannot use the display unit. Note Please keep this in mind when you use this function. We recommend writing down the password set for the display unit and keeping it in a safe place for reference. If you forget the password, consult with qualified Sony personnel. To activate the Security Lock 1 Press MENU and set "Security Lock" to "On" in the INITIAL SETUP/INFORMATION menu. 2 Enter a password. Enter a four digit password with MENU, M/m, ENTER. ("ENTER, ENTER, ENTER, ENTER" is set as the factory preset password. Press "ENTER" four times when you use this function for the first time.) Enter password key. Password required for power-on. Use : MENU ENTER Cancel : Other key A dialog box prompting you to enter a new password appears on the screen. (Enter a password here even when you intend to continue using the current password.) Enter the password in the dialog box. Enter new password key. Power-on cannot be performed without the password. Use : MENU ENTER Cancel : Other key Note The time is not preset in the factory setting, so "-- : --" is displayed for the clock. 38 (GB)
-
 1
1 -
2
-
3
-
4
-
5
-
6
-
7
-
8
-
9
-
10
-
11
-
12
-
13
-
14
-
15
-
16
-
17
-
18
-
19
-
20
-
21
-
22
-
23
-
24
-
25
-
26
-
27
-
28
-
29
-
30
-
31
-
32
-
 33
33 -
 34
34 -
 35
35 -
 36
36 -
 37
37 -
 38
38 -
 39
39 -
 40
40 -
 41
41 -
 42
42 -
 43
43
 |
 |