Sony FWD-50PX2 User Manual - Page 20
Auto Shut Off, Auto Screen Adjust, Information, IP Address Setup, Speed Setup, All Reset - software
 |
View all Sony FWD-50PX2 manuals
Add to My Manuals
Save this manual to your list of manuals |
Page 20 highlights
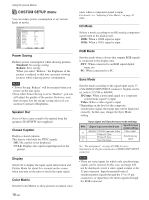
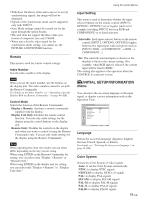
Using On-screen Menus Auto Shut Off When you set this item to "On," the display unit automatically enters the standby mode when a signal is not input to the COMPONENT or DVI input connectors for more than about five minutes. The display unit automatically enters the power saving mode when a signal is not input to the DVI or RGB input connectors for more than about thirty seconds. While in the standby mode, press the 1POWER switch on the display unit or the POWER ON button on the Remote Commander to switch the display unit on. While in the power saving mode, the display unit is automatically turned on when a signal is input. Auto Screen Adjust When "Auto Screen Adjust" is set to On, it saves the screen-settings for size and positioning for each input signal on the unit and automatically detects the last setting in memory each time input signals are switched. When "Auto Screen Adjust" is set to Off, this auto adjustment is set disabled. Even when input signals are switched, the original factory settings operate. Information This menu is used for displaying various information, including information on the internal status of the display unit. INITIAL SETUP/INFORMATION Information Model Name: Serial Number: Operation Time: Software Version: Software Version Indicates the system software version. IP Address Setup Sets an IP address for communication between the display unit and an optional adaptor with network management capability (such as BKM-FW32, BKMFW50). DHCP: Automatically obtain an IP address. Manual: Manually configure an IP address. For details, see "Setting an IP Address and communication speed" on page 42 (GB). Speed Setup Sets the communication speed between the display unit and an optional adaptor with network management capability (such as BKM-FW32, BKMFW50). For details, see "Setting an IP Address and communication speed" on page 42 (GB). Note These setting items appear on the menu only when an optional adaptor with network management capability is installed in the OPTION1 slot. All Reset This menu is used to reset all adjustment and setting values to the factory default condition. Select Set ENTER Exit MENU Model Name Indicates the model name. Serial Number Indicates the serial number. Operation Time Indicates the total number of hours of operation. Note Time spent in standby mode is not counted as part of the Operation Time. 20 (GB)
-
 1
1 -
2
-
3
-
4
-
5
-
6
-
7
-
8
-
9
-
10
-
11
-
12
-
13
-
14
-
 15
15 -
 16
16 -
 17
17 -
 18
18 -
 19
19 -
 20
20 -
 21
21 -
 22
22 -
 23
23 -
 24
24 -
 25
25 -
26
-
27
-
28
-
29
-
30
-
31
-
32
-
33
-
34
-
35
-
36
-
37
-
38
-
39
-
40
-
41
-
42
-
43
-
44
-
45
-
46
-
47
-
48
-
49
-
50
 |
 |
