Sony HDR-CX100/R Handycam® Handbook - Page 29
Press START/STOP to start recording., To stop recording, press START/STOP again. - record time
 |
UPC - 027242765030
View all Sony HDR-CX100/R manuals
Add to My Manuals
Save this manual to your list of manuals |
Page 29 highlights
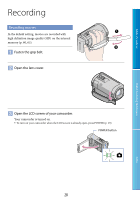
Press START/STOP to start recording. Table of Contents Useful Recording Techniques [STBY] [REC] To stop recording, press START/STOP again. If you close the LCD screen while recording movies, the camcorder stops recording. See page 98 on the recordable time of movies. When a movie file exceeds 2 GB, the next movie file is created automatically. You can change the recording media and the image quality (p. 60, 65). [ STEADYSHOT] is set to [ON] in the default setting. It will take several seconds until you can start recording after you turn on the camcorder. You cannot operate your camcorder during this time. If the access lamp is lit or flashing after recording is finished, it means that data is still being written onto the recording media. Do not apply shock or vibration to your camcorder, and do not remove the battery or AC Adaptor. You can check the recordable time and the remaining capacity, etc., by touching (HOME) (MANAGE MEDIA) [MEDIA INFO] (p. 62). To adjust the angle of the LCD panel, first open the LCD panel 90 degrees to the camcorder (), and then adjust the angle (). If you rotate the LCD panel 180 degrees to the lens side (), you can record movies/photos in mirror mode. 90 degrees (max.) 180 degrees (max.) 90 degrees to the camcorder When you open or close the LCD screen, or adjust the angle, be careful not to press the buttons on the side of the LCD screen by mistake. Tips You can record photos during movie recording by pressing PHOTO ([Dual Rec], p. 32). When a face is detected, a white frame appears and the image quality around the face is optimized automatically ([FACE DET. SETTING], p. 72). In the default setting, a photo is recorded automatically when the camcorder detects the smile of a person during movie recording ([SMILE SHUTTER], p. 73). An orange frame appears around a face targeted for possible smile detection shot. You can capture photos from recorded movies (p. 49). 29 Index
-
 1
1 -
2
-
3
-
4
-
5
-
6
-
7
-
8
-
9
-
10
-
11
-
12
-
13
-
14
-
15
-
16
-
17
-
18
-
19
-
20
-
21
-
22
-
23
-
 24
24 -
 25
25 -
 26
26 -
 27
27 -
 28
28 -
 29
29 -
 30
30 -
 31
31 -
 32
32 -
 33
33 -
 34
34 -
35
-
36
-
37
-
38
-
39
-
40
-
41
-
42
-
43
-
44
-
45
-
46
-
47
-
48
-
49
-
50
-
51
-
52
-
53
-
54
-
55
-
56
-
57
-
58
-
59
-
60
-
61
-
62
-
63
-
64
-
65
-
66
-
67
-
68
-
69
-
70
-
71
-
72
-
73
-
74
-
75
-
76
-
77
-
78
-
79
-
80
-
81
-
82
-
83
-
84
-
85
-
86
-
87
-
88
-
89
-
90
-
91
-
92
-
93
-
94
-
95
-
96
-
97
-
98
-
99
-
100
-
101
-
102
-
103
-
104
-
105
-
106
-
107
-
108
-
109
-
110
-
111
-
112
-
113
 |
 |
