Sony HDR-PJ760V Operating Guide - Page 43
Shooting images with the Shutter Speed priority mode
 |
View all Sony HDR-PJ760V manuals
Add to My Manuals
Save this manual to your list of manuals |
Page 43 highlights
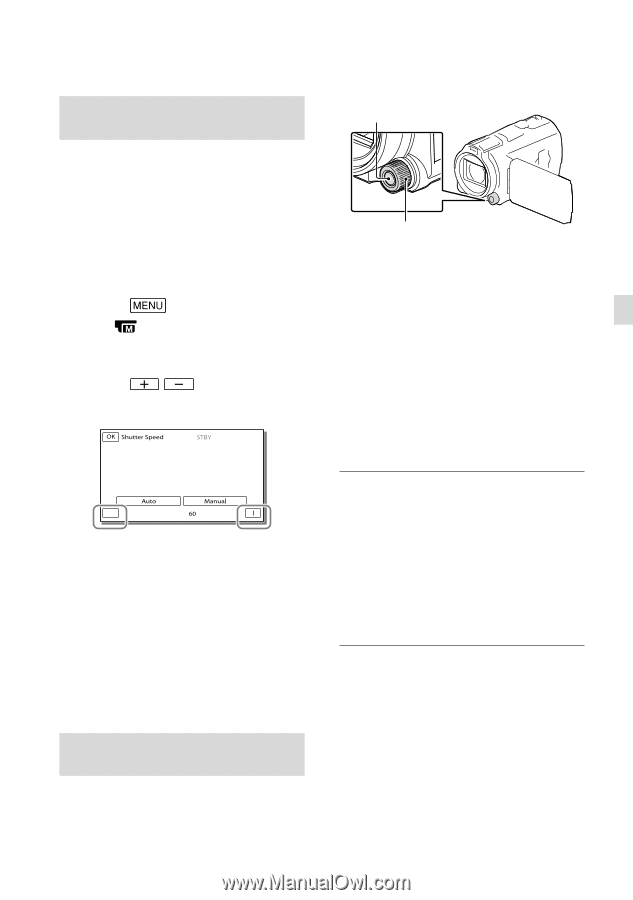
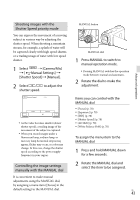
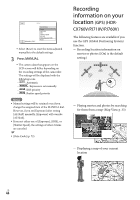
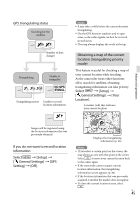
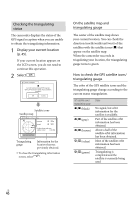
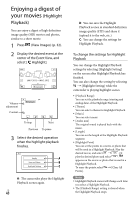
Shooting images with the Shutter Speed priority mode You can express the movement of a moving subject in various way by adjusting the shutter speed. When shooting a mountain stream, for example, a splash of water will be captured clearly with high speed shutter, or a trailing image of water with low speed shutter. 1 Select [Camera/Mic] [ Manual Settings] [Shutter Speed] [Manual]. 2 Select / to adjust the shutter speed. As the value becomes smaller (slower shutter speed), a trailing image of the movement of the subject is captured. When you record images under a fluorescent lamp, sodium lamp, or mercury lamp horizontal stripes may appear, flicker may occur, or color may change. In this case, change the shutter speed according to the power supply frequency in your region. Controlling the image settings manually with the MANUAL dial It is convenient to make manual adjustments using the MANUAL dial, by assigning a menu item ([Focus] in the default setting) to the MANUAL dial. MANUAL button MANUAL dial 1 Press MANUAL to switch to manual operation mode. Pressing MANUAL switches the operation mode between manual and automatic. 2 Rotate the dial to make the adjustment. Items you can control with the MANUAL dial [Focus] (p. 70) [Exposure] (p. 70) [IRIS] (p. 70) [Shutter Speed] (p. 70) [AE Shift] (p. 70) [White Balance Shift] (p. 70) To assign the menu item to the MANUAL dial 1 Press and hold MANUAL down for a few seconds. 2 Rotate the MANUAL dial and select the item to be assigned. US 43 Advanced operations
-
 1
1 -
2
-
3
-
4
-
5
-
6
-
7
-
8
-
9
-
10
-
11
-
12
-
13
-
14
-
15
-
16
-
17
-
18
-
19
-
20
-
21
-
22
-
23
-
24
-
25
-
26
-
27
-
28
-
29
-
30
-
31
-
32
-
33
-
34
-
35
-
36
-
37
-
 38
38 -
 39
39 -
 40
40 -
 41
41 -
 42
42 -
 43
43 -
 44
44 -
 45
45 -
 46
46 -
 47
47 -
 48
48 -
49
-
50
-
51
-
52
-
53
-
54
-
55
-
56
-
57
-
58
-
59
-
60
-
61
-
62
-
63
-
64
-
65
-
66
-
67
-
68
-
69
-
70
-
71
-
72
-
73
-
74
-
75
-
76
-
77
-
78
-
79
-
80
-
81
-
82
-
83
-
84
-
85
-
86
-
87
-
88
-
89
-
90
-
91
-
92
-
93
-
94
-
95
-
96
-
97
-
98
-
99
-
100
-
101
-
102
-
103
-
104
-
105
-
106
-
107
-
108
-
109
-
110
-
111
-
112
-
113
-
114
-
115
-
116
-
117
-
118
-
119
-
120
-
121
-
122
-
123
-
124
-
125
-
126
-
127
-
128
-
129
-
130
-
131
-
132
-
133
-
134
-
135
-
136
-
137
-
138
-
139
-
140
-
141
-
142
-
143
-
144
-
145
-
146
-
147
-
148
-
149
-
150
-
151
-
152
-
153
-
154
-
155
-
156
-
157
-
158
-
159
-
160
-
161
-
162
-
163
-
164
-
165
-
166
-
167
-
168
-
169
-
170
-
171
-
172
-
173
-
174
-
175
-
176
-
177
-
178
-
179
-
180
-
181
-
182
-
183
-
184
-
185
-
186
-
187
-
188
-
189
-
190
-
191
 |
 |