Sony IPT-DS1 Operating Instructions - Page 56
Automatic shooting, About installation
 |
UPC - 027242777613
View all Sony IPT-DS1 manuals
Add to My Manuals
Save this manual to your list of manuals |
Page 56 highlights
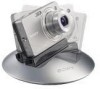
Automatic shooting 1 Set the ON/OFF (power) switch of this unit to ON. The tilt arm moves to the initial position and this unit enters standby mode. ¦¦Notes Set the ON/OFF (power) switch to OFF when you want to stop operation immediately or do not intend to use this unit for a long time. ¼¼Tips This unit automatically enters standby mode if automatic shooting is not performed. You can leave the ON/OFF (power) switch of this unit to ON for regular use. 2 Set the power switch of your camera to ON. The camera enters shooting mode. For details, refer to the operating instructions of your camera. 3 Attach your camera to this unit (page 18). This unit starts automatic shooting. For details, see page 22. Status of this unit ON/OFF (power) switch of this unit Camera Power switch of your camera Status of this unit Not attached ON OFF Attached ON Standby*1 Automatic shooting*2 *1 Indicator B lights up in red when an AC adaptor is connected to this unit. *2 When the MENU button is pressed, this unit enters MENU mode. ˎˎ When the ON/OFF (power) switch of this unit is set to OFF, it does not turn on even when you attach your camera to this unit. About installation Use this unit where: ˎˎ it is stable and flat. ˎˎ the camera has a clear view of people's faces. ˎˎ there are no objects nearby that may fall over. 20-GB
-
 1
1 -
2
-
3
-
4
-
5
-
6
-
7
-
8
-
9
-
10
-
11
-
12
-
13
-
14
-
15
-
16
-
17
-
18
-
19
-
20
-
21
-
22
-
23
-
24
-
25
-
26
-
27
-
28
-
29
-
30
-
31
-
32
-
33
-
34
-
35
-
36
-
37
-
38
-
39
-
40
-
41
-
42
-
43
-
44
-
45
-
46
-
47
-
48
-
49
-
50
-
 51
51 -
 52
52 -
 53
53 -
 54
54 -
 55
55 -
 56
56 -
 57
57 -
 58
58 -
 59
59 -
 60
60 -
 61
61 -
62
-
63
-
64
-
65
-
66
-
67
-
68
-
69
-
70
-
71
-
72
-
73
-
74
-
75
-
76
-
77
-
78
-
79
-
80
-
81
-
82
-
83
-
84
-
85
-
86
-
87
-
88
-
89
-
90
-
91
-
92
-
93
-
94
-
95
-
96
-
97
-
98
-
99
-
100
-
101
-
102
-
103
-
104
-
105
-
106
-
107
-
108
-
109
-
110
-
111
-
112
-
113
-
114
-
115
-
116
-
117
-
118
-
119
-
120
-
121
-
122
-
123
-
124
-
125
-
126
-
127
-
128
-
129
-
130
-
131
 |
 |
