Sony KV-36FS13 Operating Instructions
Sony KV-36FS13 - 36" Fd Trinitron Wega Television Manual
 |
View all Sony KV-36FS13 manuals
Add to My Manuals
Save this manual to your list of manuals |
Sony KV-36FS13 manual content summary:
- Sony KV-36FS13 | Operating Instructions - Page 1
4-081-776-22 TM © 2001 by Sony Corporation Operating Instructions KV-36FS13 KV-36FS17 - Sony KV-36FS13 | Operating Instructions - Page 2
- Sony KV-36FS13 | Operating Instructions - Page 3
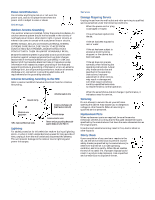
model and serial numbers are provided on the front of this instruction manual and at the rear of the TV. Refer to them whenever you call upon your Sony dealer regarding this product. About this Manual This manual is for models KV-36FS13 and KV-36FS17. The menu and illustrations shown are for model - Sony KV-36FS13 | Operating Instructions - Page 4
use and servicing of the set. Use Power Sources This set should be operated only from the type of power source indicated on the serial/model plate. If you are not sure of the type of electrical power supplied . Use only a cart or stand recommended by the manufacturer for the specific model of TV. An - Sony KV-36FS13 | Operating Instructions - Page 5
unit (NEC Section 810-20) Electrical wire equipment NEC: National Electrical Code Ground clamps Antenna lead-in wire Power service grounding electrode system (NEC Art 250 Part H) Lightning For added protection for this television receiver during a lightning storm, or when it is left unattended - Sony KV-36FS13 | Operating Instructions - Page 6
- Sony KV-36FS13 | Operating Instructions - Page 7
Contents Introducing the FD Trinitron Wega Overview 1 Presenting the FD Trinitron Wega 2 Package Contents 3 Using the Remote Control 3 Using the Features Overview 29 Using Favorite Channels 30 Using Picture in Picture (PIP) (KV-36FS17 only 31 Installing the TV Overview 9 TV Controls and - Sony KV-36FS13 | Operating Instructions - Page 8
- Sony KV-36FS13 | Operating Instructions - Page 9
Introducing the FD Trinitron Wega Overview This chapter defines the contents of your Wega TV and provides an overview of how to set up and use basic features. Topic Page Presenting the FD Trinitron Wega 2 Package Contents 3 Using the Remote Control 3 1 - Sony KV-36FS13 | Operating Instructions - Page 10
Wega The FD Trinitron Wega (pronounced VAY-GAH) is characterized by outstanding contrast, uncompromising accuracy, and corner-tocorner detail. You will recognize the superiority of Wega technology almost immediately. The first thing you will probably notice is minimal glare from the flat picture - Sony KV-36FS13 | Operating Instructions - Page 11
Introducing the FD Trinitron Wega Package Contents Along with your new Trinitron TV, the packing box contains a remote control and two AA batteries. These items are all you need to set it up and operate the TV in its basic configuration. Most peripherals come with the necessary cables to connect - Sony KV-36FS13 | Operating Instructions - Page 12
Introducing the FD Trinitron Wega Button Descriptions The POWER button on the remote control (no. 11 in the illustration below) activates both the remote control and the TV. 1 2 3 4 5 6 7 8 9 q; RM-Y180 Model KV-36FS13 KV-36FS17 (See page 6) Button 1 MUTING qa qs 2 SYSTEM OFF 3 TV/VCR qd qf qg - Sony KV-36FS13 | Operating Instructions - Page 13
the FD Trinitron Wega Button qs FUNCTION buttons (WHITE) qd TV/VIDEO qf DISPLAY qg MTS/SAP qh 0 - 9 and ENTER qj GUIDE qk Description Select the equipment (TV, VCR/DVD, SAT/CABLE) that you want to operate. The indicator lights up momentarily when pressed to show which device the remote control - Sony KV-36FS13 | Operating Instructions - Page 14
the FD Trinitron Wega 1 2 3 4 5 6 7 8 9 q; RM-Y181 The POWER button on the remote control (no. 11 in the illustration below) activates both the remote control and the TV. Button Description 1 MUTING Mutes the sound. Press again or press VOL + to restore qa 2 SYSTEM OFF the sound. Powers off - Sony KV-36FS13 | Operating Instructions - Page 15
Introducing the FD Trinitron Wega Button qa POWER buttons (GREEN) qs FUNCTION buttons (WHITE) qd TV/VIDEO qf ANT qg DISPLAY qh MTS/SAP qj 0 - 9 and ENTER qk GUIDE ql Description Turn on and off the TV and other audio/video equipment. Select the equipment (TV, VCR/DVD, SAT/CABLE) that you want to - Sony KV-36FS13 | Operating Instructions - Page 16
- Sony KV-36FS13 | Operating Instructions - Page 17
Connectors Connecting a DVD Player with A/V Connectors 26 Connecting a Camcorder 27 Setting Up the TV Automatically 28 Note About the AC Power Cord The AC power cord is attached to the rear of the TV with hooks. Use caution when removing the AC plug from its holder. Gently slide the cord in - Sony KV-36FS13 | Operating Instructions - Page 18
to the on-screen menus without the use of a remote control. Pressing the MENU button brings up the on-screen menus. The arrow buttons (Vv) move the on-screen cursor in the menus and the ( ) button selects the menu item. TV Rear Panel Model KV-36FS13 6 4 3 Model KV-36FS17 5 4 1 2 3 7 6 7 5 10 - Sony KV-36FS13 | Operating Instructions - Page 19
cannot be viewed in PIP. 2TO CONVERTER (KV-36FS17) This is a VHF/UHF out jack that lets you set up your TV to switch between scrambled channels (through a cable box) and normal cable channels (CATV). Use this jack instead of a splitter to get better picture quality when needing to switch between - Sony KV-36FS13 | Operating Instructions - Page 20
Only or VHF/UHF or Cable 75-ohm coaxial cable VHF/UHF Rear of TV Older homes may have 300-ohm, twin-lead cable: VHF Only or UHF Rear of TV Antenna connector Other homes may have both: VHF and UHF 75-ohm coaxial cable 300-ohm twin lead cable VHF/UHF Rear of TV U/V Mixer (not supplied) 12 - Sony KV-36FS13 | Operating Instructions - Page 21
's tuner provides a better signal than the cable box.) ❑ Use the PIP feature normally with the CATV input. ❑ Use the PIP feature partially with the cable box. (When you switch the TV input to AUX - to use the cable box - the scrambled picture will display only in the main window. If you turn on the - Sony KV-36FS13 | Operating Instructions - Page 22
50.) Then use the remote control to switch cable box channels. To prevent the accidental switching of TV channels ❑ When using the cable box, you need your TV to stay on a required channel (usually channel 3 or 4). You can use the TV's Channel Fix feature to lock in a specific channel. The Channel - Sony KV-36FS13 | Operating Instructions - Page 23
are scrambled, but others are not, consider using the hookup "Cable Box and Cable" on page 13 instead. 1 Connect the coaxial connector from your cable service to the cable box's IN jack. 2 Using a coaxial cable, connect the cable box's OUT jack to the TV's VHF/UHF jack. Cable VHF/UHF Rear - Sony KV-36FS13 | Operating Instructions - Page 24
an A/V cable, connect the VCR's Audio and Video OUT jacks to the TV's Audio and Video IN jacks. ✍ If the VCR you are connecting has an S VIDEO jack, you can use an S VIDEO cable for improved picture quality (compared to a combination audio/video cable). Because S VIDEO cables carry only the video - Sony KV-36FS13 | Operating Instructions - Page 25
. ❑ Use the TV remote control to change TV channels when the signal is not scrambled. (Your TV's tuner provides a better signal than the cable box.) ❑ Use the PIP feature. ❑ Record both regular CATV and scrambled channels. To connect a cable box and a VCR, you will need: ❑ A small, inexpensive - Sony KV-36FS13 | Operating Instructions - Page 26
not supplied) Cable box Coaxial cable VCR TV AUDIO-R (red) AUDIO-L (white) VIDEO (yellow) A/V cable To view cable box channels ❑ Turn on the VCR and set it to the channel the cable box uses (channel 3 or 4). Set the TV to VIDEO 1. Use the cable box to switch channels. To use the TV remote control - Sony KV-36FS13 | Operating Instructions - Page 27
with the Cable Box ❑ Turn on the cable box and VCR. Use the remote control's TV/VIDEO (yellow) button to set the PIP output to VIDEO 1. Change the PIP channel via the cable box. (The cable box's tuner is used as the PIP video source; if you do not turn on the cable box - Sony KV-36FS13 | Operating Instructions - Page 28
's user's guide for instructions. To view what is being recorded ❑ Use the remote control to set the TV to the video input to which the recording VCR is connected. (VIDEO 1 in the illustration above.) ✍ If the VCRs you are connecting have S VIDEO jacks, you can use S VIDEO cables to improve picture - Sony KV-36FS13 | Operating Instructions - Page 29
Audio and Video IN jacks. 3 Connect a coaxial cable from your cable or antenna to the TV's VHF/UHF jack. ✍ If the satellite receiver has an S VIDEO jack, you can use an S VIDEO cable to improve picture quality; replace the yellow video cable of the combination A/V cable with the S VIDEO cable. You - Sony KV-36FS13 | Operating Instructions - Page 30
jacks. Satellite antenna cable Satellite receiver TV VCR 22 CATV Coaxial cable AUDIO-R (red) AUDIO-L (white) VIDEO (yellow) Coaxial cable A/V cable ✍ If the satellite receiver and VCR have S VIDEO jacks, you can use an S VIDEO cable to improve picture quality; replace the yellow video cable - Sony KV-36FS13 | Operating Instructions - Page 31
Installing the TV To change VCR video input ❑ See your VCR's user's guide for instructions. To watch satellite TV, or the VCR ❑ Use the TV/VIDEO on the remote control to select video source. To watch cable TV ❑ Use the TV/VIDEO on the remote control to select VHF/UHF source. 23 - Sony KV-36FS13 | Operating Instructions - Page 32
Connecting an Audio Receiver For improved sound quality, you may want to send the TV's audio signals to your stereo system. The procedure below tells you how. 1 Using audio cables, connect the TV's Audio OUT jacks to the audio receiver's Audio LINE IN jacks. AUDIO-L (white) AUDIO-R (red) Line input - Sony KV-36FS13 | Operating Instructions - Page 33
Y, CB and CR, or Y, B-Y and R-Y. If so, connect the cables to like colors. 2 Using an audio cable, connect the DVD player's Audio OUT jacks to the TV's Audio IN jacks. Be sure to use the same column (VIDEO 4) of inputs that you used for the video connection. DVD player Component video cables - Sony KV-36FS13 | Operating Instructions - Page 34
OUT jacks to the TV's Audio IN jacks. 2 Using an S VIDEO cable, connect the DVD player's S VIDEO jack to the TV's S VIDEO jack. TV DVD player S VIDEO cable AUDIO-R (red) AUDIO-L (white) Audio cable To switch between your TV and DVD ❑ Use the TV/VIDEO button on the remote control to switch from - Sony KV-36FS13 | Operating Instructions - Page 35
has an S VIDEO jack, you can use an S VIDEO cable to improve picture quality; replace the yellow video cable of the combination A/V cable with the S VIDEO cable. You will still need audio cables for sound. To view the camera's output ❑ Use the TV's remote control to set the appropriate input on the - Sony KV-36FS13 | Operating Instructions - Page 36
40). ✍ The Auto Setup feature does not apply for installations that use a cable box for all channel selection. Using Auto Setup 1 Press POWER to turn on the TV. 2 Press the TV function button on the remote control. 3 Press CH+ on the front of your TV to run the Auto Setup or press CH- to exit. If - Sony KV-36FS13 | Operating Instructions - Page 37
Using the Features Overview This chapter describes how to use special features of your TV. Topic Using Favorite Channels Using Picture in Picture (PIP) (KV-36FS17 only) Page 30 31 29 - Sony KV-36FS13 | Operating Instructions - Page 38
Using the Features Using Favorite Channels The Favorite Channel feature lets you select options appear.) 4 Press V or v to highlight the channel you want to watch. (If you have a KV-36FS17 model, the PIP window will open, showing a preview of the highlighted Favorite Channel.) 5 When you find - Sony KV-36FS13 | Operating Instructions - Page 39
Press the button (or the button labeled PIP). The window picture appears. 3 Use the yellow-labeled buttons on your remote control (see diagram) to control the PIP features (which are listed on the next page). To check your PIP: 1 Tune your TV to a channel that you know is airing programming. 2 Press - Sony KV-36FS13 | Operating Instructions - Page 40
5 PIP 6 TV/VIDEO 7 AUDIO Description Freezes the window picture. Press again to restore the picture. The main window continues to play as usual. Changes the channel in the window picture. To change the channel in the main window, use the main CH+/buttons at the bottom of the remote control. Moves - Sony KV-36FS13 | Operating Instructions - Page 41
PIP feature will not work. The cable box only unscrambles one signal at a time, so the window picture will be the same as the main picture. ❑ You can use PIP to see pictures from different sources on your TV. For example, you can have a regular (CATV) channel and the output from a VCR or DVD player - Sony KV-36FS13 | Operating Instructions - Page 42
- Sony KV-36FS13 | Operating Instructions - Page 43
buttons to scroll up and down through the features. 4 See the specific menu page for instructions on moving through the menu. The Menu gives you access to the following features: Menu Icon Description Allows you to make adjustments to your picture settings. It also allows you to customize the - Sony KV-36FS13 | Operating Instructions - Page 44
the factory default settings for Picture, Brightness, Color, Hue, Sharpness, Color Temp and VM. ❑ Press RESET on the remote control when in the Video menu. Selecting Video Options z To change from one Video Mode to another, use the PICTURE MODE button on the remote control. The Video Menu includes - Sony KV-36FS13 | Operating Instructions - Page 45
Velocity Modulation Description Choose from three color temperatures: Cool Select to give the white colors a blue tint. Neutral Select to give the white colors a neutral tint. Warm Select to give the white colors a red tint (NTSC-Standard). Sharpens picture definition to give every object - Sony KV-36FS13 | Operating Instructions - Page 46
the remote control when in the Audio menu. Selecting Audio Options z As a shortcut to using the menus, use the button on the remote control TV to second audio programs when a signal is received. (If no SAP signal is present, the TV remains in Stereo mode.) Mono Select for mono reception. (Use - Sony KV-36FS13 | Operating Instructions - Page 47
are turned off, but the volume output from your audio system can still be controlled by the TV's remote control. Fixed The TV's speakers are turned off and the volume output of the TV is fixed. Use your audio receiver's remote control to adjust the volume through your audio system. 39 - Sony KV-36FS13 | Operating Instructions - Page 48
an antenna. ✍ You should run Auto Program after changing the cable setting. Channel Fix 2-6 "Fix" your TV's channel setting to 2 - 6 and Useful when you use the cable box or Satellite receiver to have a cable box or change channels. Select one of these satellite receiver settings if you - Sony KV-36FS13 | Operating Instructions - Page 49
z Channels that you set to be skipped can be accessed only with the 0-9 buttons. Using the Menus Option Channel Skip/Add Channel Label Description Removes and adds viewable channels. 1 Use the arrow buttons to scroll through the channels until you find the channel you want to skip/add. 2 Press to - Sony KV-36FS13 | Operating Instructions - Page 50
The Parent menu allows you to set up the TV to block programs according to their content and rating levels. To select the Parent Menu 1 Press MENU. 2 Use the arrow buttons to move to the Parent icon and press . 3 Use the 0-9 buttons on the remote control to enter your four-digit password. 4 Confirm - Sony KV-36FS13 | Operating Instructions - Page 51
, the agebased ratings should be blocked. z If you block unrated TV programs, be aware that the following types of programs may be blocked: emergency broadcasts, political programs, sports, news, public service announcements, religious programs and weather. For US models, the Custom Rating - Sony KV-36FS13 | Operating Instructions - Page 52
Using the Menus Canadian Models: Selecting Custom Rating Options Viewing Blocked Programs (Continued from the temporarily switches off the Parental Lock. To reactivate the Parental Lock settings, turn off the TV. When the TV is turned on again, your Parental Controls settings are reactivated. 44 - Sony KV-36FS13 | Operating Instructions - Page 53
. To set the Timer Before setting the timer, be sure to set your TV's clock to the current time (and, if appropriate, to Daylight Saving mode). 1 Use the arrow buttons to move to "Timer 1" or "Timer 2", then press . 2 Use the arrow buttons to enter your date, time and channel preferences, then press - Sony KV-36FS13 | Operating Instructions - Page 54
Use the arrow buttons to move to the Setup icon and press . 3 Use the arrow buttons to scroll through the features. 4 Press to select a feature. (That feature's options appear.) 5 Use Displays network/station TEXT3, TEXT4 information presented using either half or the whole screen (if available - Sony KV-36FS13 | Operating Instructions - Page 55
connected to the TV, so you can identify them when using the TV/VIDEO button. When in the Setup menu's Video Label feature, use the arrow buttons picture resolution for widescreen (anamorphic) sources, such as selected DVD titles (only available when the TV is in VIDEO mode). Press TV/VIDEO - Sony KV-36FS13 | Operating Instructions - Page 56
Selecting Basic Options z As a shortcut to using the menus, use the button on the remote control to cycle through available audio effects. The Basic Menu includes the following options: Option Description Picture Adjust the picture contrast. Caption Vision Displays your current advanced-menu - Sony KV-36FS13 | Operating Instructions - Page 57
Other Information Overview This chapter includes the following topics: Topic Programming the Remote Control Operating Other Components with Your TV Remote Control Troubleshooting Specifications Index Page 50 52 54 56 57 49 - Sony KV-36FS13 | Operating Instructions - Page 58
three-digit manufacturer's code number. 5 Press ENTER. 6 To check if the code number works, aim the TV's remote control at the component and press the green POWER button that corresponds with that component. If it responds, you are done. If not, try using another code listed for that manufacturer - Sony KV-36FS13 | Operating Instructions - Page 59
758 756 757 761 759 753 757 752 755 758 754 760 Cable Boxes Manufacturer Sony Hamlin/Regal Jerrold/G. I. Oak Panasonic Pioneer Scientific Atlanta Tocom Zenith Code 230 222, 223, 224, 225, 226 201, 202, 203, 204, 205, 206, 207, 208, 218 227, 228, 229 219, 220, 221 214, 215 209, 210 - Sony KV-36FS13 | Operating Instructions - Page 60
Other Components with Your TV Remote Control Operating a VCR Operating a DVD Player To Do This ... Turn on/off Select VCR Change channels Record Play Stop Fast forward Rewind the tape Pause Search the picture forward or backward Change input mode Press VCR/DVD (green POWER button) VCR/DVD - Sony KV-36FS13 | Operating Instructions - Page 61
, ENTER CH +/JUMP TV/SAT DISPLAY GUIDE MENU arrows button Operating an MDP (Laserdisc Player) To Do This ... Press Turn on/off VCR/DVD (green POWER button) Select MDP VCR/DVD (FUNCTION button) Play N Stop x Pause X (press again to resume normal playback) Search the picture forward M or - Sony KV-36FS13 | Operating Instructions - Page 62
Troubleshooting Problem Possible Remedies Reset TV to ❏ Turn on the TV. While holding down the RESET button on the remote factory settings control, press the POWER button on the TV. (The TV will turn itself off, then back on again.) Release the RESET button. No picture ❏ If your TV - Sony KV-36FS13 | Operating Instructions - Page 63
a VCR, DVD player or Satellite Receiver to the AUX input on the TV, it will not show in the small window picture. ❏ Both may be set to the same channel. Try changing channels in either the main picture or the window picture. ❏ You may using a cable box for all your channels. If you must have a cable - Sony KV-36FS13 | Operating Instructions - Page 64
Input KV-36FS13, 36FS17 Supplied Accessories Remote Control KV-36FS13 KV-36FS17 AA (R6) Batteries Optional Accessories AV Cable Audio Cable Component Video Cable TV Stand Visible Screen Size Actual CRT Size Speaker Output Dimensions (W x H x D) Mass Power Consumption In Use In Standby FD Trinitron - Sony KV-36FS13 | Operating Instructions - Page 65
off 5, 7 DVD player using with TV remote control 52 with A/V connectors, connecting 26 with component video connectors, connecting 25 E Enhanced picture resolution 47 Extended Data Service 46 F Favorite Channel setting up 40 using 30 features 2 Front Panel controls 10 G Guide button 5, 7 (Continued - Sony KV-36FS13 | Operating Instructions - Page 66
CABLE power button 4, 7 SAT/CABLE function button 5, 7 satellite receiver, using with TV remote control 53 Setting favorite channels 40 setting up channels 28, 40 Setup menu 35, 46 sharpness, adjusting 36 Sleep timer/button 4, 6 speakers turning on/off 38 using external speakers 38 specifications 56 - Sony KV-36FS13 | Operating Instructions - Page 67
20 using with TV remote control 52 with cable box, connecting 17 with cable, connecting 16 with satellite receiver, connecting 21 VCR/DVD power button 4, 7 VCR/DVD function button 5, 7 Velocity Modulation 2, 37 video inputs, labeling 47 Video menu 35, 36 Video Modes, selecting 36 W Wega, described - Sony KV-36FS13 | Operating Instructions - Page 68
- Sony KV-36FS13 | Operating Instructions - Page 69
- Sony KV-36FS13 | Operating Instructions - Page 70
Printed in U.S.A.
-
 1
1 -
 2
2 -
 3
3 -
 4
4 -
 5
5 -
 6
6 -
 7
7 -
8
-
9
-
10
-
11
-
12
-
13
-
14
-
15
-
16
-
17
-
18
-
19
-
20
-
21
-
22
-
23
-
24
-
25
-
26
-
27
-
28
-
29
-
30
-
31
-
32
-
33
-
34
-
35
-
36
-
37
-
38
-
39
-
40
-
41
-
42
-
43
-
44
-
45
-
46
-
47
-
48
-
49
-
50
-
51
-
52
-
53
-
54
-
55
-
56
-
57
-
58
-
59
-
60
-
61
-
62
-
63
-
64
-
65
-
66
-
67
-
68
-
69
-
70
 |
 |

KV-36FS13
KV-36FS17
© 2001 by Sony Corporation
4-081-776-
22
Operating Instructions
TM