Sony M937 Operating Instructions
Sony M937 - SPP Cordless Phone Manual
 |
View all Sony M937 manuals
Add to My Manuals
Save this manual to your list of manuals |
Sony M937 manual content summary:
- Sony M937 | Operating Instructions - Page 1
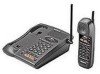
3-221-711-11 (1) 2-Line Cordless Telephone Operating Instructions US Manual de instrucciones ES SPP-M937 ©2000 Sony Corporation - Sony M937 | Operating Instructions - Page 2
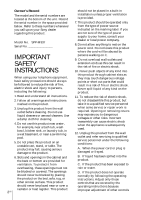
you call upon your Sony dealer regarding this product. Model No. SPP-M937 Serial No IMPORTANT SAFETY INSTRUCTIONS When using your telephone do not disassemble this product, but take it to a qualified service personnel when some service or repair work is required. Opening or removing covers may - Sony M937 | Operating Instructions - Page 3
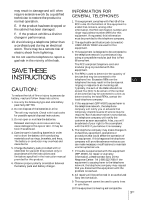
will provide advance notice so you can make necessary modifications to maintain uninterrupted service. 7. If trouble is experienced with this equipment (SPP-M937), for repair or warranty information, please contact Sony Direct Response Center: Tel 1-800-222-7669. If the equipment is causing harm - Sony M937 | Operating Instructions - Page 4
You are cautioned that any changes or modifications not expressly approved in this manual could void your authority to operate this equipment. Note This equipment has , if not installed and used in accordance with the instructions, may cause harmful interference to radio communications. However, - Sony M937 | Operating Instructions - Page 5
the package contents 8 Step 2: Setting up the base phone 12 Step 3: Preparing the battery pack 14 Identifying the parts Basics 17 Making calls 19 the base phone on a wall 38 Carrying the handset by the belt clip 39 Notes on power sources 39 Maintenance 40 Troubleshooting 42 Specifications - Sony M937 | Operating Instructions - Page 6
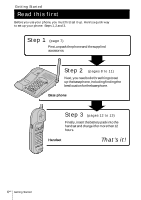
. Step 2 (pages 8 to 11) Next, you need to do three things to set up the base phone, including finding the best location for the base phone. Base phone Step 3 (pages 12 to 13) Finally, insert the battery pack into the handset and charge it for more than 12 hours. Handset That's it! 6US Getting - Sony M937 | Operating Instructions - Page 7
the following items in the package. If anything is missing, contact your local Sony dealer. Getting Started AC power adaptor (AC-T122) Base phone Handset Telephone line cords (3) Wall bracket for base phone Rechargeable battery pack (BP-T23) Directories (2) Belt clip Getting Started 7US - Sony M937 | Operating Instructions - Page 8
loss of audio during a conversation, try moving closer to the base or move base phone away from other noise sources. • The cordless telephone operates at a frequency that may cause interference to nearby TVs and VCRs; the base phone should not be placed near or on the top of a TV or VCR; and - Sony M937 | Operating Instructions - Page 9
wall, see page 37. To connect the base phone to a single outlet having two lines 3 Getting Started Hook the cord. To an AC outlet To DC IN 9V 2 AC power adaptor (supplied AC-T122) - Sony M937 | Operating Instructions - Page 10
Step 2: Setting up the base phone (continued) To connect the base phone to two separate outlets 3 Hook the cord. To an AC outlet To DC IN 9V 2 AC power adaptor (supplied AC-T122) To the telephone outlets - Sony M937 | Operating Instructions - Page 11
your telephone service company for assistance. • L1 is the first phone line connected to center pair of wires. L2 is the second phone line connected to having one line, connect the telephone line cord to the L2 jack. SPP-M937 To DATA Computer or FAX Choose the dialing mode For the telephone - Sony M937 | Operating Instructions - Page 12
for more than 12 hours before you start using your phone. 1 Slideopenthebattery compartment lid of the handset. BP-T23 2 Insert the battery pack (with contacts facing down) into the battery compartment. CHARGE lamp 12US Getting Started 3 Closethebatterycompartment lid. 4 Placethehandsetonthebase - Sony M937 | Operating Instructions - Page 13
after 12 hours of charging, the usable life of the battery has expired and needs replacement. Contact your local Sony authorized dealer or service center, and ask for a Sony BP-T23 rechargeable battery pack. Note Battery life may vary depending on usage condition and ambient temperature. Getting - Sony M937 | Operating Instructions - Page 14
Refer to the pages indicated in parentheses for details. Base Phone 1 2 3 qa 4 5 qs 6 qd 7 qf a call on hold. 6 CHARGE lamp (p. 12) Lights while the battery is being charged. 7 MUTING button and lamp (p. 21) Mutes your voice " service, or lets you make a new call. 14US Getting Started - Sony M937 | Operating Instructions - Page 15
Getting Started wd ql w; wa ws qf VOLUME +/- button (p. 18, 21) Adjusts the speaker volume. qg DIAL MODE switch (p. 11) Selects pulse or tone dialing. qh RINGER LEVEL switches (L1, L2) (p. 21) Adjusts the ringer volume. qj INTERCOM button (p. 30, 32) Used to make an intercom call. qk OFF button - Sony M937 | Operating Instructions - Page 16
Puts a call on hold. 7 Dialing keys (p. 17) 8 Battery compartment (p. 12) 9 TONE button (p. 17) Allows you to Switches to a second call if you have "call waiting" service, or lets you make a new call. qd OFF button 30) Lets you talk by using the base phone and handset. qh REDIAL/PAUSE button (p. 19) - Sony M937 | Operating Instructions - Page 17
If you hear an error beep, move closer to the base phone. Basics (*TONE) 3 Dial the phone number. (CHANNEL) (REDIAL/PAUSE) 4 When you are done talking, press volume Slide the VOL switch. Switch to another call ("call waiting" service*) Press (FLASH). Press (FLASH) again to return to the first - Sony M937 | Operating Instructions - Page 18
line, the hold will be automatically released and you will be able to resume conversation on that phone. If the handset battery becomes weak during a call You will hear a beep and the INTERCOM/BATT LOW lamp on the handset flashes. The call will be disconnected soon. Replace - Sony M937 | Operating Instructions - Page 19
number last dialed can be stored separately for the handset and the base phone. Making another call while talking Example: Making a call on line 2 hold and the LINE 1 button flashes slowly. 2 Press (LINE 2). 3 Dial a phone number for the second party. Now you can talk to the second party on line - Sony M937 | Operating Instructions - Page 20
flashing. or • Pick up the handset from the base phone when the handset is placed on the base phone. The corresponding line button lights up, so you can handset volume Slide the VOL switch. Switch to another call ("call waiting" service*) Press (FLASH). Press (FLASH) again to return to the first - Sony M937 | Operating Instructions - Page 21
); to turn the ringer off, set to OFF. Switch to another call ("call waiting" service*) Press (FLASH). Press (FLASH) again to return to the first caller. Mute your voice Press (MUTING) to disable the base phone microphone. The MUTING lamp lights up. Press (MUTING) again to cancel. * You need to - Sony M937 | Operating Instructions - Page 22
Receiving calls (continued) Receiving a call while talking If another call comes in while talking on the other line, you will hear a ringer tone through the speaker of the handset. Example: Receiving a call on line 2 while talking on line 1 1 Press (HOLD). The line 1 is put on hold and the LINE 1 - Sony M937 | Operating Instructions - Page 23
off. Notes • Do not allow more than 20 seconds to elapse between each step of the procedure. • In step 3, if you do not enter the phone number, the previously stored number will be erased. Tips • If you enter a wrong number, press (OFF), then start from the beginning. • Use the supplied directories - Sony M937 | Operating Instructions - Page 24
a number to be dialed via Private Branch Exchange (PBX) Before entering a phone number in step 3 on the previous page, do as follows: 1 Enter /PAUSE). To change a stored number To store a new number, follow the instructions described on the previous page. To clear a number from memory 1 Press ( - Sony M937 | Operating Instructions - Page 25
line. The corresponding line button lights up. 2 Press (PGM/SPEED DIAL). If you're at the base phone, press (SPEED DIAL). 3 Enter the desired speed dialing number ((0) to (9)). The phone number stored as the speed dialing number will be dialed. (LINE 1) (LINE 2) (0) - (9) (SPEED DIAL) (PGM/SPEED - Sony M937 | Operating Instructions - Page 26
set the ringer type of the line 1 or (2) to set that of the line 2. 4 Press (5). 5 Press (OFF). To turn the ringer on again Follow the instructions described in "Setting the ringer type." 26US Advanced Features - Sony M937 | Operating Instructions - Page 27
Checking the ringer type 1 Press (PGM/SPEED DIAL). 2 Press (#). 3 Press (1) to check the ringer type of the line 1 or (2) to check that of the line 2. 4 Press (0). The currently selected ringer sounds. 5 Press (OFF). Note If you hear no sound (only key beep), the ringer on the handset has been - Sony M937 | Operating Instructions - Page 28
on the handset lights up and the LINE 1 button on the base phone double flashes in succession. 2 Press (LINE 1) on the handset. on the handset or replace it on the base phone. The LINE 1 button goes off. Tip While talking through the speakerphone on the base phone (or handset), if you press (LINE 1) - Sony M937 | Operating Instructions - Page 29
To switch from the handset to the base phone Example: While talking on line 1: 1 Press (HOLD) on the handset. The LINE 1 button on the base phone and handset flash slowly. The LINE 1 button on the base phone lights up and the LINE 1 button on the handset double flashes in succession. 2 Press (LINE - Sony M937 | Operating Instructions - Page 30
INTERCOM/ BATT LOW lamp (LINE 1) (LINE 2) (OFF) (INTERCOM) Press (INTERCOM) on the handset. After the base phone rings once, you will be connected automatically. When a person at the base phone answers, you can talk with each other. The INTERCOM/BATT LOW lamp on the handset and the INTERCOM lamp - Sony M937 | Operating Instructions - Page 31
When a call comes in, a beep is heard through the handset and a ringer tone is heard through the base phone. The LINE 1 or LINE 2 button on both the handset and the base phone flashes. Press (LINE 1) or (LINE 2) whichever is flashing, then you can answer the call. Advanced Features 31US Advanced - Sony M937 | Operating Instructions - Page 32
put on hold, and the handset rings. The corresponding line button on the base phone and handset flashes. 2 Press (INTERCOM) on the handset. The INTERCOM lamp on the base phone lights up. You can talk between the base phone and the handset. 3 To talk to the caller with the handset: Press (OFF) on - Sony M937 | Operating Instructions - Page 33
1) (LINE 2) (OFF) 1 Press (HOLD) and then press (INTERCOM) on the handset. The call is put on hold. After the base phone rings once, you will be connected automatically. When a person at the base phone answers, you can talk with each other. The corresponding line button on the handset and base - Sony M937 | Operating Instructions - Page 34
you can also talk on one line, the handset and the base phone at the same time. Making another call while talking You can talk 2 Press (LINE 1) or (LINE 2), whichever is not used. (OFF) 3 Dial a phone number for the second party. 4 Press (CONF) (conference) after the second party is connected. - Sony M937 | Operating Instructions - Page 35
three-way conference To disconnect both lines at the same time, replace the handset on the base phone or press (OFF). To disconnect line 1 and talk on line 2 only: 1 Press ( call waiting" service even if you press (FLASH) on the base phone or the handset. continued Advanced Features 35US Advanced - Sony M937 | Operating Instructions - Page 36
lines on hold. The LINE 1 and LINE 2 buttons on the handset and the base phone flash. 2 Press (CONF) on the base phone to resume the conversation. Switching conference from the base phone to the handset 1 Press (HOLD) on the base phone to put both lines on hold. The LINE 1 and LINE 2 buttons on the - Sony M937 | Operating Instructions - Page 37
Additional Information Mounting the base phone on a wall 1 Hang-up tab 2 AC power adaptor cord the center of the base phone. Align the f marks of the wall bracket with those of the base phone. 4 Plug the telephone line cord(s) to the telephone outlet(s), and hook the base phone to the wall plate. - Sony M937 | Operating Instructions - Page 38
. Note Remove the belt clip carefully to avoid breaking your fingernails. Using the headset You can talk on handset without using your hands by connecting Sony TL-HD1 headset (optional) to the I (HEADSET) jack on the handset. 38US Additional Information - Sony M937 | Operating Instructions - Page 39
a long period of time, remove the battery pack after charging for more than 12 hours. This maintains battery life. On power failure During a power phone and handset are soiled, wipe them with a soft cloth. If you have any questions or problems concerning your phone, please consult your nearest Sony - Sony M937 | Operating Instructions - Page 40
If you experience any of the following difficulties while using your phone, use this troubleshooting list to help you remedy the problem. Should any problem persist, consult your nearest Sony dealer. Making calls Symptom Remedy You hear an error beep when you press (LINE 1) or (LINE - Sony M937 | Operating Instructions - Page 41
. The CHARGE lamp does not light up when you place the handset on the base phone. The battery duration is short. Remedy • Eitherthehandsetorthebasephoneisbeingused. • Theothertelephoneconnectedtothelineisbeing used. • Makesurethetelephonelinecordissecurely connected to the telephone outlet. • When - Sony M937 | Operating Instructions - Page 42
(approx. 2 1⁄4 x 7 x 1 13⁄16 inches) Antenna: Approx. 30 mm (approx. 1 1⁄4 inches) Mass Approx. 250 g (approx. 8.8 oz), battery included Base phone Power source DC 9 V from AC power adaptor Battery charging time Approx. 12 hours Dimensions Approx. 187 x 66 x 225 mm (w/h/d), antenna excluded (approx - Sony M937 | Operating Instructions - Page 43
21, 26 speaker volume 18, 21 B Battery pack charging 12 duration 13 Belt clip 38 C Call waiting service 20 Channel 17 Conference 34 Connection 9 U Talking between the phones 30 Three-way conference 34 Tone dialing dialing mode 11 switching to 17 Transferring a call 32 Troubleshooting 40 V, W, X, Y, - Sony M937 | Operating Instructions - Page 44
serie en el espacio que se proporciona a continuación. Refiérase a estos números cada vez que se comunique con su distribuidor Sony con respecto al producto. Modelo No SPP-M937 Serie No IMPORTANTES INSTRUCCIONES DE SEGURIDAD A fin de reducir el riesgo de incendio, descarga eléctrica y lesiones a las - Sony M937 | Operating Instructions - Page 45
. 14. Para notificar una fuga de gas, no utilice el teléfono en la de pilas del siguiente tipo y tamaño: SONY BP-T23. 2. No deseche el paquete de especificadas en el manual de instrucciones correspondiente la compañía telefónica. 5. Si este equipo (SPP-M937) produce daños en la red telefónica, la - Sony M937 | Operating Instructions - Page 46
algún problema con este equipo (SPP-M937), con respecto a la reparación o a la información sobre la garantía, póngase en contacto con Sony Direct Response Center: Tel 1-800 cambio o modificación no aprobado expresamente en el presente manual podría anular su autorización para operar este equipo. 4ES - Sony M937 | Operating Instructions - Page 47
Índice Preparativos 6 Lea esto en primer lugar 7 Paso 1: Comprobación del contenido del paquete 8 Paso 2: Instalación del teléfono base 12 Paso 3: Preparación de la batería 14 Identificación de las partes Operaciones básicas 17 Realización de llamadas 19 Repetición de la marcación 19 - Sony M937 | Operating Instructions - Page 48
para instalar el teléfono base, incluyendo la búsqueda del mejor lugar para el mismo. Teléfono Base Paso 3 (páginas 12 a 13) Finally, insert the battery pack into the handset and charge it for more than 12 hours. Microteléfono ¡Esto es todo! 6ES Preparativos - Sony M937 | Operating Instructions - Page 49
ón del contenido del paquete Compruebe si con el paquete ha recibido los ítemes siguientes. Si falta alguno, póngase en contacto con su proveedor Sony. Preparativos Adaptador de alimentación de CA (AC-T122) Teléfono base Microteléfono Cables de línea telefónica (3) Soporte mural para el tel - Sony M937 | Operating Instructions - Page 50
Paso 2 Instalación del teléfono base Realice los pasos siguientes: • Elección del mejor lugar • Conexión del teléfono base • Elección del modo de marcación Elección del mejor lugar La situación del teléfono base afectará la calidad de la recepción del microteléfono. Alejado de fuentes de - Sony M937 | Operating Instructions - Page 51
Conexión del teléfono base Si desea colgar el teléfono base en una pared, consulte la página 37. Para conectar el teléfono a una sola toma que posea dos líneas 3 Preparativos Enrute el cable. A un tomacorriente de CA A DC IN 9V 2 Adaptador de alimentación de CA (AC-T122 suministrado) A la toma - Sony M937 | Operating Instructions - Page 52
Paso 2: Instalación del teléfono base (continuación) Para conectar el teléfono a dos tomas separadas 3 Enrute el cable. A un tomacorriente de CA A DC IN 9V 2 A un tomacorriente de CA (AC-T122 suministrado) A la toma teléfonica A L1/L1+L2 Línea 1 Cable de línea telefónica (suministrado) 1 A - Sony M937 | Operating Instructions - Page 53
exterior de conductores. Conexión a un PC o facsímil Usted podrá conectar un PC o un facsímil a la toma DATA. L1 L2 A L1/L1+L2 y/o L2 SPP-M937 Notas • L2 se utiliza para recibir/transmitir datos del/al PC o facsímil además de realizar o recibir llamadas telefónicas. Si entra una llamada a trav - Sony M937 | Operating Instructions - Page 54
Paso 3 Preparación de la batería Antes de utilizar su teléfono, cargue la batería durante más de 12 horas. 1 Deslice y abra la tapa del compartimiento de la batería del microteléfono. BP-T23 2 Inserte la batería (con les contactos hacia abajo) en el compartimiento para la misma. Lámpara CHARGE - Sony M937 | Operating Instructions - Page 55
útil de la misma habrá expirado y necesita reemplazarse. Póngase en contacto con su proveedor o un centro de reparaciones autorizado por Sony, y solicite una batería BP-T23 Sony. Nota La duración de la batería puede variar dependiendo de las condiciones de utilización y de la temperatura ambiental - Sony M937 | Operating Instructions - Page 56
Identificacíon de las partes Con respecto a los detalles, consulte las páginas indicadas entre paréntesis. Teléfono base 1 2 3 qa 4 5 qs 6 qd 7 qf 8 9 qg 0 qh qj qk 1 Botón de marcación instantánea (SPEED DIAL) (p. 24) Presiónelo para marcar automáticamente números almacenados. 2 - Sony M937 | Operating Instructions - Page 57
Preparativos wd ql w; wa ws qf Botones de volumen (VOLUME +/-) (p. 18, 21) Presiónelas para ajustar el volumen del altavoz. qg Selector de modo de marcación (DIAL MODE) (p. 11) Utilícelo para seleccionar la marcación por pulsos o por tonos. qh Selector de nivel del generador de llamada (RINGER - Sony M937 | Operating Instructions - Page 58
Identificación de las partes (continuación) Microteléfono 1 qa 2 3 qs 4 qd 5 qf 6 qg 7 8 9 qh 0 qj qk 1 Antena 2 Altavoz 3 Lámpara de intercomunicación/ batería bajo (INTERCOM/BATT LOW) (p. 17) Parpadeará cuando la batería esté débil/permanecerá encendida durante una llamada de - Sony M937 | Operating Instructions - Page 59
Operaciones básicas Realización de llamadas 1 Tome el microteléfono del teléfono base. Lámpara INTERCOM/ BATT LOW Selector VOL (HOLD) Toma I (HEADSET) (FLASH) 2 Presione (LINE 1) o (LINE 2) para seleccionar la línea. El botón de la línea correspondiente se encenderá. Usted oirá el tono de - Sony M937 | Operating Instructions - Page 60
Realización de llamasdas (continuación) Notas • Si suena el teléfono durante la conversación, significa que hay una llamada entrante por la otra línea (consulte la página 22). • No presione (CHANNEL) cuando esté alejado del teléfono base. La llamada podría desconectarse. • Si se escucha un pitido - Sony M937 | Operating Instructions - Page 61
Para obtener el máximo rendimiento del modo de interfono • Es posible que en un lugar ruidoso no oiga la voz de su interlocutor. Por lo tanto, utilice la función de interfono en una sala silenciosa. • No acerque demasiado la mano ni ningún otro objeto al micrófono, ya que oiría un aullido (" - Sony M937 | Operating Instructions - Page 62
Recepción de llamadas Selector VOL (HOLD) (FLASH) 1 Cuando suene el teléfono, • Presione (LINE 1) o (LINE 2) según el botón que parpadee. o • Levante el microteléfono del teléfono base si dicho microteléfono se encuentra en ésta. El botón correspondiente a la línea conectada se encenderá, para - Sony M937 | Operating Instructions - Page 63
Operaciones básicas Recepción de llamadas a través del interfono Cuando suene el teléfono, presione (LINE 1) o (LINE 2), de acuerdo con el botón que esté parpadeando. (VOLUME) Para ajustar el volumen del, presione (VOLUME)(+) o (--). Cuando termine de conversar, presione (OFF). (HOLD) Para - Sony M937 | Operating Instructions - Page 64
Recepción de llamadas (continuación) Recepción de una llamada durante la conversación Si recibe una llamada mientras habla por la otra línea, oirá un tono de llamada a través del altavoz del microteléfono. Ejemplo: Para recibir una llamada a través de la línea 2 durante la conversación a través de - Sony M937 | Operating Instructions - Page 65
Funciones avanzadas Marcación abreviada Usted podrá marcar presionando algunas teclas de marcación después de haber almacenado un número en la misma. Usted podrá almacenar hasta 10 números de teléfono diferentes solamente con el microteléfono, pero podrá realizar la marcación abreviada desde ambos - Sony M937 | Operating Instructions - Page 66
Marcación abreviada (continuación) Para almacenar el número previamente marcado Presione (REDIAL/PAUSE) en vez de introducir el número de teléfono en el paso 3. Nota Si el último número marcado tiene más de 20 dígitos, o si se borró, el pitido de error le indicarán que el número de marcación - Sony M937 | Operating Instructions - Page 67
Realización de llamadas con marcación abreviada 1 Presione (LINE 1) o (LINE 2) para seleccionar la línea. La tecla de la línea correspondiente se encenderá. 2 Presione (PGM/SPEED DIAL). Si está en el teléfono base, presione (SPEED DIAL). 3 Presione la tecla de marcación abreviada deseada ((0) a - Sony M937 | Operating Instructions - Page 68
Ajuste del tipo de generador de llamada Es posible seleccionar un tipo de timbre de entre cuatro. (1) - (5) 1 Presione (PGM/SPEED DIAL). 2 Presione (#). 3 Presione (1) para ajustar el tipo de timbre de la línea 1 o (2) para ajustar el de la línea 2. 4 Presione una tecla de marcación, (1) a (4), - Sony M937 | Operating Instructions - Page 69
Comprobación del generador de llamada 1 Presione (PGM/SPEED DIAL). 2 Presione (#). 3 Presione (1) para comprobar el tipo de timbre de la línea 1 o (2) para comprobar el de la línea 2. 4 Presione (0). Sonará el generador de llamada actualmente seleccionado. 5 Presione (OFF). Nota Si no escucha ningún - Sony M937 | Operating Instructions - Page 70
Cambio de teléfonos durante una llamada Si pone una llamada en retención, podrá cambiar entre el teléfono base y el microteléfono sin que se desconecte. La llamada de la línea 1 cambiará a la línea 1 en el otro teléfono, y la de la línea 2 a la línea 2. Para cambiar del teléfono base al microtelé - Sony M937 | Operating Instructions - Page 71
Para cambiar del microteléfono al teléfono base Ejemplo: Cuando esté conversando a través de la línea 1: 1 Presione (HOLD) del microteléfono. El botón LINE 1 del teléfono base y del microteléfono parpadeará lentamente. El botón LINE 1 del teléfono base se encenderá, y el botón LINE 1 del microtelé - Sony M937 | Operating Instructions - Page 72
Conversación entre el microteléfono y el teléfono base (Intercomunicación) Usted podrá conversar entre el teléfono base y el microteléfono. Usted podrá iniciar la intercomunicación desde cualquier teléfono. Para conversar del microteléfono al teléfono base Lámpara INTERCOM/ BATT LOW Presione ( - Sony M937 | Operating Instructions - Page 73
Nota La llamada de al microteléfono se parará automáticamente después de un minuto. Recepción de una llamada durante la intercomunicación Si se recibe una llamada, se oirá un pitido en el auricular y un tono de timbre a trarés del altavoz del teléfono base. El botón LINE 1 o LINE 2 del auricular tel - Sony M937 | Operating Instructions - Page 74
Transferencia de una llamada Usted podrá transferir una llamada entre el microteléfono y el teléfono base sin desconectarla. Para transferir del teléfono base al microteléfono (LINE 1) (LINE 2) (LINE 1) (LINE 2) Lámpara INTERCOM (OFF) 1 Presione (HOLD) y después presione (INTERCOM) del teléfono - Sony M937 | Operating Instructions - Page 75
Para transferir del microteléfono al teléfono base (LINE 1) (LINE 2) (LINE 1) (LINE 2) (OFF) 1 Presione (HOLD) y después presione (INTERCOM) del microteléfono. La llamada se pondrá en retención. Después de sonar el teléfono base una vez, se conectará automaticamente. Cuando la persona del telé - Sony M937 | Operating Instructions - Page 76
Realización de llamadas de conferencia Usted podrá conversar a través de dos líneas al mismo tiempo, y también a través de una línea , el microteléfono, y el teléfono base a la vez. Realización de otra llamada durante la conversación Usted podrá conversar con dos interlocutores al mismo tiempo - Sony M937 | Operating Instructions - Page 77
Recepción de una llamada durante la conversación Si se recibe otra llamada mientras habla por la otra línea, se oirá un tono de timbre a través del altavoz del auricular. 1 Presione (HOLD). La línea que esté utilizando se pondrá en retención. 2 Presione (LINE 1) o (LINE 2), de acuerdo con la línea - Sony M937 | Operating Instructions - Page 78
Realización de llamada de conferencia (continuación) Cambio de conferencia del microteléfono al teléfono base 1 Presione (HOLD) del microteléfono para poner ambas líneas en retención. Los botons LINE 1 y LINE 2 del microteléfono y del teléfono base parpadearán. 2 Para reanudar la conversación, - Sony M937 | Operating Instructions - Page 79
Información adicional Montaje del teléfono en una pared 1 Lengüeta de colgado 2 Cable del adaptador de alimentación de CA 3 Cable de línea telefónica 1 Levantelalengüetadecolgado. 2 Enchufeel(los)cable(s)delínea telefónica en las tomas L1/ L1+L2 y/o L2, y el adaptador de alimentación de CA en la - Sony M937 | Operating Instructions - Page 80
cuidadosamente para evitar romperse las uñas. Uso de cascos Es posible hablar por el auricular sin utilizar las manos conectando los cascos TL-HD1 de Sony (opción) a la toma I (HEADSET) del microteléfono. 38ES Información adicional - Sony M937 | Operating Instructions - Page 81
cadmio en contenedores domésticos o industriales puede estar prohibido. La RBRC (Rechargeable Battery Recycling Corporation) le aconsejará sobre la recogida de pilas usadas en el siguiente con el teléfono, consulte a su proveedor Sony más próximo. Información adicional Información adicional 39ES - Sony M937 | Operating Instructions - Page 82
su teléfono, use esta guía como ayuda para solucionarlo. Si el problema persiste, póngase en contacto con su proveedor Sony. Realización de llamadas Problema Solución Se oye cinco pitido de error al presionar (LINE 1) o (LINE 2). • Compruebesielteléfonobaseestácorrectamente instalado (página - Sony M937 | Operating Instructions - Page 83
Botones LINE 1 y 2 Marcación abreviada Problema Solución El botón LINE 1 o 2 parpadea cuando no está utilizándose. • Estáutilizándoseelmicroteléfonooelteléfonobase. • Elotroteléfonoqueestéenchufadoalalíneaesté utilizándose. • Asegeúresedequeelcabledelalíneatelefónicaesté firmemente enchufado a - Sony M937 | Operating Instructions - Page 84
Especificaciones Generales Banda de frecuencias 902 - 928 MHz Modo de operación FM, dúplex Canales de operación 30 canales Señal de marcación Tonos y 10 PPS (pulsos por segundo), seleccionable Accesorios suministrados Consulte la página 7. Microteléfono Fuente de alimentación Batería BP-T23 - Sony M937 | Operating Instructions - Page 85
Índice alfabético A Ajuste del volumen altavoz 18, 20 generador de llamada 21, 26 microteléfono 17, 20 B Batería carga 12 duración 13 C, D, E, F Cambio de teléfonos durante una llamada 28 Canal 17 Conexión 9 Conferencia 34 Conferencia tripartita 34 Contenido del paquete 7 Conversación entre telé - Sony M937 | Operating Instructions - Page 86
44ES Información adicional - Sony M937 | Operating Instructions - Page 87
Para clientes en EE. UU. Guarde el recibo y únalo a su tarjeta de GARANTÍA para el caso de tener que llevar su equipo a reparar a un centro de reparaciones autorizado por Sony. Información adicional 45ES Información adicional - Sony M937 | Operating Instructions - Page 88
For the customers in the USA Be sure to save the receipt and attach it to your WARRANTY card when having your equipment repaired at an authorized Sony service station. Sony Corporation Printed in China
-
 1
1 -
 2
2 -
 3
3 -
 4
4 -
 5
5 -
 6
6 -
 7
7 -
8
-
9
-
10
-
11
-
12
-
13
-
14
-
15
-
16
-
17
-
18
-
19
-
20
-
21
-
22
-
23
-
24
-
25
-
26
-
27
-
28
-
29
-
30
-
31
-
32
-
33
-
34
-
35
-
36
-
37
-
38
-
39
-
40
-
41
-
42
-
43
-
44
-
45
-
46
-
47
-
48
-
49
-
50
-
51
-
52
-
53
-
54
-
55
-
56
-
57
-
58
-
59
-
60
-
61
-
62
-
63
-
64
-
65
-
66
-
67
-
68
-
69
-
70
-
71
-
72
-
73
-
74
-
75
-
76
-
77
-
78
-
79
-
80
-
81
-
82
-
83
-
84
-
85
-
86
-
87
-
88
 |
 |
3-221-711-
11
(1)
©2000 Sony Corporation
ES
Operating Instructions
Manual de instrucciones
SPP-M937
US
2-Line Cordless
Telephone