Sony MEX-DV2000 Operating Instructions - Page 13
Preparing the card remote commander, Detaching the front panel
 |
UPC - 027242706477
View all Sony MEX-DV2000 manuals
Add to My Manuals
Save this manual to your list of manuals |
Page 13 highlights
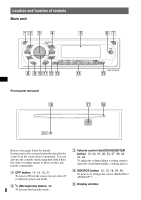
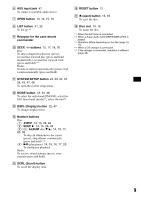
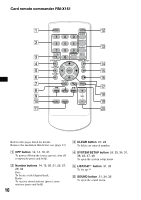
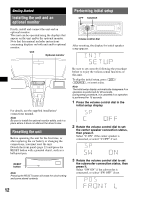
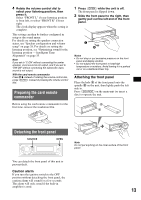
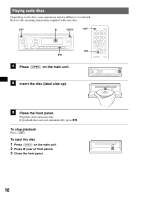
4 Rotate the volume control dial to select your listening position, then press it. Select "FRONT L" if your listening position is front left, or select "FRONT R" if front right. The clock display appears when the setting is complete. This setting can then be further configured in setup or the sound menu. For details on setting the speaker connection status, see "Speaker configuration and volume setup" on page 38. For details on setting the listening position, see "Optimizing sound for the listening position - Intelligent Time Alignment" on page 35. Note If you set to "C ON" without connecting the center speaker, vocal sound is not output, and if you set to "SW ON" without connecting the subwoofer, bass sound is not output. With the card remote commander Press M/m instead of rotating the volume control dial, press (ENTER) instead of pressing the volume control dial. Preparing the card remote commander Before using the card remote commander for the first time, remove the insulation film. 1 Press (OPEN) while the unit is off. The front panel is flipped down. 2 Slide the front panel to the right, then gently pull out the left end of the front panel. 1 2 Notes • Do not drop or put excessive pressure on the front panel and display window. • Do not subject the front panel to heat/high temperature or moisture. Avoid leaving it in a parked car or on a dashboard/rear tray. Attaching the front panel Place the hole A of the front panel onto the spindle B on the unit, then lightly push the left side in. Press (SOURCE) on the main unit (or insert a disc) to operate the unit. A B Detaching the front panel SOURCE OPEN c Note Do not put anything on the inner surface of the front panel. You can detach the front panel of this unit to prevent theft. Caution alarm If you turn the ignition switch to the OFF position without detaching the front panel, the caution alarm will sound for a few seconds. The alarm will only sound if the built-in amplifier is used. 13
-
 1
1 -
2
-
3
-
4
-
5
-
6
-
7
-
 8
8 -
 9
9 -
 10
10 -
 11
11 -
 12
12 -
 13
13 -
 14
14 -
 15
15 -
 16
16 -
 17
17 -
 18
18 -
19
-
20
-
21
-
22
-
23
-
24
-
25
-
26
-
27
-
28
-
29
-
30
-
31
-
32
-
33
-
34
-
35
-
36
-
37
-
38
-
39
-
40
-
41
-
42
-
43
-
44
-
45
-
46
-
47
-
48
-
49
-
50
-
51
-
52
-
53
-
54
-
55
-
56
-
57
-
58
-
59
-
60
-
61
-
62
-
63
-
64
-
65
-
66
-
67
-
68
-
69
-
70
-
71
-
72
-
73
-
74
-
75
-
76
-
77
-
78
-
79
-
80
-
81
-
82
-
83
-
84
-
85
-
86
-
87
-
88
-
89
-
90
-
91
-
92
-
93
-
94
-
95
-
96
-
97
-
98
-
99
-
100
-
101
-
102
-
103
-
104
-
105
-
106
-
107
-
108
-
109
-
110
-
111
-
112
-
113
-
114
-
115
-
116
-
117
-
118
-
119
-
120
-
121
-
122
-
123
-
124
-
125
-
126
-
127
-
128
-
129
-
130
-
131
-
132
-
133
-
134
-
135
-
136
-
137
-
138
-
139
-
140
-
141
-
142
-
143
-
144
-
145
-
146
-
147
-
148
-
149
-
150
-
151
-
152
-
153
-
154
-
155
-
156
-
157
-
158
-
159
-
160
-
161
-
162
-
163
-
164
-
165
-
166
-
167
-
168
-
169
-
170
-
171
-
172
-
173
-
174
-
175
-
176
-
177
-
178
-
179
-
180
-
181
-
182
-
183
-
184
-
185
-
186
-
187
-
188
-
189
-
190
-
191
-
192
 |
 |
