Sony MVC-FD90 Operating Instructions
Sony MVC-FD90 - Mavica 1.2MP Digital Camera Manual
 |
UPC - 027242570061
View all Sony MVC-FD90 manuals
Add to My Manuals
Save this manual to your list of manuals |
Sony MVC-FD90 manual content summary:
- Sony MVC-FD90 | Operating Instructions - Page 1
3-060-831-12(1) Digital Still Camera Operating Instructions Before operating the unit, please read this manual thoroughly, and retain it for future reference. Owner's Record The model and serial numbers are located on the bottom. Record the serial number in the space provided below. Refer to these - Sony MVC-FD90 | Operating Instructions - Page 2
approved in this manual could void your authority to operate this equipment. 2 Note: This equipment has been tested and found to comply with the limits for a Class B digital device, pursuant to Part 15 of the FCC Rules. These limits are designed to provide reasonable protection against harmful - Sony MVC-FD90 | Operating Instructions - Page 3
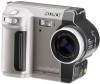
, please contact your nearest Sony service station. For the Customers camera Operating instructions Before operating the unit, please read this manual thoroughly, and retain it for future reference. The instructions in this manual are for the two models: MVC-FD85, MVC-FD90. The MVC-FD90 is the model - Sony MVC-FD90 | Operating Instructions - Page 4
pixels are operational for effective use. • Be careful when placing the camera near a window or outdoors. Exposing the LCD screen or the lens to direct get the camera wet. If moisture condensation occurs, refer to page 53 and follow the instructions on how to remove it before using the camera. Back up - Sony MVC-FD90 | Operating Instructions - Page 5
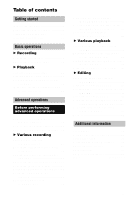
images (COPY 48 Copying all the information on your floppy disk (DISK COPY) ......50 Selecting still images to print (PRINT MARK 51 Format 52 Additional information Precautions 53 Using your camera abroad 55 Troubleshooting 56 Warning and notice messages .......59 Self-diagnosis display - Sony MVC-FD90 | Operating Instructions - Page 6
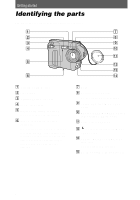
Getting started Identifying the parts See the pages in parentheses for details of operation. camera to tripods having longer screws, and may damage the camera. G Lens H Built-in microphone Do not touch while recording. I Focus ring (38) (MVC-FD90 only) J FOCUS AUTO/MANUAL switch (37, 38) (MVC-FD90 - Sony MVC-FD90 | Operating Instructions - Page 7
(19) G FOCUS button (37, 38) (MVCFD85) / (Macro) button (37) (MVC-FD90) H PROGRAM AE button (39) I Hooks for strap J LCD screen K Floppy disk slot (14) L ACCESS lamp (16) M DISK EJECT lever (14) N Speaker O POWER switch (12) P Battery cover/PUSH button (8) Q Control button (28) R DISPLAY button (18 - Sony MVC-FD90 | Operating Instructions - Page 8
Preparing the power supply Installing the battery pack Your camera operates only with the NP-F330 (supplied)/F550 (not supplied) "InfoLITHIUM" battery pack* (L series). 12 2 1 32 1 1 Open the battery cover. Slide the battery cover in the direction of the arrow while pressing the PUSH button. 2 - Sony MVC-FD90 | Operating Instructions - Page 9
charge is completed. Battery remaining indicator The LCD screen on the camera shows the remaining time for which you can still record or play back images. This indication may not be entirely accurate depending on the conditions of use and the operating environment. Auto power-off function If you - Sony MVC-FD90 | Operating Instructions - Page 10
The capacity of the floppy disk is limited. The above figures are a guide when you continuously record/play back by replacing the floppy disk. • If sufficient battery remaining time is indicated but the power runs out soon, fully charge the battery so that the correct battery remaining time appears - Sony MVC-FD90 | Operating Instructions - Page 11
2 Power cord (mains lead) 1 Open the DC IN cover and connect the DC connecting plug to the DC IN jack of your camera with the v mark facing up. 2 Connect the power cord (mains lead) to the AC power adaptor and then to a wall outlet (mains). Using a car battery Use Sony DC adaptor/charger. 11 - Sony MVC-FD90 | Operating Instructions - Page 12
and time. If these are not set, the CLOCK SET screen appears whenever you turn on your camera for recording. ON/CHG lamp Control button 1 Slide the POWER switch to the right to turn on the power. The ON/CHG (green) lamp lights up. 2 Press v on the control button. The menu bar appears - Sony MVC-FD90 | Operating Instructions - Page 13
Getting started 5 Select the desired date display format with v/V on the control button, then press the center z. Select from [Y/M/D] (year/month/day), [M/D/Y] (month/day/year), or [D/M/Y] (day/month/year). 6 Select the year, month, - Sony MVC-FD90 | Operating Instructions - Page 14
44 MB • Format: MS-DOS format (512 bytes × 18 sectors) You can use the "Memory Stick"* (not supplied) with inserting it into the MSACFD2M Floppy Disk Adaptor for Memory Stick (not supplied), other than floppy disks mentioned above. ∗ "Memory Stick" and are trademarks of Sony Corporation. Removing - Sony MVC-FD90 | Operating Instructions - Page 15
Basic operations Recording still images B Recording Still images are recorded in JPEG format. To record still images, slide the POWER switch to the right to turn on the power and insert a floppy disk. 2, 3 B Recording ACCESS lamp 1 1 Set the PLAY/STILL/MOVIE selector to STILL. 2 Press and - Sony MVC-FD90 | Operating Instructions - Page 16
camera. Also, do not turn the power off, or not remove the battery pack/floppy disk. Otherwise, an image data breakdown may occur and the floppy disk may become unusable. • When using a "Memory Stick To delete the image, select [DELETE] on the review screen with b/B on the control button, then press - Sony MVC-FD90 | Operating Instructions - Page 17
T side: About 60 cm (23 5/8 inches) or more (MVC-FD85) About 90 cm (35 1/2 inches) or more (MVC-FD90) To record even closer subjects, see page 37. Digital zoom function This camera has a digital zoom function. Digital zoom enlarges the image by digital processing, and it starts to function when the - Sony MVC-FD90 | Operating Instructions - Page 18
LCD screen indicators during recording Press DISPLAY to turn on/off the indicators on the LCD screen. See page 63 for a detailed description of the indicators. DISPLAY Notes • You cannot turn off the (self-timer) indicator and some of the indicators used in advanced operations. • The indicators on - Sony MVC-FD90 | Operating Instructions - Page 19
from the flash and the recorded image may be eclipsed. • You cannot use the built-in flash and an external strobe at the same time (MVC-FD90 only). • Auto red-eye reduction may not produce the desired red-eye reduction effects depending on individual differences, the distance to the subject, if the - Sony MVC-FD90 | Operating Instructions - Page 20
Recording moving images Moving images with audio are recorded in MPEG format. To record moving images, slide the POWER switch to the right to turn on the power and insert a floppy disk. 2 1 1 Set the PLAY/STILL/MOVIE selector to MOVIE. 2 Press the shutter button fully down. "REC" appears on the LCD - Sony MVC-FD90 | Operating Instructions - Page 21
• You might not be able to correctly play back images recorded with this camera on other equipment. • You may not be able to play back images maximum image size that can be used with this camera for recording. LCD screen indicators during still image playback Press DISPLAY to turn on/off the - Sony MVC-FD90 | Operating Instructions - Page 22
menu bar on the LCD screen. 3 Select the desired moving image with the control button. Moving images are displayed one size smaller than still images. Press v/V/b/B on the control button to select "b/B" on the LCD screen, then press b/B. "b: To display the preceding image. B": To display the next - Sony MVC-FD90 | Operating Instructions - Page 23
B Playback To pause playback Select X (pause) on the LCD screen with v/V/b/B on the control button, then press the center z. When the menu bar is not displayed You can directly select the image with b/B on the control button, and play back the image and sound by pressing the center z. When you - Sony MVC-FD90 | Operating Instructions - Page 24
use the floppy disk recorded with this camera using PC Exchange with Mac OS system 7.5 or higher. A viewing application for Macintosh is also necessary for viewing images. To play back an MPEG file, install QuickTime 3.0 or higher. • When using the MSAC-FD2M Floppy Disk Adaptor for Memory Stick, the - Sony MVC-FD90 | Operating Instructions - Page 25
B Playback Viewing images For Windows98 users 1 Start up your personal computer and insert the floppy disk into the disk drive of your personal computer. 2 Open [ My computer] and double click [ 31/2 Floppy (A:)]. 3 Double-click the desired data file. Copying moving image files and audio files to - Sony MVC-FD90 | Operating Instructions - Page 26
and image file names Image files recorded with your camera are grouped in folders by recording mode. Images in a floppy disk and ones in a "Memory Stick" have different file names. The meanings of the file names are as follows. When using floppy disks sss stands for any number within the range from - Sony MVC-FD90 | Operating Instructions - Page 27
stands for any number within the range from 0001 to 9999. For Window98 users (The drive recognizing the Floppy Disk Adaptor for Memory Stick is [A].) Folder containing still image data Folder containing E-mail mode image data Folder containing moving image data Folder containing voice memo audio - Sony MVC-FD90 | Operating Instructions - Page 28
: To play back or edit images To record still images and voice memos To record moving images How to use the control button The control button is used to select the buttons, images and menus displayed on the LCD screen of your camera and modify the settings. The operation methods that are - Sony MVC-FD90 | Operating Instructions - Page 29
OK MENU BAR OFF VIDEO OUT /LANGUAGE CLOCK SET BEEP LCD BRIGHT INDEX DELETE FILE TOOL SETUP SELECT CLOSE The "Advanced operations" section of this manual refers to selecting and entering items by the above procedure as "Select [item name]." Before performing advanced operations 29 - Sony MVC-FD90 | Operating Instructions - Page 30
/ MOVIE selector. MOVIE/STILL PLAY (single mode) PLAY (INDEX mode) EFFECT FILE CAMERA SETUP SELECT OK MENU BAR OFF INDEX DELETE FILE TOOL SETUP SELECT OK MENU BAR OFF MVC-001F 2000 7 4 10:30PM DELETE FILE TOOL SETUP SELECT SINGLE DISPLAY 2 Select the desired item with v/V/b/B on - Sony MVC-FD90 | Operating Instructions - Page 31
DATE x OFF FILE Item-1 DISK TOOL Item-2 Setting Description PLAY/STILL/ MOVIE selector FORMAT OK Formats a floppy disk (page 52). MOVIE CANCEL Cancels formatting of a floppy STILL disk. PLAY DISK COPY OK Copies all data stored in a floppy disk to another disk (page 50). CANCEL Cancels - Sony MVC-FD90 | Operating Instructions - Page 32
1104 Selects the image size when recording (MVC- still images. FD90 only) x 1280× 960 1280(3:2) 1024×768 640×480 STILL 320×240 Selects the MPEG image size when x 160×112 recording moving images. MOVIE REC MODE TEXT Records a GIF file in black-and-white. STILL VOICE Records an audio file (with - Sony MVC-FD90 | Operating Instructions - Page 33
1104 Changes the recorded image size (MVC- (page 48). FD90 only) 1280×960 1024×768 640×480 x CANCEL PLAY/STILL/ MOVIE selector PLAY PLAY Setting x STBY/ON OFF Description PLAY/STILL/ MOVIE selector Displayed only when you use the AC MOVIE power adaptor in MOVIE or STILL STILL mode. When [ON] is - Sony MVC-FD90 | Operating Instructions - Page 34
off the beep/shutter sound. Adjusts the LCD screen brightness using -/+ on the LCD screen. PLAY/STILL/ MOVIE selector MOVIE STILL PLAY MOVIE STILL PLAY MOVIE STILL PLAY MOVIE STILL PLAY MOVIE STILL PLAY INDEX (Only in PLAY (single) mode) Displays six images at a time (PLAY (INDEX) mode). DELETE - Sony MVC-FD90 | Operating Instructions - Page 35
size. Still image sizes: 1472×1104 (MVC-FD90 only), 1280×960, 1280 (3:2)*, 1024×768, 640×480 ∗ The image is recorded in the ratio of three to two to fit the printing paper size. Moving image sizes: 320×240, 160×112 The number of images or the time that you can record on a floppy disk Image - Sony MVC-FD90 | Operating Instructions - Page 36
record on a floppy disk in VOICE mode Image size Number of images 1472×1104 Approx. 3 (21) (MVC-FD90 only) 1280×960 Approx. 4 (26) 1280 (3:2) Approx. 4 (26) 1024×768 Approx. 6 (37) 640×480 Approx. 12 (74) Numbers in parentheses indicate the number when you use the "Memory Stick" (8 MB - Sony MVC-FD90 | Operating Instructions - Page 37
record on a floppy disk in TEXT mode Image size Number of images 1472×1104 Minimum 5 (29) (MVC-FD90 only) 1280×960 Minimum 7 (40) 1280 (3:2) Minimum 8 (44) 1024×768 Minimum 11 (61) 640×480 Minimum 28 (160) Numbers in parentheses indicate the number when you use the "Memory Stick" (8 MB) (not - Sony MVC-FD90 | Operating Instructions - Page 38
when the auto focus does not work well such as in dark places. MVC-FD85 1 2 MVC-FD90 1 2 1 Set the PLAY/STILL/MOVIE selector to MOVIE or STILL. 2 • MVC-FD85: Press FOCUS repeatedly until a sharp focus is achieved. The 9 (manual focus) indicator appears on the LCD screen. You can select from six - Sony MVC-FD90 | Operating Instructions - Page 39
background, etc. Position the point you want to record at the spot light-metering cross hair. LCD screen 1 Set the PLAY/STILL/MOVIE selector to MOVIE or STILL. 2 Press PROGRAM AE repeatedly to select the desired PROGRAM AE mode. Twilight mode Suppresses the blurring of colors of a bright subject - Sony MVC-FD90 | Operating Instructions - Page 40
. 40 Adjusting the white balance (WHITE BALANCE) Normally the white balance is automatically adjusted. 1 2, 3 1 Set the PLAY/STILL/MOVIE selector to MOVIE or STILL. 2 Select [CAMERA] and then [WHITE BALANCE] from the menu. 3 Select the desired white balance setting. IN DOOR (n) • Places where the - Sony MVC-FD90 | Operating Instructions - Page 41
and time do not appear on the LCD screen during shooting, these appear during playback only. 2000 7 4 1 2, 3 1 Set the PLAY/STILL/MOVIE selector to MOVIE or STILL. 2 Select [EFFECT] and then [P. EFFECT] from the menu. 3 Select the desired mode. SOLARIZE The light contrast is clearer and the picture - Sony MVC-FD90 | Operating Instructions - Page 42
once (INDEX) 1 2 1 Set the PLAY/STILL/MOVIE selector to PLAY. 2 Select [INDEX] on shot in TEXT mode cannot be displayed on the INDEX screen. TEXT MVC-001F 2000 7 4 12:30PM DELETE FILE TOOL SETUP SELECT SINGLE Print mark -: Protect mark TEXT: TEXT file (No mark): Normal recording (no settings) - Sony MVC-FD90 | Operating Instructions - Page 43
Enlarging a part of the still image (Zoom and trimming) 3 1 4 1 Set the PLAY/STILL/MOVIE selector to PLAY. 2 Display the image to be enlarged. 3 Zoom in/out the image with the zoom lever. The zoom scaling indicator appears on - Sony MVC-FD90 | Operating Instructions - Page 44
Playing back the still images in order (SLIDE SHOW) This function is useful for checking the not end until all the images played back, even if it takes more than 20 minutes. 1 Set the PLAY/STILL/MOVIE selector to PLAY. 2 Select [FILE] and then [SLIDE SHOW] from the menu. Set the following items. - Sony MVC-FD90 | Operating Instructions - Page 45
/ VIDEO switch to "VIDEO". A/V connecting cable to AUDIO (MONO)/ VIDEO OUT jack 1 Connect the A/V connecting cable to the AUDIO (MONO)/ VIDEO OUT jack of your camera and to the audio/ video input jacks of the TV. If your TV has stereo type input jacks, connect the audio plug of the A/V connecting - Sony MVC-FD90 | Operating Instructions - Page 46
] in step 2. In INDEX mode 1 Set the PLAY/STILL/MOVIE selector to PLAY, then display the INDEX screen. 2 Select [FILE], [PROTECT], and then [ALL] or [SELECT] from the menu. 3 When you select [ALL] Select [ON]. All the images in the floppy disk are protected. When you select [SELECT] Select all the - Sony MVC-FD90 | Operating Instructions - Page 47
Deleting images (DELETE) Protected images cannot be deleted. 1 2, 3 In single mode 1 Set the PLAY/STILL/MOVIE selector to PLAY, then display the image to be deleted. 2 Select [DELETE] and then [OK] from the menu. The image is deleted. In INDEX mode 1 Set the PLAY/STILL/MOVIE selector to PLAY, then - Sony MVC-FD90 | Operating Instructions - Page 48
STILL/MOVIE selector to PLAY, then display the image of which you want to change the size. 2 Select [TOOL] and then [RESIZE] from the menu. 3 Select the desired size. 1472×1104 (MVC-FD90 COPY) Copies images to another floppy disk. In single mode 3 1 2 1 Set the PLAY/STILL/MOVIE selector to PLAY, then - Sony MVC-FD90 | Operating Instructions - Page 49
To cancel copying part-way Change the PLAY/STILL/MOVIE selector position or turn off the power. Note If you eject and insert the floppy disk without selecting [EXIT] after "COMPLETE" appears, the image will be copied to the floppy disk. Notes on the Floppy Disk Adaptor for Memory Stick • You cannot - Sony MVC-FD90 | Operating Instructions - Page 50
part-way Change the PLAY/STILL/MOVIE selector position or turn off the power. Note If you eject and insert the floppy disk without selecting [EXIT] after "COMPLETE" appears, DISK COPY will be carried out onto the floppy disk. Note on the Floppy Disk Adaptor for Memory Stick You cannot do DISK - Sony MVC-FD90 | Operating Instructions - Page 51
still images recorded with your camera. This mark is convenient when you have images printed at a shop that conforms with the DPOF (Digital Print Order Format The marks on all images are removed. To print out using the FVP-1 Mavica Printer Set PRESET SELECT SW to PC on the printer. Note You cannot - Sony MVC-FD90 | Operating Instructions - Page 52
[DISK TOOL], [FORMAT], and then [OK] from the menu. To cancel formatting Select [CANCEL] in step 2. Notes • When you format the disk, be sure to use a fully charged battery pack or the AC power adaptor as the power source. • If you use the Floppy Disk Adaptor for Memory Stick, you can format "Memory - Sony MVC-FD90 | Operating Instructions - Page 53
your camera, causing a malfunction. On floppy disks To protect data recorded on floppy disks, note the following: • Avoid storing floppy disks condensation When bringing the camera from a cold place to a warm place, seal the camera in a plastic bag and allow it to adapt to conditions at the - Sony MVC-FD90 | Operating Instructions - Page 54
floppy disk, then turn off the camera and wait about an hour for the moisture to evaporate. Note that if you attempt to record with moisture remaining inside the lens, you will be unable to record clear images. On AC power the metal parts of the battery pack • Use only the specified charger - Sony MVC-FD90 | Operating Instructions - Page 55
problem occurs, unplug your camera and contact your nearest Sony dealer. Using your camera abroad Power sources You can use your camera in any country or area with the supplied battery charger of your digital still camera. TV color systems differ from country to country. Check the following list: 55 - Sony MVC-FD90 | Operating Instructions - Page 56
Troubleshooting If you experience trouble with your camera, first check the following items. Should your camera still not operate properly after you have made these checks, consult your Sony dealer or local authorized Sony service facility. If code displays (C:ss:ss) appear on the LCD screen, the - Sony MVC-FD90 | Operating Instructions - Page 57
• The camera is in one of the following PROGRAM AE modes: Twilight, Twilight plus, or Landscape. t Cancel the PROGRAM AE function or set the flash to (page 19, 39). • The PLAY/STILL/MOVIE selector is set to MOVIE. t Set it to STILL. • When using the Floppy Disk Adaptor for Memory Stick, writing and - Sony MVC-FD90 | Operating Instructions - Page 58
protected. t Cancel the protection (page 46). • With the PLAY/STILL/MOVIE selector set to STILL or MOVIE, if you do not operate the camera for about three minutes while the power is on, the camera turns off automatically to prevent wearing down the battery pack. t Turn on the camera. • The battery - Sony MVC-FD90 | Operating Instructions - Page 59
FORMAT ERROR DISK PROTECT DISK FULL NO FILE FILE ERROR FILE PROTECT DISK ERROR NOT ENOUGH MEMORY IMAGE SIZE OVER INVALID OPERATION for "InfoLITHIUM" battery only - NOT ENOUGH FD ADAPTOR'S BATTERY COULDN'T RECORD Meaning There is trouble with the disk drive. No disk has been inserted. • The floppy - Sony MVC-FD90 | Operating Instructions - Page 60
Message INVALID OPERATION DISK ERROR Meaning The battery level of the Floppy Disk Adaptor for Memory Stick is too low to do some operations. • The battery level of the Floppy Disk Adaptor for Memory Stick is too low to operate. • Trouble has occurred on the Floppy Disk Adaptor for Memory Stick. 60 - Sony MVC-FD90 | Operating Instructions - Page 61
is trouble with the disk drive. t Turn the power off and on again. • An unformatted floppy disk is inserted. t Format the floppy disk. (page 52) • An disk not compatible with this camera is inserted. t Change the disk. (page 14) • The battery level of the Floppy Disk Adaptor for Memory Stick is - Sony MVC-FD90 | Operating Instructions - Page 62
inches) when converted into a 35 mm still camera) MVC-FD85: F = 2.8 - 2.9 MVC-FD90: F = 2.8 - 3.0 Exposure control Automatic exposure White balance Automatic, Indoor, Outdoor, Hold Data compression system Movie: MPEG1 Still: Floppy disk: JPEG (JFIF) "Memory Stick": JPEG (Exif2.1) GIF (in TEXT mode - Sony MVC-FD90 | Operating Instructions - Page 63
1280 3:2 10 REC 0 : 0 3 15s EFFECT FILE CAMERA SETUP SELECT OK MENU BAR OFF qs qd qf qg qh mode indicator/Macro indicator D Battery remaining indicator E Flash level level indicator K Menu bar and guide menu They appear by pressing v images O Remaining disk capacity indicator P Recording - Sony MVC-FD90 | Operating Instructions - Page 64
The indicators during still image playback 120min 1280 11/12 MVC-011S 2000 7 4 12:00AM A Recording mode indicator B Image size indicator C Image number D Remaining disk capacity indicator E Number of stored images on a floppy disk F Print mark indicator G Protect indicator/Zoom scaling indicator - Sony MVC-FD90 | Operating Instructions - Page 65
image file indicator B Image size indicator C Image number/number of stored images on a floppy disk D Remainig disk capacity indicator E Counter F Playback image G Playback bar H Menu bar and guide menu I Image searching buttons J Playback buttons B is displayed during stop, and X during playback - Sony MVC-FD90 | Operating Instructions - Page 66
- Sony MVC-FD90 | Operating Instructions - Page 67
- Sony MVC-FD90 | Operating Instructions - Page 68
12 Control button 28 COPY 48 D DELETE 47 , DEMO 33 DIGITAL ZOOM .. 17 33 DISK COPY 50 DISK TOOL 31 DPOF 51 E Editing COPY 48 DELETE 47 PROTECT 46 E-MAIL 36 F FILE NUMBER 31 FLASH LEVEL 33 Floppy disk Copying 50 Format 52 Inserting 14 Number of recordable images 35 Usable type 14
-
 1
1 -
 2
2 -
 3
3 -
 4
4 -
 5
5 -
 6
6 -
 7
7 -
8
-
9
-
10
-
11
-
12
-
13
-
14
-
15
-
16
-
17
-
18
-
19
-
20
-
21
-
22
-
23
-
24
-
25
-
26
-
27
-
28
-
29
-
30
-
31
-
32
-
33
-
34
-
35
-
36
-
37
-
38
-
39
-
40
-
41
-
42
-
43
-
44
-
45
-
46
-
47
-
48
-
49
-
50
-
51
-
52
-
53
-
54
-
55
-
56
-
57
-
58
-
59
-
60
-
61
-
62
-
63
-
64
-
65
-
66
-
67
-
68
 |
 |
3-060-831-
12
(1)
Digital Still Camera
Operating Instructions
Before operating the unit, please read this manual thoroughly, and retain it
for future reference.
Owner’s Record
The model and serial numbers are located on the bottom. Record the serial
number in the space provided below. Refer to these numbers whenever you
call upon your Sony dealer regarding this product.
Model No. ________________________
Serial No. ________________________
©2000 Sony Corporation
MVC-FD85/FD90
MVC-FD90