Sony SLV-N51 Operating Instructions
Sony SLV-N51 - Video Cassette Recorder Manual
 |
View all Sony SLV-N51 manuals
Add to My Manuals
Save this manual to your list of manuals |
Sony SLV-N51 manual content summary:
- Sony SLV-N51 | Operating Instructions - Page 1
Instructions For customers in the USA If you have any questions about this product, you may call: Sony Customer Information Services Center 1-800-222-SONY (7669) or write to: Sony Customer Information Services Center 6900-29 Daniels Parkway, PMB 330, Fort Myers, FL 33912 SLV-N51 © 2001 Sony - Sony SLV-N51 | Operating Instructions - Page 2
user to the presence of important operating and maintenance (servicing) instructions location, moisture may condense inside the VCR and cause damage to the video head and tape. When you first install experienced radio/TV technician for help. Owner's record The model and serial numbers are located at - Sony SLV-N51 | Operating Instructions - Page 3
instructions completely before operating the appliance, and keep this manual for future reference. Carefully observe all warnings, precautions and instructions on the appliance, or the one described in the operating instructions parts that Cleaning Unplug the set from the wall outlet before cleaning - Sony SLV-N51 | Operating Instructions - Page 4
operating instructions. Improper adjustment of other controls may result in damage and will often require extensive work by a qualified technician to restore the set to normal operation. • When the set exhibits a distinct change in performance - this indicates a need for service. Servicing Do not - Sony SLV-N51 | Operating Instructions - Page 5
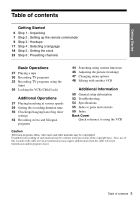
up the remote commander stereo and bilingual programs 44 Searching using various functions 46 Adjusting the picture (tracking) 47 Changing menu options 48 Editing with another VCR Additional Information 50 General setup information 52 Troubleshooting 54 Specifications 55 Index to parts and controls - Sony SLV-N51 | Operating Instructions - Page 6
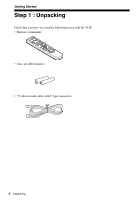
Getting Started Step 1 : Unpacking Check that you have received the following items with the VCR: • Remote commander • Size AA (R6) batteries • 75-ohm coaxial cable with F-type connectors 6 Unpacking - Sony SLV-N51 | Operating Instructions - Page 7
(•) can be used to operate your Sony TV. Remote sensor •TV / VIDEO To operate the VCR a Sony TV 123 Set •TV / VIDEO to VIDEO and point at the remote sensor at the VCR •TV and point at the remote sensor at the TV Notes • With normal use, the batteries should last about three to six months. • If - Sony SLV-N51 | Operating Instructions - Page 8
of the remote commander to •TV. 2 Hold down ?/1, and enter your TV's code number using the number buttons. Then release ?/1. Now you can use the ?/1, VOL +/-, CH +/-, and TV/VIDEO buttons to control your TV. You can also use the buttons marked with a dot (•) to control a Sony TV. To control the VCR - Sony SLV-N51 | Operating Instructions - Page 9
below. Then use the accompanying diagrams and procedures on the following pages to set up your VCR. If your TV has audio/ , follow the instructions for setup. After you've completed the setup, you're ready to use your VCR. Procedures differ depending Sony dealer or qualified technician. Hookups 9 - Sony SLV-N51 | Operating Instructions - Page 10
, and then go to the following pages for antenna or cable hookups. A Use this hookup if your TV has stereo jacks VCR LINE LINE OUT IN 1 AUDIO VIDEO TV IN VIDEO AUDIO AUDIO OUT Stereo receiver AUX IN Audio/video cable (not supplied) Audio cable (not supplied) B Use this hookup if your TV - Sony SLV-N51 | Operating Instructions - Page 11
should be made only as shown in the following instructions. Failure to do so may result in operation that violates the regulations of the Federal Communications Commission regarding the use and operation of RF devices. Never connect the output of the VCR to an antenna or make simultaneous (parallel - Sony SLV-N51 | Operating Instructions - Page 12
antenna (you get channels 14 and higher) • Separate VHF and UHF antennas VCR IN OUT Rear of TV VHF/UHF A Match the type of connector on this hookup if you're using a VHF-only antenna (you get channels 2-13 only) VCR IN OUT Rear of TV VHF/UHF A Match the type of connector on your or TV - Sony SLV-N51 | Operating Instructions - Page 13
/disabling channels manually" on page 25. Notes • If you connect the AC power cord before the antenna connections are completed, the channels may be incorrectly set. If this happens, go to "Step 6 :Presetting channels" on page 23. • Do not press any buttons on the VCR or remote commander during - Sony SLV-N51 | Operating Instructions - Page 14
a few channels. What you can do with this hookup • Record any unscrambled channel by selecting the channel on the VCR What you can't do • Record scrambled channels that require a cable box Wall VCR IN OUT Connect this cable directly to your TV if you don't have a cable box. Cable box IN OUT - Sony SLV-N51 | Operating Instructions - Page 15
/disabling channels manually" on page 25. Notes • If you connect the AC power cord before the antenna connections are completed, the channels may be incorrectly set. If this happens, go to "Step 6 :Presetting channels" on page 23. • Do not press any buttons on the VCR or remote commander during - Sony SLV-N51 | Operating Instructions - Page 16
cable box What you can't do • Record with the cable box turned off • Record one channel while watching another channel Wall Cable box IN OUT VCR IN OUT Rear of TV VHF/UHF A Match the type of connector on your or TV: A, B, or C. VHF For connector B types B and C, no or UHF - Sony SLV-N51 | Operating Instructions - Page 17
A/V connections, set the TV to video input. • Press TV/VIDEO to display the VCR indicator in the VCR's display window. 1 MENU Press MENU. MENU M/m/, OK MAIN MENU Timer set / check Clock set Tuner preset Advanced options Language / Idioma / Langue Select : Vv Set : OK Quit : MENU 2 Press - Sony SLV-N51 | Operating Instructions - Page 18
the VCR's display window. 1 MENU Press MENU. 2 Press M/m to move the cursor (B) to "Clock set," then press OK. PLAY OK MENU M/m/ - Sony SLV-N51 | Operating Instructions - Page 19
. (Hawaii) y AUTO Select : Vv End : OK Set : Bb Quit : MENU • For "Daylight Saving" Select YES or NO (standard time), or AUTO to have the VCR automatically set the daylight saving time. CLOCK SET Clock set CH: Time zone: Daylight Saving: [ AUTO ] [ AUTO ] [ NO ] Select : Vv End : OK Set : Bb - Sony SLV-N51 | Operating Instructions - Page 20
Notes • The clock cannot be set automatically if you don't receive a channel that carries a time signal in your area. If so, set the clock manually (see page 21). • If there are only a few channels in your area that carry time signals, setting the clock automatically may take up to about - Sony SLV-N51 | Operating Instructions - Page 21
in the VCR's display window. MENU M/m/, OK 1 MENU Press MENU. MAIN MENU Timer set / check Clock set Tuner preset Advanced options Language / Idioma / Langue Select : Vv Set : OK Quit : MENU 2 Press M/m to move the cursor (B) to "Clock set," then press OK. PLAY OK CLOCK SET AUTO MANUAL - Sony SLV-N51 | Operating Instructions - Page 22
4 Press M/m to set the month. PLAY OK CLOCK SET DATE YEAR TIME 9 / 0 1 2 0 0 1 SAT 12 : 0 0 AM Select : Bb End : OK Set : Vv Quit : MENU 5 Press , to flash the day and press M/m to set the day. PLAY OK CLOCK SET DATE YEAR TIME 9 / 2 8 2 0 0 1 FRI 12 : 0 0 AM Select : Bb End : OK - Sony SLV-N51 | Operating Instructions - Page 23
manually. If you have already decided which channels you wish to preset, set them directly using manual VCR using A/V connections, set the TV to video input. • Press TV/VIDEO to display the VCR indicator in the VCR's display window. 1 MENU Press MENU. 2 Press M/m to move the cursor (B) to "Tuner - Sony SLV-N51 | Operating Instructions - Page 24
Channel add / erase • To preset VHF and UHF channels: PLAY Press - Sony SLV-N51 | Operating Instructions - Page 25
TV to video input. • Press TV/VIDEO to display the VCR indicator in the VCR's display window. 123 456 789 0 Number buttons, ENTER CH +/- MENU M/m/ - Sony SLV-N51 | Operating Instructions - Page 26
3 1 2 3 • To preset a channel: 4 5 6 1 Press the number buttons to enter the 789 channel number, then press ENTER. 0 2 Press ,, then press OK or MENU. PLAY OK MENU Channel to be preset CHANNEL ADD / ERASE Select channel: [ 1] and press press End : OK [ b ] to ADD [ B ] to ERASE Quit : - Sony SLV-N51 | Operating Instructions - Page 27
DISPLAY REPLAY X PAUSE COMMERCIAL SKIP H PLAY M FF x STOP m REW Basic Operations 1 Turn on your TV and set it to the video channel. 2 Insert a tape. The VCR turns on and starts playing automatically if you insert a tape with its safety tab removed. continued Playing a tape 27 - Sony SLV-N51 | Operating Instructions - Page 28
the scene you want to watch again. During playback, press REPLAY. The VCR rewinds the tape about ten seconds on the counter for each press of and restart playback. During playback, press COMMERCIAL SKIP up to four times. The VCR skips the tape 30 seconds on the counter for each press of the button, - Sony SLV-N51 | Operating Instructions - Page 29
To display the counter on the TV screen, press DISPLAY. Notes • Tapes recorded in the LP mode on other VCRs can be played back on this VCR but the picture quality cannot be guaranteed. • While displaying a menu on the TV screen, you cannot use H PLAY, X PAUSE, M FF, m REW, or x STOP buttons. • The - Sony SLV-N51 | Operating Instructions - Page 30
Recording TV programs 123 456 789 0 TV/VIDEO COUNTER/ REMAIN DISPLAY SP/EP CH +/- z REC x STOP 1 Turn on your TV and set it to the video channel. To record from a cable box, turn it on. 2 Insert a tape with its safety tab in place. 30 Recording TV programs - Sony SLV-N51 | Operating Instructions - Page 31
) provides recording time three times as long as SP (Standard Play). However, SP produces better picture and audio quality. VCR 5 REC Press z REC to start recording. "REC" appears in the display window. VCR To stop recording Press x STOP. To check the remaining tape length Press DISPLAY. With - Sony SLV-N51 | Operating Instructions - Page 32
1 Press TV/VIDEO to turn off the VCR indicator in the display window. 2 If the TV is connected to the VCR's LINE OUT jacks, set the TV to tab Tips • To select a channel, you can use the number buttons on the remote commander. Enter the channel number, then press ENTER. • You can select a video - Sony SLV-N51 | Operating Instructions - Page 33
Recording TV programs using the timer You can preset up to eight programs at a time. Before you start... • Check that the VCR clock is set to the correct time. • Turn on your TV and set it to the video channel. When using a cable box, turn it on. • - Sony SLV-N51 | Operating Instructions - Page 34
to exit the menu. 6 Press ?/1 to turn off the VCR. The TIMER indicator appears in the display window and the VCR stands by for recording. When using a cable box, leave it on. To stop recording To stop the VCR while recording, press x STOP. Daily/weekly recording In step 3 - Sony SLV-N51 | Operating Instructions - Page 35
VCR after setting the timer To use the VCR before timer recording begins, just press ?/1. The VCR switches on. The VCR will start recording at the preset time even if the VCR in stop mode. You can also do the following tasks while the VCR is recording: • Reset the counter (page 29). • Display tape - Sony SLV-N51 | Operating Instructions - Page 36
timer recordings. To unlock the VCR Hold down ?/1 POWER on the VCR until "LOC" disappears from the display window. The VCR is unlocked and turns on. To stop timer recording while the VCR is locked, press x STOP. The recording stops and the VCR is unlocked. Note • The VCR will be unlocked when: - You - Sony SLV-N51 | Operating Instructions - Page 37
normal speed During playback, press ×2. Play in slow motion During playback or pause, press y SLOW. Play frame by frame During pause, press M FF on the remote commander. To resume normal playback Press H PLAY. Additional Operations continued Playing/searching at various speeds 37 - Sony SLV-N51 | Operating Instructions - Page 38
The picture shakes during pause. Notes • The sound is muted during these operations. • Tapes recorded in the LP mode on other VCRs can be played back on this VCR but the picture quality cannot be guaranteed. • The picture may show noise when playing at high speed in reverse. 38 Playing/searching at - Sony SLV-N51 | Operating Instructions - Page 39
the time in increments of 30 minutes. 0:30 1:00 3:30 4:00 Normal recording The tape counter decreases minute by minute to 0:00, then the VCR stops recording and turns off automatically. To extend the duration Press z REC repeatedly to set a new duration time. To cancel the duration Press z REC - Sony SLV-N51 | Operating Instructions - Page 40
Before you start... • Turn on your TV and set it to the video channel. ?/1 123 456 789 0 CLEAR MENU M/m/ - Sony SLV-N51 | Operating Instructions - Page 41
Select : Bb Set : Vv End : OK Quit : MENU 4 Press OK. 5 Press MENU to exit the menu. If any timer settings remain, turn off the VCR to return to recording standby. When the timer settings overlap The program that starts first has priority and the second program starts recording only after - Sony SLV-N51 | Operating Instructions - Page 42
. If there is noise in the stereo program, select MONO. The sound will be recorded in monaural (on both hi-fi and normal audio tracks) but with VCR records only the main sound. Selecting the sound during playback During playback, press AUDIO MONITOR to select the sound you want. To listen to Stereo - Sony SLV-N51 | Operating Instructions - Page 43
a video tape The VCR records sound onto two separate tracks. Hi-fi audio is recorded onto the main track along with the picture. Monaural sound is recorded onto the normal audio track along the edge of the tape. Normal audio track Monaural sound Hi-fi audio track (main track) Stereo sound (left - Sony SLV-N51 | Operating Instructions - Page 44
H PLAY To search using the index function (Scan and Play) The VCR marks the tape with an index signal at the point where each recording begins. Use these signals as references to find a specific recording. 1 Press SEARCH. Scan and play: Press [ B ] or [ b ] Go to [ 0 : 0 0 : 0 0 ] : Press - Sony SLV-N51 | Operating Instructions - Page 45
searching and automatically stops at the 0:00:00 point. Go to [ 0 : 0 0 : 0 0 ] 0 : 0 1 : 3 0 SP To search for a blank portion of the tape The VCR automatically searches for the beginning of a blank portion. You can easily find a point you can start recording from. 1 Press SEARCH. 2 Press - Sony SLV-N51 | Operating Instructions - Page 46
adjusts the tracking when playing a tape, distortion may occur if the recording is in poor condition. In this case, manually adjust the tracking. Press TRACKING +/- on the VCR to display the tracking meter. The distortion should disappear as you press one of the two tracking buttons. To resume - Sony SLV-N51 | Operating Instructions - Page 47
the VCR is turned off with the tape inserted. • OFF to turn off Auto play. You need to press ?/1 and then H PLAY to start playback, when the VCR is VCR automatically one hour after the last operation. • 2Hr to turn off the VCR automatically two hours after the last operation. • OFF to set no specific - Sony SLV-N51 | Operating Instructions - Page 48
cable (not supplied) : Signal flow Notes • Make sure you connect the plugs to jacks of the same color. • If the other VCR is a monaural type and connected to this VCR's LINE-2 IN jacks, connect the audio plug to the AUDIO L (white) jack. The sound is recorded on both right and left channels - Sony SLV-N51 | Operating Instructions - Page 49
. • Press SP/EP to select the tape speed, SP or EP. X PAUSE z REC 1 Insert a source tape with its safety tab removed into the other (playback) VCR. Search for the point to start playback and set it to playback pause. 2 Insert a tape into this (recording - Sony SLV-N51 | Operating Instructions - Page 50
used in your area. If both are used, set the switch to either channel. 2 Press ?/1 POWER to turn on the VCR. 3 Press TV/VIDEO to turn on the VCR indicator in the VCR's display window. 4 Press CHANNEL +/- to display a channel number in the display window. Select an active channel number in your area - Sony SLV-N51 | Operating Instructions - Page 51
the EAC-32 antenna connector (not supplied) to connect the antenna to the VCR. 300-ohm twin lead cable EAC-32 antenna connector (not supplied) 1 Loosen UHF/VHF band separator/mixer (not supplied) to connect the antenna to the VCR. 300-ohm twin lead cable EAC-66 UHF/VHF band separator/ mixer (not - Sony SLV-N51 | Operating Instructions - Page 52
the VCR. If you are using a monitor, set it to video input. • Adjust the tracking with the TRACKING +/- buttons. • The video heads are dirty (see the last page of "Troubleshooting"). Clean the video heads using the Sony T-25CLD or T-25CLDR video head cleaning cassette. If these cleaning cassettes - Sony SLV-N51 | Operating Instructions - Page 53
recording Others Symptom The timer does not operate. A tape cannot be inserted. The remote commander does not function. The tracking meter does not appear on the screen. You cannot control other TVs. The VCR needs to be cleaned. Remedy • Check that the clock is set. • Make sure a tape has been - Sony SLV-N51 | Operating Instructions - Page 54
. 14 14 × 3 34 × 10 1 8 inches) including projecting parts and controls Mass Approx. 2.6 kg (6 lb 3 oz) Supplied accessories Remote commander (1) Size AA (R6) batteries (2) 75-ohm coaxial cable with F-type connectors (1) Design and specifications are subject to change without notice. ENERGY STAR® is - Sony SLV-N51 | Operating Instructions - Page 55
Index to parts and controls Refer to the pages indicated in parentheses ( ) for details. Front panel A ?/1 POWER switch (34) B Z EJECT button (28) C Remote sensor (7) D Tape compartment E m REW (rewind) button (28) (37) F H PLAY button (28) G M FF (fast-forward) button (28) (37) H x STOP button ( - Sony SLV-N51 | Operating Instructions - Page 56
indicator (29) (31) (49) E VCR indicator (32) (50) A AC power cord (9) (13) (15) B LINE OUT AUDIO R/L/VIDEO jacks (10) C LINE IN 1 AUDIO R/L/VIDEO jacks (48) D RF IN (FROM ANT.) connector (12) (14) (16) E RF OUT (TO TV) connector (12) (14) (16) F CH 3/4 switch (50) 56 Index to parts and controls - Sony SLV-N51 | Operating Instructions - Page 57
Remote commander 123 456 789 0 A •TV / VIDEO switch (7) B Z EJECT button (28) C TV/VIDEO button (8) (32) D DISPLAY button (31) E SP ( REW (rewind)/ < button (28) (37) M FF (fast-forward)/ , button (28) (37) H PLAY/OK button (17) (28) Additional Information continued Index to parts and controls 57 - Sony SLV-N51 | Operating Instructions - Page 58
) P ENTER button (32) Q CH (channel) +/- buttons (8) (31) R VOL (volume) +/- buttons (8) S SEARCH button (44) T REPLAY button (28) U ×2 button (37) V COMMERCIAL SKIP button (28) 58 Index to parts and controls - Sony SLV-N51 | Operating Instructions - Page 59
Lock 36 Cleaning the video heads 52 Clock setting 18 Commercial Skip 28 Connecting Cable TV 16 external antenna connector 51 UHF/VHF band mixer 51 Counter 29 D Disabling channels 25 Dubbing. see Editing E Editing 48 EP mode 31 H Hi-fi audio track 43 L Language selecting 17 Locking the VCR - Sony SLV-N51 | Operating Instructions - Page 60
TV 1 Turn off your VCR, or press the VCR's TV/ VIDEO button until the VCR indicator in the display window turns off. 2 Turn on your cable box. 3 Set the TV to the cable box output channel (usually 2, 3, or 4). 4 Set the cable box to the channel you want to watch. Sony Corporation Printed in China
-
 1
1 -
 2
2 -
 3
3 -
 4
4 -
 5
5 -
 6
6 -
 7
7 -
8
-
9
-
10
-
11
-
12
-
13
-
14
-
15
-
16
-
17
-
18
-
19
-
20
-
21
-
22
-
23
-
24
-
25
-
26
-
27
-
28
-
29
-
30
-
31
-
32
-
33
-
34
-
35
-
36
-
37
-
38
-
39
-
40
-
41
-
42
-
43
-
44
-
45
-
46
-
47
-
48
-
49
-
50
-
51
-
52
-
53
-
54
-
55
-
56
-
57
-
58
-
59
-
60
 |
 |
3-066-196-
11
(2)
Video Cassette
Recorder
Operating Instructions
For customers in the USA
If you have any questions about this product, you may call:
Sony
Customer Information Services Center
1-800-222-SONY (7669) or
write to:
Sony Customer Information Services Center
6900-29
Daniels Parkway, PMB 330, Fort Myers, FL 33912
SLV-N51
© 2001 Sony Corporation