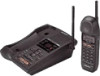
Sony SPP-A972 Operating Instructions
Sony SPP-A972 - Cordless Telephone With Answering System Manual
 |
View all Sony SPP-A972 manuals
Add to My Manuals
Save this manual to your list of manuals |
Sony SPP-A972 manual content summary:
- Sony SPP-A972 | Operating Instructions - Page 1
3-221-211-12 (1) 2-Line Cordless Telephone with Answering System Operating Instructions US SPP-A972 ©2000 Sony Corporation - Sony SPP-A972 | Operating Instructions - Page 2
Owner's Record The model and the serial numbers are located at the bottom of the unit. Record the serial number in the space provided below. Refer to these numbers whenever you call upon your Sony dealer regarding this product. Model No. SPP-A972 Serial No 2US - Sony SPP-A972 | Operating Instructions - Page 3
IMPORTANT SAFETY INSTRUCTIONS When using your telephone equipment, basic safety precautions should always be followed to reduce the risk of fire, electric shock and injury to persons, including the following: 1. Read and understand all instructions. 2. Follow all warnings and instructions marked on - Sony SPP-A972 | Operating Instructions - Page 4
to maintain uninterrupted service. 7. If trouble is experienced with this equipment (SPP-A972), for repair or warranty information, please contact Sony Direct Response Center: Tel 1-800-222-7669. If the equipment is causing harm to the telephone network, the telephone company may request - Sony SPP-A972 | Operating Instructions - Page 5
manual could void your authority to operate this equipment. Note This equipment has been tested and found to comply with the limits for a Class B digital device, pursuant to Part can be determined by turning the equipment off and on, the user is encouraged to try to correct the interference by one or - Sony SPP-A972 | Operating Instructions - Page 6
Preparing the battery pack 17 Step 4: Entering the area code 20 Identifying the parts Basics 24 Making calls 26 Redialing 27 Making another call while talking 28 Receiving calls 31 Receiving a call while talking Telephone Features 32 Phone Directory 32 Storing phone numbers and names - Sony SPP-A972 | Operating Instructions - Page 7
the number of digits of the phone number 69 Using "Caller ID with call waiting" service Additional Information 70 Mounting the base unit on a wall 71 Carrying the handset by the belt clip 72 Notes on power sources 73 Maintenance 74 Troubleshooting 78 Specifications 79 Index Back cover LIMITED - Sony SPP-A972 | Operating Instructions - Page 8
9) First, unpack the phone and the supplied accessories. Step 2 (pages 10 to 13) Next, you need to do three things to set up the base unit, including finding the best location for the base unit. Base unit Step 3 (pages 14 to 15) Then, insert the battery pack into the handset and charge it - Sony SPP-A972 | Operating Instructions - Page 9
you have received the following items in the package. If anything is missing, contact your local Sony dealer. Getting Started AC power adaptor (AC-T131) Base unit Handset Telephone line cords (3) Wall bracket for base unit Rechargeable battery pack (BP-T23) Belt clip Getting Started 9US - Sony SPP-A972 | Operating Instructions - Page 10
Where you place the base unit affects the reception quality of the handset. Away from noise sources such as a window by a street with the base or move base unit away from other noise sources. • The cordless telephone operates at a frequency that may cause interference to nearby TVs and VCRs; - Sony SPP-A972 | Operating Instructions - Page 11
AC outlet To DC IN 9V 2 AC power adaptor (supplied AC-T131) DATA jack 1 Telephone line cord (supplied) To L1/L1+L2 To the telephone outlet 1 Connect the telephone line cord to the L1/L1+L2 jack and to a telephone outlet. 2 Connect the AC power adaptor to the DC IN 9V jack and to - Sony SPP-A972 | Operating Instructions - Page 12
the cord. To an AC outlet To DC IN 9V 2 AC power adaptor (supplied AC-T131) To the telephone outlets To L1/L1+L2 Line 1 Telephone line cord (supplied) 1 Telephone line cord (supplied) DATA jack To L2 Line 2 1 Connect the telephone line cords to the L1/L1+L2 and L2 jacks and to the - Sony SPP-A972 | Operating Instructions - Page 13
telephone outlet is not modular, contact your telephone service company for assistance. L1 • L1 is the first phone line connected to center pair of wires. L2 is the second phone the telephone line cord to the L2 jack. SPP-A972 To DATA Computer or FAX Choose the dialing mode For the telephone to - Sony SPP-A972 | Operating Instructions - Page 14
before you start using your phone. 1 Slide open the battery compartment lid of the handset. BP-T23 2 Insert the battery pack (with contacts facing down) into the battery compartment. CHARGE lamp 14US Getting Started 3 Close the battery compartment lid. 4 Place the handset on the base unit. You - Sony SPP-A972 | Operating Instructions - Page 15
in use. • If you leave the battery pack in the handset without charging it, the battery pack will be completely discharged. It may battery has expired and needs replacement. Contact your local Sony authorized dealer or service center, and ask for a Sony BP-T23 rechargeable battery pack. Note Battery - Sony SPP-A972 | Operating Instructions - Page 16
Step 3: Preparing the battery pack (continued) Handset spare battery usage As only one battery pack is supplied with this unit, it is necessary to purchase an additional battery pack (not supplied) for use as a handset spare battery pack. 1 Open the battery compartment lid of the base unit. BP-T23 - Sony SPP-A972 | Operating Instructions - Page 17
this phone and the Caller ID functions. This is also necessary because the phone must telephone to take advantage of this system. See "To enter the local area code (For 10 digits phone number users)" To enter the local area code (For 10 digits phone number users)" on page 18. To enter your home area - Sony SPP-A972 | Operating Instructions - Page 18
Notes • If the home area code is already entered, it appears on the display in step 4. To enter a different home area code, see "To change local area code (For 10 digits phone numbers users) If a call matches one of the local area codes you entered, the phone number will be registered with 10 digits - Sony SPP-A972 | Operating Instructions - Page 19
using the dialing keys. 7 Press (PGM). You will hear a long confirmation beep. Notes • If the local area code is already entered, it appears on the display in step 5. To enter a different local area code, see "To change the local area code" below. • Do not allow more than 20 seconds to elapse - Sony SPP-A972 | Operating Instructions - Page 20
Identifying the parts Refer to the pages indicated in parentheses for details. Base Unit 1 qh 2 3 . 20US Getting Started 7 Battery compartment (p. 16) 8 SPARE BATTERY lamp (p. 16) Lights while the spare battery is being charged. 9 CHARGE lamp (p. 14) Lights while the battery is being charged. 0 - Sony SPP-A972 | Operating Instructions - Page 21
in the Caller ID list. w; ANSWER ON/OFF button (p. 52) Turns the answering function on or off. wa VOLUME to a second call if you have "call waiting" service. wh PLAY/STOP (MAILBOX 1, 2, 3) buttons (p. 40) Lets you talk by using the base unit and handset. wk Hook for AC power adaptor cord (p. 11) wl - Sony SPP-A972 | Operating Instructions - Page 22
by using the base unit and handset. 6 HOLD button (p. 25) Puts a call on hold. 7 Battery compartment (p. 14) 8 TONE Display window (p. 24, 61) qa OFF button (p. 24) Allows you to disconnect the call. qs FLASH/CALL WAITING button (p. 29, 69) Switches to a second call if you have "call waiting" service - Sony SPP-A972 | Operating Instructions - Page 23
button (p. 26, 33) Redials the last number called/ inserts a pause in the dialing sequence. qh PGM (program) button (p. 17, 32) Used to store numbers in Phone Directory. qj Microphone qk I (HEADSET) jack (p. 24, 28, 71) ql VOL (volume) switch (p. 25) Adjusts the - Sony SPP-A972 | Operating Instructions - Page 24
base unit double flashes in succession. If "CHANNEL SEARCHING..." appears on the display, move closer to the base unit. 3 Dial the phone number. 4 When you're done talking, press (OFF) or replace the handset on the base unit. The display and the LINE 1 or LINE 2 button go off. Making calls when the - Sony SPP-A972 | Operating Instructions - Page 25
call The handset will beep every three seconds five times and E and "BATTERY LOW" appears on the display. Finish your call and charge the battery pack. For optimum performance, charge the battery for a full 12 hours. Note that during the first 10 - 15 minutes of charging, the phone will be inactive - Sony SPP-A972 | Operating Instructions - Page 26
) If you have a spare battery You can replace the battery pack without disconnecting the call during a conversation. To replace the battery pack, perform the following procedure. 1 Press (HOLD) on the handset. The call is on hold and "HOLD" appears on the display. 2 Replace the battery pack. 3 Press - Sony SPP-A972 | Operating Instructions - Page 27
on line 2 while talking on line 1 1 Press (HOLD) while talking. The line 1 is put on hold and the LINE 1 button flashes slowly. 2 Press (LINE 2). 3 Dial a phone number for the second party. Now you can talk to the second party on line 2. 4 To put on hold line 2 and resume the conversation on - Sony SPP-A972 | Operating Instructions - Page 28
phone ring, press (LINE 1) or (LINE 2) whichever button is flashing. The corresponding line button lights up. I (HEADSET) jack VOL switch "TALK" appears on the display and the display 're done talking, press (OFF) or replace the handset on the base unit. The display and the LINE 1 or LINE 2 button - Sony SPP-A972 | Operating Instructions - Page 29
of the handset" on page 38. * You need to subscribe to the service from your telephone company. Note If another call comes in by "call waiting" service while conversing with an outside caller, you will hear two short beeps. Tip To inform you of an incoming call, the display shows "** RINGING - Sony SPP-A972 | Operating Instructions - Page 30
return to the first caller. * You need to subscribe to the service from your telephone company. Note Even when you set the L1 or L2 RINGER LEVEL switch on the base unit to OFF, the handset will ring when the ringer of the handset is turned on (see page 38). Tips • To inform you - Sony SPP-A972 | Operating Instructions - Page 31
line button on the base unit will flash. • If another call comes in while talking on the handset, a ringer tone will be heard once through the handset and the corresponding line button on the handset will flash. At this time, the base unit will ring and the corresponding line button will flash - Sony SPP-A972 | Operating Instructions - Page 32
Telephone Features Phone Directory You can dial a number by scrolling through the Phone Directory, in which up to 50 phone numbers can be stored. Storing phone numbers and names Example: to store "SONY" "123-4567". Turn Press 1 Press (PGM). (Be sure not to press (LINE 1) and (LINE 2).) - Sony SPP-A972 | Operating Instructions - Page 33
digits or more has been entered, the phone number appears in two lines. SONY 1234567 1234567890123456 12 6 Press (PGM). You will hear a long confirmation beep, and the name and the number are stored. The display goes off. Notes • If you intend to save a 51st phone number, you will hear five short - Sony SPP-A972 | Operating Instructions - Page 34
a long confirmation beep and the name and/or the number is changed. SONY 1234567 SMITH 1234567 Tip When the phone number of 17 digits or more has been entered, "-" is displayed next to 15th digit and then the all digits are displayed in two lines after about two seconds. 34US Telephone Features - Sony SPP-A972 | Operating Instructions - Page 35
Erasing a memory location 1 Display the name and phone number you want to erase by doing steps 1 and 2 in "Making calls from the Phone Directory". 2 Press Jog Dial. SONY 1234567 DIAL EDIT ERASE 1234567 Telephone Features 3 Turn Jog Dial up to make "ERASE" flash and press Jog Dial. ERASE NO YES - Sony SPP-A972 | Operating Instructions - Page 36
t t Phone Directory (continued) Tips • You may press (LINE 1) or (LINE 2) to make a call Alphabetical order: ABC...XYZ y symbols y * y # y 0 - 9 • Initial character: To search for "SONY" for example, press (7) and then turn Jog Dial to search through the names starting with P, Q, R, S or 7. 36US - Sony SPP-A972 | Operating Instructions - Page 37
Telephone Features Setting the ringer type You can select a ringer type of the handset from four type. Turn Press 1 Press (PGM). 2 Turn Jog Dial up to make "RINGER" to (4)) to select a ringer type. You will hear the corresponding ringer tone. 7 Press (OFF). continued Telephone Features 37US - Sony SPP-A972 | Operating Instructions - Page 38
When "RINGER" is set to "RINGER OFF" The handset won't ring. You can still make calls, and also receive calls if another telephone connected to the same line rings to inform you on incoming calls. To turn the ringer on again Follow the instructions described in "Setting the ringer type" on page 37 - Sony SPP-A972 | Operating Instructions - Page 39
continue talking to the caller through the handset. Telephone Features To switch from the handset to the base unit Example: While talking on line 1: (LINE 1) 1 Press (HOLD) on the handset. The call is on hold and "HOLD" appears on the display of the handset and the LINE 1 button flashes slowly - Sony SPP-A972 | Operating Instructions - Page 40
handset. When a person at the handset presses (INTERCOM), you can talk with each other. "INTERCOM" appears on the display of the handset and the INTERCOM lamp on the base unit lights up. When you are done talking or if no one answers the phone Press (OFF) on the base unit. 40US Telephone Features - Sony SPP-A972 | Operating Instructions - Page 41
a call while using the intercom When a call comes in, "** RINGING **" appears on the display of the handset and only the base unit rings at a low level. The LINE 1 or LINE 2 button flashes. Press (LINE 1) or (LINE 2) whichever is flashing, then you can answer the call. Telephone Features 41US - Sony SPP-A972 | Operating Instructions - Page 42
unit lights up. You can talk between the base unit and the handset. 3 Press (LINE 1) or (LINE 2) which is flashing on the handset to talk to the caller with the handset. "TALK" appears on the display of the handset. If no one answers the phone Press (OFF) on the base unit. Tips • You can receive an - Sony SPP-A972 | Operating Instructions - Page 43
display of the handset and the INTERCOM lamp on the base unit lights up. (LINE 1) (LINE 2) INTERCOM lamp 2 Press (LINE 1) or (LINE 2) which is flashing on the base unit to talk to the caller with the base unit. The corresponding line button of the base unit lights up. If no one answers the phone - Sony SPP-A972 | Operating Instructions - Page 44
can also talk on one line, the handset and the base unit at the same time phone number for the second party. (CONF) (HOLD) 4 Press (CONF) (conference) after the second party is connected. "CONFERENCE" appears on the display. Now you can talk to both parties. (LINE 1) (LINE 2) (OFF) 44US Telephone - Sony SPP-A972 | Operating Instructions - Page 45
Telephone Features Receiving a call while talking If another call comes in while talking, the LINE 1 or LINE (The other line is kept on hold.) Tip During a three-way conference, you cannot use "call waiting" service even if you press (FLASH/CALL WAITING) or (FLASH). continued Telephone Features 45US - Sony SPP-A972 | Operating Instructions - Page 46
. To join on the handset while the base unit is talking on one line Press the double flashing (LINE 1) or (LINE 2) on the handset. Now you can talk to the base unit and to the line connected. To join three-way conference (four-way conference) Press (LINE 1) or (LINE 2). 46US Telephone Features - Sony SPP-A972 | Operating Instructions - Page 47
Features Setting up the answering machine Setting the time and day of the week 1 Press (MENU) repeatedly until you hear "Set day and time". "- -" blinks on the display. 2 Press (SELECT) repeatedly to select the day of the week. 3 Press (TIME/SET). The day is set and the hour is announced. 4 Press - Sony SPP-A972 | Operating Instructions - Page 48
Press (MENU) repeatedly until "Set out-going message" is announced. "- -" blinks on the display. (ERASE) 2 Press (REC/MEMO). "Now recording" is announced and a long beep sounds page 56), then follow the instructions above. Otherwise, the normal greeting will be recorded. Answering Machine Features - Sony SPP-A972 | Operating Instructions - Page 49
Normal mode: "Hello, I'm unable to answer your call right now. Please leave your name, number and message after the tone." Announcement only mode: "Hello, I'm unable to answer your call right now. Please call again. Thank you." Answering Machine Features continued Answering Machine Features 49US - Sony SPP-A972 | Operating Instructions - Page 50
up the answering machine (continued) Setting the number of rings You can select the number of times the phone rings before it answers to take a message. There are four modes: 2, 4, 6, and Toll Saver. 1 Press (MENU) repeatedly until you hear "Set number of rings". "- -" blinks on the display. 2 Press - Sony SPP-A972 | Operating Instructions - Page 51
) 1 Press (MENU) repeatedly until you hear "Set audible message alert". "- -" blinks on the display. 2 Press (SELECT) to set the audible message alert on or off. 3 Press (TIME/SET). , press any button related to the answering machine function or (VOLUME The audible message alert is preset to off - Sony SPP-A972 | Operating Instructions - Page 52
Setting up the answering machine (continued) Turning on the answering function Press (ANSWER ON/OFF) on the base unit. The ANSWER ON/OFF button lights up. Mailbox usage This phone offers you three voice mailboxes, providing a convenient way to share the mailbox feature with other members of your - Sony SPP-A972 | Operating Instructions - Page 53
display and the answering machine goes into the memory full status. In this status, the answering machine will not answer a call until after 10 rings even if the answering function is on. To avoid this, erase unnecessary messages (see page 55). You can also erase the messages from an outside phone - Sony SPP-A972 | Operating Instructions - Page 54
Playing back messages If there are new messages, the display flashes the number of new messages. You will hear beeps if the audible message alert setting is , all the previously reviewed messages are played back. • The messages are saved even after a power failure. 54US Answering Machine Features - Sony SPP-A972 | Operating Instructions - Page 55
volume To adjust the speaker volume, press (VOLUME)(+) or (-). Answering Machine Features Notes • When you have reached the minimum or maximum volume level, you will hear three short beeps. • You cannot adjust the speaker volume while the phone is ringing. Tip There are 8 steps for the volume - Sony SPP-A972 | Operating Instructions - Page 56
set the announcement only mode on or off. 3 Press (TIME/SET). The setting is announced. 4 Press (PLAY/STOP) to exit the menu setup mode. The display shows "A" when the answering machine is set to the announcement only mode. Notes • To activate announcement only mode, you have to turn on the - Sony SPP-A972 | Operating Instructions - Page 57
answering machine will stop automatically when the handset or a parallel phone is picked up. If the answering machine does not stop, press either (PLAY/STOP) on the base unit, or (*)(0) on the handset or parallel phone. The recording will remain as a new message. Turning on/off the screening calls - Sony SPP-A972 | Operating Instructions - Page 58
Recording a memo message You can leave messages for other users of the unit. 1 Press (REC/MEMO). 2 Press a STOP) to stop recording. The message number on the display increases by one. Notes • If the memory becomes full, the answering machine will stop recording. • "Memory full" is announced if - Sony SPP-A972 | Operating Instructions - Page 59
Setting the remote ID code (security code) To operate the answering machine from a touch-tone phone while you are away from home, you need to set the remote ID code (security code). 1 Press (MENU) repeatedly until you hear "Set security code". 2 - Sony SPP-A972 | Operating Instructions - Page 60
Picking up new messages 1 Call your telephone number from a touch-tone phone. 2 When you hear the greeting, press not turn on the answering machine, your phone answers automatically after 10 rings. • If the message recording memory runs out, the answering machine turns off automatically. "Memory - Sony SPP-A972 | Operating Instructions - Page 61
Understanding the Caller ID service Caller ID allows the caller's phone number to be shown on the display before the call is answered. In order to use this feature, you must first subscribe to the Caller ID service. The name of this service may vary depending on your telephone company. To use this - Sony SPP-A972 | Operating Instructions - Page 62
keeps track of all calls received; even if they were not answered. Viewing the Caller ID list You can look through the Caller ID list to check the phone number and/or name of the calls received. 1 Turn Jog Dial. Turn The display shows the number of "NEW" (calls which you have not - Sony SPP-A972 | Operating Instructions - Page 63
if there are more than two calls from the same phone number. The older data will be replaced by the new data, so the calls are counted as you can also manually erase unnecessary data one by one or erase the entire list. To erase the phone number one by one 1 Display the phone number you want - Sony SPP-A972 | Operating Instructions - Page 64
Looking at the Caller ID list (continued) To erase the entire list at once 1 Display any Caller ID data. SMITH JOHN 1-201-123-4567 2 Press Jog Dial. DIAL PGM ERASE 1-201-123-4567 3 Turn Jog Dial up to make "ERASE" - Sony SPP-A972 | Operating Instructions - Page 65
). SMITH JOHN 1-201-123-4567 2 Confirm the number and press Jog Dial. DIAL PGM ERASE 1-201-123-4567 3 Press Jog Dial again. The phone automatically dials the displayed number. Notes • If the number displayed in step 1 is not the one you should call back, you can change the number of digits of the - Sony SPP-A972 | Operating Instructions - Page 66
Using the Caller ID list (continued) Storing a number of the Caller ID list into the Phone Directory 1 Display the name and phone number you want to store from the Caller ID list (see page 62). SMITH JOHN 1-201-123-4567 2 Confirm the number and press Jog Dial. - Sony SPP-A972 | Operating Instructions - Page 67
ID list is different from the actual phone number, you need to adjust the number of digits of the phone number to call back or store into the Phone Directory. 1 While the phone number from the Caller ID list is displayed, press (#) repeatedly until the phone number with the correct number of digits - Sony SPP-A972 | Operating Instructions - Page 68
JOHN 201-123-4567 SMITH JOHN 1-123-4567 SMITH JOHN 1-201-123-4567 SMITH JOHN 123-4567 2 Continue the operation to call or store the phone number with the correct number of digits (pages 65 and 66). Notes • You need to adjust the number of digits each time you call back - Sony SPP-A972 | Operating Instructions - Page 69
ID with call waiting" service, you will not be able to see the name and number of the second caller. When a new call comes in while you are talking, you hear two short beeps. The caller's name and/or phone number of the new call appears on the display for about 20 seconds - Sony SPP-A972 | Operating Instructions - Page 70
bracket to the center of the base unit. Align the f marks of the wall bracket with those of the base unit. 4 Plug the telephone line cord(s) to the telephone outlet(s), and hook the base unit to the wall plate. 5 Plug the AC power adaptor to an AC outlet. Then raise the antenna - Sony SPP-A972 | Operating Instructions - Page 71
tabs click and go into the holes on the sides of the handset. Note To prevent the handset from dropping, make sure that each tab is completely inserted. Using the headset You can talk on handset without using your hands by connecting Sony TL-HD1 headset (optional) to the I (HEADSET) jack on the - Sony SPP-A972 | Operating Instructions - Page 72
from the handset after charging for more than 12 hours, and base unit after charging for more than 24 hours when you have a spare battery. This maintains battery life. On power failure During a power interruption, you cannot make or receive calls, and you cannot use the answering machine. For the - Sony SPP-A972 | Operating Instructions - Page 73
as they may damage the finish of the cabinet. • If the charge terminals of the base unit and handset are soiled, wipe them with a soft cloth. If you have any questions or problems concerning your phone, please consult your nearest Sony dealer. Additional Information 73US Additional Information - Sony SPP-A972 | Operating Instructions - Page 74
If you've experienced any of the following difficulties while using your phone, use this troubleshooting guide to help you remedy the problem. Should any problem persist, consult your nearest Sony dealer. Making calls Symptom Remedy You hear five short error • Make sure you have - Sony SPP-A972 | Operating Instructions - Page 75
make an intercom call. • Either the base unit or handset is being used to converse with an outside caller. Message is not recorded. • The remaining recording time is less than 30 seconds or 99 messages were recorded. The answering machine becomes "Memory full" status and does not record messages - Sony SPP-A972 | Operating Instructions - Page 76
to answer after the Caller ID data is displayed. The caller's name and/or phone number does not appear on the display during call waiting. • Make sure you have subscribed to "Caller ID with call waiting" service (page 69). • Make sure nobody is talking with another phone on the same telephone line - Sony SPP-A972 | Operating Instructions - Page 77
Message counter The message counter on the base unit shows the following information. When the counter shows Flashing number CL A F It means Number of messages not yet played back. Flashes when the day and time is cleared or delayed due to a power interruption, or when you connect the base unit to - Sony SPP-A972 | Operating Instructions - Page 78
adaptor AC-T131 Battery charging time Approx. 24 hours Dimensions Approx. 185 x 70 x 225 mm (w/h/d), antenna excluded (approx. 7 3⁄ 8 x 2 7⁄8 x 8 7⁄8 inches) Antenna: Approx. 150 mm (approx. 6 inches) Mass Approx. 656 g (approx. 1 lb 7 oz), wall bracket excluded Answering machine Maximum recording - Sony SPP-A972 | Operating Instructions - Page 79
calls 57 turning on/off the screening calls function 57 Setting up answering machine 47 base unit 10 handset 14 Spare battery 16 Speakerphone 29 Stamping messages with day and time 47, 54 Storing Caller ID data in Phone Directory 66 Switching phones during a call 39 T, U Talking between the - Sony SPP-A972 | Operating Instructions - Page 80
For the customers in the USA Be sure to save the receipt and attach it to your WARRANTY card when having your equipment repaired at an authorized Sony service station. Sony Corporation Printed in China
-
 1
1 -
 2
2 -
 3
3 -
 4
4 -
 5
5 -
 6
6 -
 7
7 -
8
-
9
-
10
-
11
-
12
-
13
-
14
-
15
-
16
-
17
-
18
-
19
-
20
-
21
-
22
-
23
-
24
-
25
-
26
-
27
-
28
-
29
-
30
-
31
-
32
-
33
-
34
-
35
-
36
-
37
-
38
-
39
-
40
-
41
-
42
-
43
-
44
-
45
-
46
-
47
-
48
-
49
-
50
-
51
-
52
-
53
-
54
-
55
-
56
-
57
-
58
-
59
-
60
-
61
-
62
-
63
-
64
-
65
-
66
-
67
-
68
-
69
-
70
-
71
-
72
-
73
-
74
-
75
-
76
-
77
-
78
-
79
-
80
 |
 |
3-221-211-
12
(1)
©2000 Sony Corporation
SPP-A972
2-Line Cordless
Telephone
with Answering System
Operating Instructions
US