Sony XAV-AX4000 Operating Instructions - Page 10
Connection
 |
View all Sony XAV-AX4000 manuals
Add to My Manuals
Save this manual to your list of manuals |
Page 10 highlights
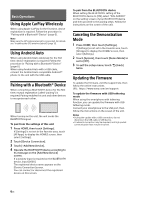
Connection • To prevent short circuits, insulate leads with a cover or tape. • Note that the unit may be damaged if it is connected incorrectly or by short circuits at the leads. *4 *3 *5 *3 *4 Blue *3 *4 *3 Rear view camera*1 iDataLink Maestro module*1*11*12 *8*9 from a steering wheel remote control*6 *13 Smartphone, USB device (for audio playback)*1 Satellite radio tuner (SiriusXM)*1*10 Red Black FUSE 10A White White/black striped Gray Gray/black striped Green Green/black striped Purple Purple/black striped Black Yellow Red Blue/white striped Orange/white striped Light green Purple/white striped Pink 10GB Front speaker*1*2 Rear speaker*1*2 For details, see "Making connections" (page 11). *13 from a car antenna (aerial)*7
-
 1
1 -
2
-
3
-
4
-
 5
5 -
 6
6 -
 7
7 -
 8
8 -
 9
9 -
 10
10 -
 11
11 -
 12
12 -
 13
13 -
 14
14 -
 15
15 -
16
-
17
-
18
-
19
-
20
-
21
-
22
-
23
-
24
-
25
-
26
-
27
-
28
-
29
-
30
-
31
-
32
-
33
-
34
-
35
-
36
-
37
-
38
-
39
-
40
-
41
-
42
-
43
-
44
-
45
-
46
-
47
-
48
-
49
-
50
-
51
-
52
-
53
-
54
-
55
-
56
 |
 |

10
GB
Connection
FUSE 10A
*
3
*
3
*
3
Rear view
camera*
1
from a steering wheel remote control*
6
White
White/black striped
Gray
Gray/black striped
Green
Green/black striped
Purple
Purple/black striped
Black
Yellow
Red
Blue/white striped
Orange/white striped
Light green
Purple/white striped
from a car antenna (aerial)*
7
For details, see “Making
connections” (page 11).
Front speaker*
1
*
2
Rear speaker*
1
*
2
Satellite radio tuner (SiriusXM)*
1
*
10
*
8
*
9
*
13
Pink
*13
Red
Black
Blue
Smartphone, USB device (for audio
playback)*
1
iDataLink Maestro module*
1
*
11
*
12
*
3
*
4
*
4
*
4
*
5
• To prevent short circuits, insulate leads with a cover or tape.
• Note that the unit may be damaged if it is connected incorrectly or by short circuits at the leads.