Sony XAV C1 Installation/Connections - Page 9
Connecting without optional TV tuner unit, To AMP REMOTE IN of an optional
 |
UPC - 027242693678
View all Sony XAV C1 manuals
Add to My Manuals
Save this manual to your list of manuals |
Page 9 highlights
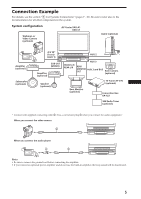
Connecting without optional TV tuner unit Active subwoofer (optional) Rear speakers (optional) RCA interconnects (optional) SUB OUT (MONO) RCA interconnects (optional) To XM tuner (optional) Connection box 1 Front speakers (optional) REAR L/R Amplifiers (optional) RCA interconnects (optional) To the optional back camera or a video equipment AUX 3 Left Front speakers (optional) Right Left Rear speakers (optional) Right FRONT L/R White White/black Gray Gray/black Green Green/black RC-104 (optional) digital output From car antenna To game etc. To rear monitor etc. Purple AUX 2 REAR MONITOR OUT Power supply leads 2 (for main unit) Purple/black To a metal surface of the car*2 To the +12 V power terminal which is energized at all times*1 To the +12 V power terminal which is energized in the accessory position of the ignition key switch*1*3 To a car's illumination signal*1 Black (0.35 m) Yellow (0.35 m) Fuse (10 A) Red (0.25 m) Orange/white (0.25 m) To the + 12 V power terminal of the back lamp lead of car To AMP REMOTE IN of an optional power amplifier*4 To the power antenna control lead or power supply lead of antenna booster amplifier*3*5 Protection device Purple/White (5m) Blue/white (0.25 m) Max. supply current 0.3 A Blue (0.25 m) Max. supply current 0.3 A Parking brake switch lead of car Light green (2.5 m) Tap 9 *1 Be sure to connect the black ground lead to it first. *2 First connect the black ground lead, then connect the yellow and red power input leads. *3 When your car has built-in FM/AM antenna in the rear/side glass, see "Notes on the control and power supply leads" (page 7). *4 This connection is only for amplifiers. Connecting any other system may damage the unit. *5 It is not necessary to connect this lead if there is no power antenna or antenna booster, or with a manually- operated telescopic antenna. Note on the accessory power input lead (red) If there is no accessory position, connect to the +12 V power (battery) terminal which is energized at all times. 9
-
 1
1 -
2
-
3
-
 4
4 -
 5
5 -
 6
6 -
 7
7 -
 8
8 -
 9
9 -
 10
10 -
 11
11 -
 12
12 -
 13
13 -
 14
14 -
15
-
16
-
17
-
18
-
19
-
20
-
21
-
22
-
23
-
24
-
25
-
26
-
27
-
28
-
29
-
30
-
31
-
32
-
33
-
34
-
35
-
36
-
37
-
38
-
39
-
40
-
41
-
42
-
43
-
44
 |
 |
