Symphonic 13TVCRMKII Owner's Manual - Page 7
speed.SP/LP/EP
 |
View all Symphonic 13TVCRMKII manuals
Add to My Manuals
Save this manual to your list of manuals |
Page 7 highlights
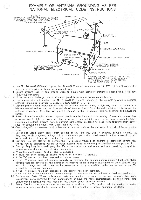
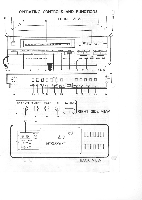
1 REMOTE SENSOR -Receives the infrared control signa!-, from the handheld remote control unit. 2 POWER button -To turn unit on and off. 3 EJECT button -Press to remove tape from VCR. 4 REWIND (SEARCH) button -Press to rewind tape, or to view video, in reverse, during play mode at a faster than normal speed. Press play button to return VCR to normal playback speed. 5 PLAY button -Press to begin playback of a tape. 6 F. FWD (SEARCH) button -Press to advance tape faster than normal or to view video, in forward direction, during play mode at a faster than normal speed. Press play button to return VCR to normal playback speed. 7 STOP button -Press to stop tape motion. 8 PAUSE/STILL-Press to temporarily stop tape during playback or manual recording. 9 RECORD button -Press to begin manual recording. 10 MONITOR button -Press to keep quiet monitor screen at timer recording. 11 VOLUME buttons -Used to adjust the volume level. 12 QTR (Quick Timer Rec) -Press to activate quick timer recording mode. 13 CLOCK/COUNTER button -Press to alternate between clock and counter display modes. 14 RESET button -Press to reset counter to 0000. 15 CHANNEL buttons -Press to select the channel for viewing or recording. 16 MEMORY button -Press to set memory-in. 17 DIGITAL DISPLAY 18 CASSETTE COMPARTMENT 19 TRACKING control -Adjust to minimize video 'noise' (lines or dots on screen) during playback. 20 TAPE SPEED button -Used to set desired recording speed.(SP/LP/EP) 21 TIMER REC button -Turn on to activate the automatic recording timer. 22 PROG CHECK button -Press to select program number. 23 SELECT button -Press to select timer setting mode. 24 SET/CH NO buttons -Adjust time with "+"or "-" button. Select channel number with X10 or X1 button. 25 CANCEL button -Press to cancel memorized Timer Program. 26 PRESET button -Use to select channel program mode. 27 BAND selector button -Press to select channel range.(VL/VF/U) 28 SEARCH button -Press to search TV channel. 29 ERASE button -Press to erase programmed channel. 30 AUTO REPEAT switch -Use to select auto repeat playback mode. 31 BRIGHTNESS control -See page 16 for detail. 32 CONTRAST control -See page 16 -tor detail. 33 COLOR control -See page 16 for detail: 34 TINT control -See page 16 for detail. 35 EARPHONE jack -Connect the earphone to this jack (not supplied). This automatically disconnects the built-in speaker. 36 UHF IN terminals -Connect a UHF antenna. 37 VHF IN terminal -Connect VHF antenna here. 38 AUDIO IN/OUT jacks -Connect to audio jacks of your audio equipment or another VCR. 39 VIDEO IN/OUT jacks -Connect to video jacks of your video camera or another VCR. - 7
-
 1
1 -
 2
2 -
 3
3 -
 4
4 -
 5
5 -
 6
6 -
 7
7 -
 8
8 -
 9
9 -
 10
10 -
 11
11 -
 12
12 -
13
-
14
-
15
-
16
-
17
-
18
-
19
-
20
-
21
-
22
-
23
-
24
-
25
-
26
-
27
-
28
-
29
-
30
-
31
-
32
 |
 |
