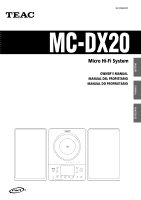
TEAC MC-DX20B Owners Manual - Page 2

Contents, Before Use - manual

Page 2 highlights

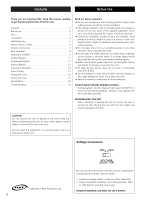
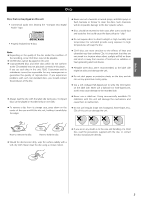
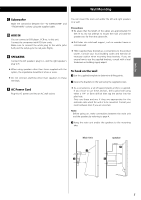
Contents Before Use Thank you for choosing TEAC. Read this manual carefully to get the best performance from this unit. Contents 2 Before Use 2 Discs 3 Connection 4 Wall Mounting 5 Names of Each Control 6 Remote Control Unit 7 Basic Operation 8 Listening to CD/MP3 9 Shuffle Playback 11 Programed Playback 12 Repeat Playback 13 Listening to the Radio 14 Preset Tuning 15 Setting the Clock 16 Setting the Timer 17 Specifications 18 Troubleshooting 19 Read this before operation < As the unit may become warm during operation, always leave sufficient space around the unit for ventilation. < The voltage supplied to the unit should match the voltage as printed on the rear panel of the supplied subwoofer. If you are in any doubt regarding this matter, consult an electrician. < Choose the installation location of your unit carefully. Avoid placing it in direct sunlight or close to a source of heat. Also avoid locations subject to vibrations and excessive dust, heat, cold or moisture. < Do not place the unit on an amplifier/receiver or any other electronic device that generates heat. < Do not open the sealed cabinet as this might result in damage to the circuitry or electrical shock. If a foreign object should get inside the unit, contact your dealer or service agency. < When removing the power plug from the wall outlet, always pull directly on the plug, never yank the cord. < To keep the laser pickup clean, do not touch it, and always close the CD door. < Do not attempt to clean the unit with chemical solvents as this might damage the finish. Use a clean, dry cloth. < Keep this manual in a safe place for future reference. DO NOT MOVE THE UNIT DURING PLAYBACK During playback, the disc rotates at high speed. Do NOT lift or move the unit during playback. Doing so may damage the disc or the laser assembly. WHEN MOVING THIS UNIT When relocating or packing the unit for moving, be sure to remove the disc. Moving this unit with the disc loaded may result in damage to this unit. CAUTION Do not expose this unit to liquids of any kind. Keep any objects containing liquids such as vases, water glasses, potted plants, et cetera off the top of this unit. Do not install this equipment in a confined space such as a bookcase or similar unit. Voltage Conversion Be sure to remove the power cord from the AC outlet before repositioning the voltage converter switch. 1. Locate the voltage selector on the rear of the subwoofer. 2. Using a flat-bladed screwdriver, set to the appropriate 230V or 120V position according to your area. trademark of New Transducers Ltd. IN NORTH AMERICA USE ONLY ON 120 V SUPPLY. 2

  • 1
  • 2
  • 3
  • 4
  • 5
  • 6
  • 7
  • 8
  • 9
  • 10
  • 11
  • 12
  • 13
  • 14
  • 15
  • 16
  • 17
  • 18
  • 19
  • 20
  • 21
  • 22
  • 23
  • 24
  • 25
  • 26
  • 27
  • 28
  • 29
  • 30
  • 31
  • 32
  • 33
  • 34
  • 35
  • 36
  • 37
  • 38
  • 39
  • 40
  • 41
  • 42
  • 43
  • 44
  • 45
  • 46
  • 47
  • 48
  • 49
  • 50
  • 51
  • 52
  • 53
  • 54
  • 55
  • 56

2
Contents
Thank you for choosing TEAC. Read this manual carefully
to get the best performance from this unit.
Before Use
Read this before operation
<
As the unit may become warm during operation, always leave
sufficient space around the unit for ventilation.
<
The voltage supplied to the unit should match the voltage as
printed on the rear panel of the supplied subwoofer. If you
are in any doubt regarding this matter, consult an electrician.
<
Choose the installation location of your unit carefully. Avoid
placing it in direct sunlight or close to a source of heat. Also
avoid locations subject to vibrations and excessive dust, heat,
cold or moisture.
<
Do not place the unit on an amplifier/receiver or any other
electronic device that generates heat.
<
Do not open the sealed cabinet as this might result in damage
to the circuitry or electrical shock. If a foreign object should
get inside the unit, contact your dealer or service agency.
<
When removing the power plug from the wall outlet, always
pull directly on the plug, never yank the cord.
<
To keep the laser pickup clean, do not touch it, and always
close the CD door.
<
Do not attempt to clean the unit with chemical solvents as
this might damage the finish. Use a clean, dry cloth.
<
Keep this manual in a safe place for future reference.
DO NOT MOVE THE UNIT DURING PLAYBACK
During playback, the disc rotates at high speed. Do NOT lift or
move the unit during playback. Doing so may damage the
disc or the laser assembly.
WHEN MOVING THIS UNIT
When relocating or packing the unit for moving, be sure to
remove the disc. Moving this unit with the disc loaded may
result in damage to this unit.
CAUTION
Do not expose this unit to liquids of any kind. Keep any
objects containing liquids such as vases, water glasses, potted
plants, et cetera off the top of this unit.
Do not install this equipment in a confined space such as a
bookcase or similar unit.
Contents . . . . . . . . . . . . . . . . . . . . . . . . . . . . . . . . . . . . . . . . . 2
Before Use . . . . . . . . . . . . . . . . . . . . . . . . . . . . . . . . . . . . . . . . 2
Discs
. . . . . . . . . . . . . . . . . . . . . . . . . . . . . . . . . . . . . . . . . . . . 3
Connection . . . . . . . . . . . . . . . . . . . . . . . . . . . . . . . . . . . . . . . 4
Wall Mounting. . . . . . . . . . . . . . . . . . . . . . . . . . . . . . . . . . . . . 5
Names of Each Control
. . . . . . . . . . . . . . . . . . . . . . . . . . . . . . 6
Remote Control Unit . . . . . . . . . . . . . . . . . . . . . . . . . . . . . . . . 7
Basic Operation . . . . . . . . . . . . . . . . . . . . . . . . . . . . . . . . . . . . 8
Listening to CD/MP3
. . . . . . . . . . . . . . . . . . . . . . . . . . . . . . . . 9
Shuffle Playback. . . . . . . . . . . . . . . . . . . . . . . . . . . . . . . . . . . 11
Programed Playback. . . . . . . . . . . . . . . . . . . . . . . . . . . . . . . . 12
Repeat Playback. . . . . . . . . . . . . . . . . . . . . . . . . . . . . . . . . . . 13
Listening to the Radio
. . . . . . . . . . . . . . . . . . . . . . . . . . . . . . 14
Preset Tuning. . . . . . . . . . . . . . . . . . . . . . . . . . . . . . . . . . . . . 15
Setting the Clock . . . . . . . . . . . . . . . . . . . . . . . . . . . . . . . . . . 16
Setting the Timer . . . . . . . . . . . . . . . . . . . . . . . . . . . . . . . . . . 17
Specifications . . . . . . . . . . . . . . . . . . . . . . . . . . . . . . . . . . . . . 18
Troubleshooting. . . . . . . . . . . . . . . . . . . . . . . . . . . . . . . . . . . 19
Voltage Conversion
Be sure to remove the power cord from the AC outlet before
repositioning the voltage converter switch.
1.
Locate the voltage selector on the rear of the subwoofer.
2.
Using a flat-bladed screwdriver, set to the appropriate 230V
or 120V position according to your area.
IN NORTH AMERICA USE ONLY ON 120 V SUPPLY.
trademark of New Transducers Ltd.