TEAC VRDS-701 Owners Manual English Francais Espanol - Page 12
Remote control parts and functions, STANDBY/ON button
 |
View all TEAC VRDS-701 manuals
Add to My Manuals
Save this manual to your list of manuals |
Page 12 highlights
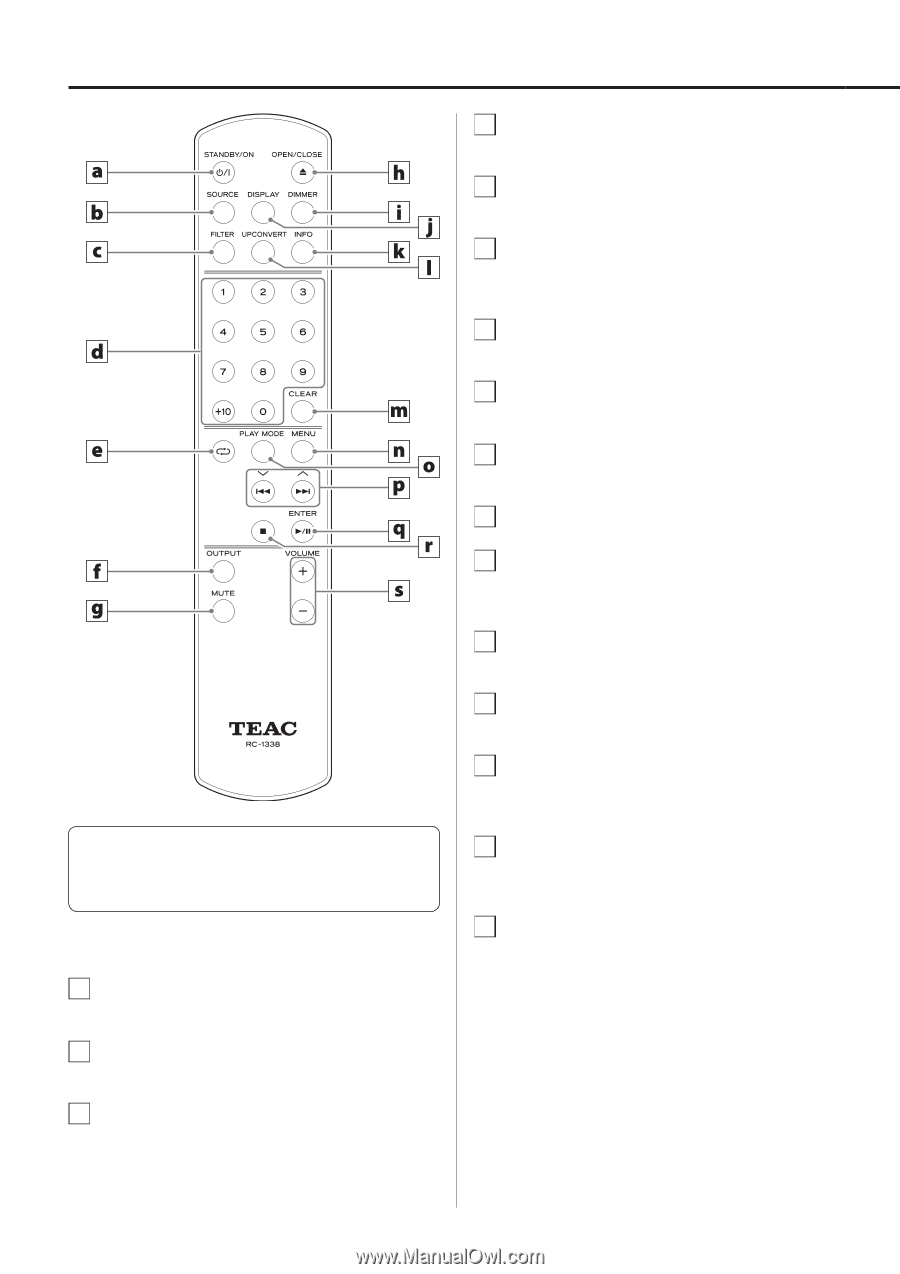
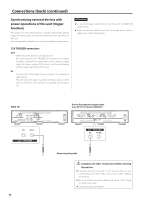
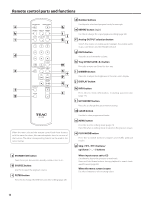
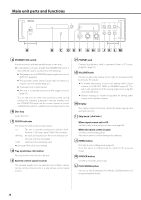
Remote control parts and functions When the main unit and the remote control both have buttons with the same functions, this manual explains how to use one of the buttons. The other corresponding button can be used in the same manner. a STANDBY/ON button Press this to put the unit into standby mode or turn it on. b SOURCE button Use this to select the playback source. c FILTER button Press this to change the DSD low-pass filter setting (page 28). d Number buttons Use these to select and program tracks, for example. e REPEAT button (¼) Use this to change the repeat playback setting (page 20). f Analog OUTPUT selection button Switch the output of analog audio between the analog audio output connectors and the headphone jack. g MUTE button Press this to minimize the volume. h Tray OPEN/CLOSE (-) button Press this to open and close the disc tray. i DIMMER button Press this to adjust the brightness of the main unit's display. j DISPLAY button k INFO button Press this to show information, including upconversion (page 17). l UPCONVERT button Press this to change the upconversion setting. m CLEAR button Use this to clear programmed tracks. n MENU button Press this to enter setting mode (page 24). Press this when in setting mode to return to the previous screen. o PLAY MODE button Press this to switch between program and shuffle playback modes. p Skip (., /) buttons/ up/down (k, j) buttons When input source set to CD Use these to skip to the previous or next track. Press and hold these buttons during playback to search backward/forward (page 20). When the menu screen is open Use these buttons to select setting values. 12
-
 1
1 -
2
-
3
-
4
-
5
-
6
-
 7
7 -
 8
8 -
 9
9 -
 10
10 -
 11
11 -
 12
12 -
 13
13 -
 14
14 -
 15
15 -
 16
16 -
 17
17 -
18
-
19
-
20
-
21
-
22
-
23
-
24
-
25
-
26
-
27
-
28
-
29
-
30
-
31
-
32
-
33
-
34
-
35
-
36
-
37
-
38
-
39
-
40
-
41
-
42
-
43
-
44
-
45
-
46
-
47
-
48
-
49
-
50
-
51
-
52
-
53
-
54
-
55
-
56
-
57
-
58
-
59
-
60
-
61
-
62
-
63
-
64
-
65
-
66
-
67
-
68
-
69
-
70
-
71
-
72
-
73
-
74
-
75
-
76
-
77
-
78
-
79
-
80
-
81
-
82
-
83
-
84
-
85
-
86
-
87
-
88
-
89
-
90
-
91
-
92
-
93
-
94
-
95
-
96
-
97
-
98
-
99
-
100
-
101
-
102
-
103
-
104
-
105
-
106
-
107
-
108
 |
 |