TP-Link TL-SG3109 User Guide - Page 105
Configuring RMON History
 |
UPC - 845973020484
View all TP-Link TL-SG3109 manuals
Add to My Manuals
Save this manual to your list of manuals |
Page 105 highlights
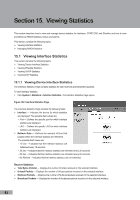
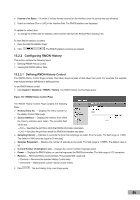
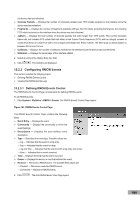
Frames of xx Bytes - Number of xx-byte frames received on the interface since the device was last refreshed. 2. Select an interface (Port or LAG) in the Interface field. The RMON statistics are displayed. To update the refresh time: To change the refresh rate for statistics, select another rate from the Refresh Rate dropdown list. To reset RMON statistics counters: 1. Open the RMON Statistics Page. 2. Click . The RMON statistics counters are cleared. 15.2.2 Configuring RMON History This section contains the following topics: Defining RMON History Control Viewing the RMON History Table 15.2.2.1 Defining RMON History Control The RMON History Control Page contains information about samples of data taken from ports. For example, the samples may include interface definitions or polling periods. To set RMON history control: 1. Click System > Statistics > RMON > History. The RMON History Control Page opens: Figure 137: RMON History Control Page The RMON History Control Page contains the following fields: History Entry No. - Displays the entry number for the History Control Table page. Source Interface - Displays the interface from which the history samples were taken. The possible field values are: - Port - Specifies the port from which the RMON information was taken. - LAG - Specifies the port from which the RMON information was taken. Sampling Interval - Indicates in seconds the time that samplings are taken from the ports. The field range is 1-3600. The default is 1800 seconds (equal to 30 minutes). Samples Requested - Displays the number of samples to be saved. The field range is 1-65535. The default value is 50. Current Number of Samples in List - Displays the current number of samples taken. Owner - Displays the RMON station or user that requested the RMON information. The field range is 0-20 characters. Remove - Removes History Control entries. The possible field values are: - Checked - Removes the selected History Control entry. - Unchecked - Maintains the current History Control entries. 2. Click . The Add History Entry User Page opens: 98
-
 1
1 -
2
-
3
-
4
-
5
-
6
-
7
-
8
-
9
-
10
-
11
-
12
-
13
-
14
-
15
-
16
-
17
-
18
-
19
-
20
-
21
-
22
-
23
-
24
-
25
-
26
-
27
-
28
-
29
-
30
-
31
-
32
-
33
-
34
-
35
-
36
-
37
-
38
-
39
-
40
-
41
-
42
-
43
-
44
-
45
-
46
-
47
-
48
-
49
-
50
-
51
-
52
-
53
-
54
-
55
-
56
-
57
-
58
-
59
-
60
-
61
-
62
-
63
-
64
-
65
-
66
-
67
-
68
-
69
-
70
-
71
-
72
-
73
-
74
-
75
-
76
-
77
-
78
-
79
-
80
-
81
-
82
-
83
-
84
-
85
-
86
-
87
-
88
-
89
-
90
-
91
-
92
-
93
-
94
-
95
-
96
-
97
-
98
-
99
-
 100
100 -
 101
101 -
 102
102 -
 103
103 -
 104
104 -
 105
105 -
 106
106 -
 107
107 -
 108
108 -
 109
109 -
 110
110 -
111
-
112
-
113
-
114
-
115
-
116
-
117
-
118
-
119
-
120
 |
 |