Toshiba 40RV52U Owners Manual - Page 35
Using the TV's features
 |
View all Toshiba 40RV52U manuals
Add to My Manuals
Save this manual to your list of manuals |
Page 35 highlights
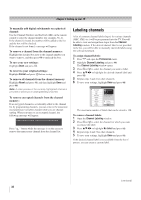
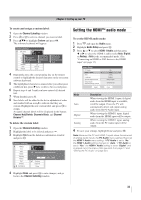
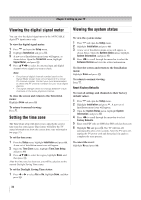
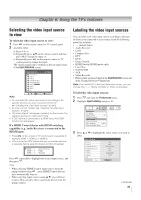
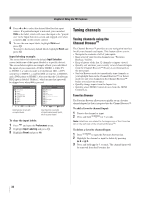
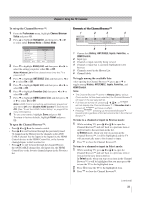
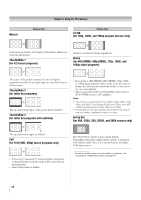
Chapter 6: Using the TV's features Selecting the video input source to view To select the video input source to view: 1 Press on the remote control or TV control panel. 2 And then either: a) Press 0-8; or b) Repeatedly press ST on the remote control and then press to change the input; or c) Repeatedly press on the remote control or TV control panel to change the input. The current signal source displays in the top right corner of the Input Selection screen. Input Selection 0 ANT/CABLE 1 Video 1 2 Video 2 3 ColorStream HD1 4 ColorStream HD2 5 HDMI 1 HDMI Control 6 HDMI 2 7 HDMI 3 8 PC ANT/CABLE Note: 0 - 8 / INPUT to Select Navigation • You can label the video input sources according to the specific devices you have connected to the TV ( "Labeling the video input sources" at right). • Sources can be "hidden" ( "Labeling the video input sources" at right). • "No Video Signal" will appear randomly on the screen if no signal is received in video input mode. • If CEC device is connected to a HDMI input, the HDMI Control icon will appear. If a HDMI Control device with HDMI switching capability (e.g. Audio Receiver) is connected to the HDMI input: • Press on the remote or TV control panel repeatedly to highlight HDMI 1, HDMI 2, or HDMI 3. • If the connected CEC device has any connected devices, a separate device selection popup window will appear. HDMI 1 - 1 HDMI 1 - 2 HDMI 1 - 3 Audio Receiver Player Recorder Press repeatedly to highlight the desired input source, and then press . Note: • When selecting HDMI Control input sources from the popup window using , some HDMI Control devices may automatically turn on. • When selecting input sources using S T, you will have to press to actually select a particular device from the popup window. Labeling the video input sources You can label each video input source according to the type of device you connected to each source, from the following preset list of labels: • - - (default label) • Audio Receiver • Cable • Compact Disc • DTV • DVD • Game Console • HDMI Switch (HDMI inputs only) • Laser Disc • Satellite/DSS • VCR • Video Recorder • Hide (to hide an unused input in the Input Selection screen and in the Channel Browser™ Inputs list) Note: If you select PC in the Input Selection screen, you can choose only "- -", "Game Console" or "Hide" as the label. To label the video input sources: 1 Press and open the Preferences menu. 2 Highlight Input Labeling and press . Preferences CC Selector Off Base CC Mode Off CC1 Digital CC Settings CC2 Input Labeling CC3 Channel Labeling CC4 Menu Language English T1 Channel Browser Setup T2 . 3 Press S or T to highlight the video source you want to label. Input Labeling Video 1 Video 2 ColorStream HD 1 ColorStream HD 2 HDMI 1 HDMI 2 HDMI 3 PC Reset VCR Cable Video Recorder Hide DTV Satellite/DSS DV D -- Done (continued) 35
-
 1
1 -
2
-
3
-
4
-
5
-
6
-
7
-
8
-
9
-
10
-
11
-
12
-
13
-
14
-
15
-
16
-
17
-
18
-
19
-
20
-
21
-
22
-
23
-
24
-
25
-
26
-
27
-
28
-
29
-
 30
30 -
 31
31 -
 32
32 -
 33
33 -
 34
34 -
 35
35 -
 36
36 -
 37
37 -
 38
38 -
 39
39 -
 40
40 -
41
-
42
-
43
-
44
-
45
-
46
-
47
-
48
-
49
-
50
-
51
-
52
-
53
-
54
-
55
-
56
-
57
-
58
-
59
-
60
-
61
-
62
-
63
-
64
 |
 |