Toshiba 50A11 Owners Manual
Toshiba 50A11 Manual
 |
View all Toshiba 50A11 manuals
Add to My Manuals
Save this manual to your list of manuals |
Toshiba 50A11 manual content summary:
- Toshiba 50A11 | Owners Manual - Page 1
Introduction Connecting your TV OWNER'S MANUAL Projection Television TM Using the Remote Control Setting up your TV Using the TV's Features Appendix Index 50A11 © 2001 TOSHIBA CORPORATION All Rights Reserved Owner's Record The model number and serial number are on the back of your TV. - Toshiba 50A11 | Owners Manual - Page 2
SERVICE THIS PRODUCT YOURSELF. The exclamation mark in the triangle tells you that important operating and maintenance instructions settings. Never leave a PIP, Multi-Window, computer, or video game display unattended. • Sit picture to appear dull as will direct sunlight and room lights. Turn the - Toshiba 50A11 | Owners Manual - Page 3
Toshiba 4 Exploring your new TV 4 Connecting your TV 5 Connecting a VCR 5 Connecting a cable converter box 6 Connecting a cable converter box and a VCR 6 Connecting a DVD player or satellite erasing channels manually 19 Troubleshooting 45 Limited United States Warranty 46 Index 47 3 - Toshiba 50A11 | Owners Manual - Page 4
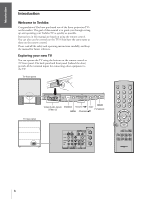
! You have purchased one of the finest projection TVs on the market. The goal of this manual is to guide you through setting up and operating your Toshiba TV as quickly as possible. Instructions in this manual are based on using the remote control. You can also use the controls on the TV if - Toshiba 50A11 | Owners Manual - Page 5
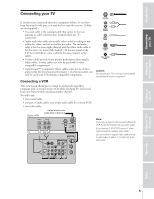
Introduction Connecting your TV Using the Remote Control Connecting your TV If you have not connected electronic equipment before, or you have been frustrated in the past, you may wish to read this section. (Cables are not supplied.) • A coaxial cable is the standard cable that comes in from an - Toshiba 50A11 | Owners Manual - Page 6
Introduction Connecting your TV Using the Remote Control Connecting a cable converter box This connection allows you to watch basic and premium channels. To use the TV's features, select ANT-1. To view premium channels, select ANT-2, tune the TV to channel 3 or 4 (whichever is vacant in your - Toshiba 50A11 | Owners Manual - Page 7
the TV and VCR) • one S-video cable (between the TV and DVD player/satellite receiver) Stereo VCR From Cable IN from ANT OUT to TV CH 3 CH 4 regular video cable for better picture quality. If your DVD player or satellite receiver has component video connections, see page 8. Do not connect a - Toshiba 50A11 | Owners Manual - Page 8
another source. The TV has ColorStream (component video) connections. Connecting the TV to a DVD player with component video connections (such as a Toshiba DVD player with ColorStream™), can greatly enhance picture quality and performance. You will need: • one coaxial cable • three pairs of audio - Toshiba 50A11 | Owners Manual - Page 9
Introduction Connecting your TV Using the Remote Control Connecting two VCRs This connection allows you to record (dub/edit) from one VCR to another VCR while watching a videotape. You can also record from one TV channel while watching another channel. You will need: • one coaxial cable • two - Toshiba 50A11 | Owners Manual - Page 10
Introduction Connecting your TV Connecting a camcorder This connection allows you to watch video materials recorded on a camcorder. You will need: • one pair of audio cables • one video cable Camcorder VIDEO AUDIO OUT L R Note: If you have an S-VHS camcorder, use an S-video cable instead of a - Toshiba 50A11 | Owners Manual - Page 11
operate the TV, most VCR models, and most cable TV converters together, even if they are different brands. If you have a Toshiba VCR or cable TV converter, not operate your VCR or cable TV converter. Refer to the owner's manual for your other device to see which features are available. In addition, - Toshiba 50A11 | Owners Manual - Page 12
and cable TV converters (see page 11). To use the remote control to operate a non-Toshiba VCR or cable converter: 1. Refer to the VCR and cable TV converter code tables on pages 13 and 14 to find the corresponding code for - Toshiba 50A11 | Owners Manual - Page 13
Ricoh Runco Samsung Sanky Sansui Sanyo Scott Sears Sharp Shintom Shogun Singer Sony STS Sylvania Symphonic Tatung Teac Technics Teknika Telefunken TMK Toshiba Totevision Unitech Vector Vector Research Video Concepts Videosonic Wards XR-1000 Yamaha Zenith 054, 096 019, 056, 344 056 056 061, 079 - Toshiba 50A11 | Owners Manual - Page 14
030, 089 Runco 019 Samsung Scientific Atlanta Signal Signature SL Marx Sprucer Standard Components Starcom Stargate Starquest Sylvania Teleview Texscan Tocom Toshiba Tusa Unika United Artists United Cable Universal Viewstar Zenith Zentek 059, 163 025, 027, 036, 296 034, 059 030 059 040 - Toshiba 50A11 | Owners Manual - Page 15
(page 34) CH y and z cycle through programmed channels (page 19) TV/CABLE/VCR switches between TV, Cable, and VCR (pages 11, 12) Channel Numbers allow direct access to channels (page 19) VOL y and z adjust the volume level CH RTN returns to the last viewed channel (page 21) ENT required by some - Toshiba 50A11 | Owners Manual - Page 16
. CH MENU VOL CH VOL TV/ DEMO EXIT VIDEO MENU yzx • EXIT P I CTURE ANTENNA MODE SPORTS CONTRAST 100 BR I GHTNESS 50 COLOR 50 T I NT 0 SHARPNESS 50 RESET SAVE NEW PREFERENCE P I CTURE ANTENNA : SELECT EXIT : ENDMODE SPORTS FLESH TONE ON / OFF NO I SE REDUCTION OFF COLOR - Toshiba 50A11 | Owners Manual - Page 17
Changing the on-screen display language Choose from three different languages (English, French and Spanish) for the on-screen display of adjustment menus and messages. To select a language: 1. Press MENU, and then press x or • until the SET UP menu appears. 1 2 3 4 5 6 SET UP 7 8 LANGUAGE - Toshiba 50A11 | Owners Manual - Page 18
TV can automatically detect all active channels and store them in its memory. After the TV has stored the channels in its memory, you can manually erase channels or add your favorite channels (see page 19). To program channels automatically: 1. Press MENU, and then press x or • until the SET UP - Toshiba 50A11 | Owners Manual - Page 19
Introduction Connecting your TV Using the Remote Control Adding and erasing channels manually After you have programmed the channels automatically, you can manually add or erase specific channels. To add or erase channels: 1. Select the channel you want to add or erase. If you are adding a - Toshiba 50A11 | Owners Manual - Page 20
Index Appendix Using the TV's Features Setting up your TV Using the Remote Control Connecting your TV Introduction Adjusting the color convergence This projection TV uses three separate TV tubes: red, green, and blue. The red, green, and blue images are projected onto the screen where they - Toshiba 50A11 | Owners Manual - Page 21
Using the TV's features Adjusting the channel settings Switching between two channels You can switch between two channels without entering an actual channel number each time. To switch between two channels: 1. Select the first channel you want to view. 2. Select a second channel using the Channel - Toshiba 50A11 | Owners Manual - Page 22
Introduction Connecting your TV Using the Remote Control Setting up your TV To clear a favorite channel: 1. Press MENU, and then press x or • until the CUSTOM menu appears. 2. Press y or z to highlight FAVORITE CH2, for example. 3. Press x or • to display the FAVORITE CH2 menu. 1 2 3 4 5 6 7 - Toshiba 50A11 | Owners Manual - Page 23
Introduction Connecting your TV Using the Remote Control 4. Press the Channel Number buttons to select the channel to label. 1 2 3 4 5 6 7 8 9 10 11 12 13 14 15 16 17 18 19 20 21 22 23 24 25 26 27 28 29 30 31 32 33 34 35 1 1 2 2 3 3 4 4 5 5 6 6 7 CUSTOM 7 8 8 9 T I MER 9 10 - Toshiba 50A11 | Owners Manual - Page 24
Introduction Connecting your TV Using the Remote Control Watching picture-in-picture (PIP) The picture-in-picture (PIP) feature allows you to watch two pictures at the same time. The smaller PIP picture comes from a TV broadcast or an external source, such as a VCR. To display the PIP: 1. Make - Toshiba 50A11 | Owners Manual - Page 25
Introduction Connecting your TV Using the Remote Control Switching the main and PIP pictures Press SWAP while you are using the PIP feature to switch the main and PIP pictures. Changing the position of the PIP window Repeatedly press LOCATE while you are watching the PIP. The display position of - Toshiba 50A11 | Owners Manual - Page 26
Index Appendix Using the TV's Features Setting up your TV Using the Remote Control Connecting your TV Introduction Using the LOCKS menu The LOCKS menu includes the V-Chip, CH Lock, Video Lock, and New PIN Code functions. You can use these functions after entering the correct PIN code. - Toshiba 50A11 | Owners Manual - Page 27
dialog L) Infrequent coarse language S) Some sexual situations V) Moderate violence General Audience (Most parents would find this program suitable for all ages.) Directed to Older Children (This program is designed for children age 7 and above. Note: Programs in which fantasy violence may be more - Toshiba 50A11 | Owners Manual - Page 28
Introduction Connecting your TV Using the Remote Control Setting up your TV MPAA RATING (Independent rating system for movies) 1. From the LOCKS menu, select MPAA RATING. 2. Press x or • to display the MPAA RATING menu, and then press z or y to highlight MPAA RATING. 3. Press x or • to - Toshiba 50A11 | Owners Manual - Page 29
Introduction Connecting your TV Using the Remote Control Setting up your TV Unlocking programs temporarily 1. If you try to watch a TV program that exceeds the rating limits you set, the TV will enter into the program lock mode. TH I S PROGRAM HAS BEEN BLOCKED ! TV -PG L V EXCEEDS SET L I M I - Toshiba 50A11 | Owners Manual - Page 30
Index Appendix Using the TV's Features Setting up your TV Using the Remote Control Connecting your TV Introduction To unlock a channel: 1. From the LOCKS menu, select CH LOCK. 2. Press x or • to display the CH LOCK menu. 3. Press yzx • to highlight the channel you want to unlock, and then - Toshiba 50A11 | Owners Manual - Page 31
6 7 P I CTURE ANTENNA 7 8 8 9 MODE 9 10 SPORTS / STANDARD / MOV I E / PREFERENCE 10 11 CONTRAST 80 11 12 BR I GHTNESS 50 12 13 COLOR 50 13 14 T I NT 0 14 15 SHARPNESS 50 15 16 RESET 16 17 SAVE NEW PREFERENCE 17 18 18 1 2 3 4 5 6 7 8 9 10 11 12 13 14 15 16 17 18 19 - Toshiba 50A11 | Owners Manual - Page 32
Index Appendix Using the TV's Features Setting up your TV Using the Remote Control Connecting your TV Introduction Saving your picture preferences You can save the PICTURE qualities you adjusted (contrast, brightness, color, tint, and sharpness) in the Picture PREFERENCE mode. To save your - Toshiba 50A11 | Owners Manual - Page 33
33 34 35 1 1 2 2 3 3 4 4 5 5 6 6 7 P I CTURE ANTENNA 7 8 8 9 MODE SPORTS 9 10 10 11 CONTRAST 100 11 12 BR I GHTNESS 50 12 13 COLOR 50 13 14 T I NT 0 14 15 SHARPNESS 50 15 16 RESET DONE 16 17 SAVE NEW PREFERENCE 17 18 18 1 2 3 4 5 6 7 8 9 10 11 12 13 14 - Toshiba 50A11 | Owners Manual - Page 34
following preset list of labels: - VCR DVD DTV SAT CBL : The default label name : Videocassette recorder : DVD player : Digital TV set-top box : Satellite box : Cable box To label the video inputs: 1. Press MENU, and then press x or • until the CUSTOM menu appears. 2. Press y or z to highlight - Toshiba 50A11 | Owners Manual - Page 35
Introduction Connecting your TV Using the Remote Control Using the closed caption feature The closed caption feature has two options: • Captions-An on-screen display of the dialogue, narration and sound effects of TV programs and videotapes that are closed captioned (usually designated as "CC - Toshiba 50A11 | Owners Manual - Page 36
Introduction Connecting your TV Using the Remote Control Setting the sleep timer To set the sleep timer to turn off the TV automatically: 1. Press MENU, and then press x or • until CUSTOM menu appears. 2. Press z or y to highlight TIMER. 3. After the number position starts to blink, press the - Toshiba 50A11 | Owners Manual - Page 37
20 21 22 23 24 25 26 27 28 29 30 31 32 33 34 35 1 1 2 2 3 3 4 4 5 5 6 6 7 AUDI O 7 8 8 9 MTS STEREO / SAP / MONO 9 10 BASS 50 10 11 TREBLE 50 11 12 BALANCE 0 12 13 RESET 13 14 14 15 15 16 16 17 17 18 18 1 2 3 4 5 6 7 8 9 10 11 12 13 14 15 16 - Toshiba 50A11 | Owners Manual - Page 38
Introduction Connecting your TV Using the surround sound feature The surround sound feature expands the audio listening field wider and deeper to create exceptional sound quality from the TV's speakers. The feature uses stereo signals from a TV broadcast or video input. To turn on the surround - Toshiba 50A11 | Owners Manual - Page 39
18 19 20 21 22 23 24 25 26 27 28 29 30 31 32 33 34 35 1 1 2 2 3 3 4 4 5 5 6 6 7 AUDI O 7 8 8 9 MTS STEREO 9 10 BASS 50 10 11 TREBLE 50 11 12 BALANCE 0 12 13 RESET DONE 13 14 14 15 15 16 16 17 17 18 18 1 2 3 4 5 6 7 8 9 10 11 12 13 14 15 - Toshiba 50A11 | Owners Manual - Page 40
Introduction Connecting your TV Using the Remote Control Using the Sub-Bass System (SBS) The Sub-Bass System enhances bass performance, even when the volume is low. To turn on the SBS: 1. Press MENU, and then press x or • until the AUDIO menu appears. 2. Press y or z to highlight SBS. 3. Press x - Toshiba 50A11 | Owners Manual - Page 41
Introduction Connecting your TV Selecting the Audio OUT sound This feature allows you to select the sound source (MAIN or PIP) that is output from the Audio OUT jacks. This is useful when amplifying or recording the PIP sound with external equipment while hearing the sound of the main picture - Toshiba 50A11 | Owners Manual - Page 42
Introduction Connecting your TV Using the Remote Control Selecting the background of the menu display You can change the background of the menu display by selecting from two preset types: shaded and solid (gray). To select the background: 1. Press MENU, and then press x or • until the CUSTOM menu - Toshiba 50A11 | Owners Manual - Page 43
Introduction Connecting your TV Using the Remote Control Setting up your TV Understanding the auto power off feature The TV will automatically turn itself off after approximately 15 minutes if it is tuned to a vacant channel or a station that completes its broadcast for the day. This feature - Toshiba 50A11 | Owners Manual - Page 44
(30% modulation equivalent, 4.7 kohm) VARIABLE AUDIO OUTPUT 0-300 mV(rms) (30% modulation equivalent, 4.7 kohm) Dimensions Width : 42-1/4 inches (1,073 mm) Height : 50-5/8 inches (1,284 mm) Depth : 20-13/16 inches (529 mm) Mass 217 lbs (98.6 kg) Supplied Accessories Remote Control with 2 size - Toshiba 50A11 | Owners Manual - Page 45
TV Troubleshooting Before calling a service technician, please check the following table for a possible cause of the problem and some solutions. Problem Try another channel. • Antenna reception may be poor. Use a highly directional outdoor antenna. Poor color or no color • The station may have - Toshiba 50A11 | Owners Manual - Page 46
this warranty. Reception problems caused by inadequate antenna instructions in this manual and checking the "Troubleshooting" section, you find that service is needed: (1) Call the TACP toll-free number 1-800-631-3811 to find the nearest TOSHIBA Authorized Service Station. In Hawaii, contact Toshiba - Toshiba 50A11 | Owners Manual - Page 47
13 VCR control buttons 11 RESET 33, 39 S SAP sound 37 Satellite receiver connection 7 Sleep timer 36 Sound quality adjustments 39 SPEAKERS on/ 40 Surf, channel 19 Surround sound 38 S-video cables 5 T TIMER 36 Troubleshooting 45 TV/VIDEO button on remote 34 TV/VIDEO button on TV 17 V - Toshiba 50A11 | Owners Manual - Page 48
WAYNE, NEW JERSEY 07470 NATIONAL SERVICE DIVISION:1420B TOSHIBA DRIVE, LEBANON, TN. 37087 HEAD OFFICE/327 KAMAKEE STREET, HONOLULU, HAWAII 96814, U.S.A. TEL: (808) 591-9281 HEAD OFFICE/191 McNABB STREET MARKHAM, ONTARIO L3R 8H2, CANADA TEL: (905) 470-5400 SERVICE CENTERS/TORONTO: 191 McNABB STREET
-
 1
1 -
 2
2 -
 3
3 -
 4
4 -
 5
5 -
 6
6 -
 7
7 -
8
-
9
-
10
-
11
-
12
-
13
-
14
-
15
-
16
-
17
-
18
-
19
-
20
-
21
-
22
-
23
-
24
-
25
-
26
-
27
-
28
-
29
-
30
-
31
-
32
-
33
-
34
-
35
-
36
-
37
-
38
-
39
-
40
-
41
-
42
-
43
-
44
-
45
-
46
-
47
-
48
 |
 |
Projection Television
© 2001 TOSHIBA CORPORATION
All Rights Reserved
50A11
O
WNER'S
M
ANUAL
TM
Owner's Record
The model number and serial number are on the back
of your TV. Record these numbers in the spaces below.
Refer to these numbers whenever you communicate
with your Toshiba dealer about this TV.
Model number:
Serial number:
Introduction
Connecting
your TV
Using the
Remote Control
Setting up
your TV
Using the TV’s
Features
Appendix
Index