Toshiba 50L2200U User Guide - Page 66
Picture Size, Theater Settings, ENTER
 |
View all Toshiba 50L2200U manuals
Add to My Manuals
Save this manual to your list of manuals |
Page 66 highlights
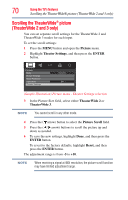
66 Using the TV's features Selecting the picture size To select the picture size using the menus: 1 Select Picture Size in the Theater Settings menu. 2 Press the ( / arrow) buttons to select the desired picture size setting. 3 Highlight Done, and then press the ENTER button. NOTE Some of the picture sizes may not be available depending on the receiving signal format (those will be grayed out in the Picture Size screen). NOTE Using these functions to change the picture size (that is, changing the height/width ratio) for any purpose other than your private viewing may be prohibited under the Copyright Laws of the United States and other countries, and may subject you to civil and criminal liability. NOTE If you select a TheaterWide® picture size, the top and bottom edges of the picture (including subtitles or captions) may be hidden. To view these edges, adjust the Picture Position or try viewing the program in 4:3 or Full, see "Scrolling the TheaterWide® picture (TheaterWide 2 and 3 only)" on page 70. Full The Full 16:9 setting is for viewing in the 16:9 (480i, 480p) source programs. If receiving a squeezed 4:3 format program, the picture is stretched horizontally to fill the width of the screen but not stretched vertically. (Sample Illustration) Picture size - Full 16:9
-
 1
1 -
2
-
3
-
4
-
5
-
6
-
7
-
8
-
9
-
10
-
11
-
12
-
13
-
14
-
15
-
16
-
17
-
18
-
19
-
20
-
21
-
22
-
23
-
24
-
25
-
26
-
27
-
28
-
29
-
30
-
31
-
32
-
33
-
34
-
35
-
36
-
37
-
38
-
39
-
40
-
41
-
42
-
43
-
44
-
45
-
46
-
47
-
48
-
49
-
50
-
51
-
52
-
53
-
54
-
55
-
56
-
57
-
58
-
59
-
60
-
 61
61 -
 62
62 -
 63
63 -
 64
64 -
 65
65 -
 66
66 -
 67
67 -
 68
68 -
 69
69 -
 70
70 -
 71
71 -
72
-
73
-
74
-
75
-
76
-
77
-
78
-
79
-
80
-
81
-
82
-
83
-
84
-
85
-
86
-
87
-
88
-
89
-
90
-
91
-
92
-
93
-
94
-
95
-
96
-
97
-
98
-
99
-
100
-
101
-
102
-
103
-
104
-
105
-
106
-
107
-
108
-
109
-
110
-
111
-
112
-
113
-
114
-
115
-
116
-
117
-
118
-
119
-
120
-
121
-
122
-
123
-
124
-
125
-
126
-
127
-
128
-
129
-
130
-
131
 |
 |
