Toshiba 51H93 Owner's Manual - English - Page 9
Connecting your TV - will not turn on
 |
UPC - 022265261781
View all Toshiba 51H93 manuals
Add to My Manuals
Save this manual to your list of manuals |
Page 9 highlights
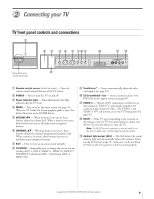
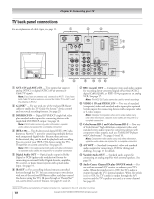
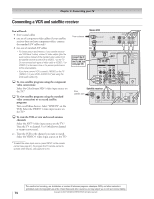
2 Connecting your TV TV front panel controls and connections 1 2 3 4 5 6 789 0 !¡ !™ { { { Press/lift to open control panel door. !£ MENU VOLUME CHANNEL EXIT TV/VIDEO TouchFocus S-VIDEO VIDEO L/MONO R AUDIO RESET 1 Remote control sensor (behind the screen) - Point the remote control toward this area of the TV screen. 2 POWER - Press to turn the TV on and off. 3 Power indicator light - When illuminated, this light indicates that the TV is on. 4 MENU - Press to access the menu system (see page 35). When the TV Guide On Screen program guide is open, this button functions as the ENTER button. 5 VOLUME x • - When no menu is on-screen, these buttons adjust the volume level. When a menu is on-screen, these buttons function as left/right menu navigation buttons. 6 CHANNEL yz - When no menu is on-screen, these buttons change the channel (programmed channels only). When a menu is on-screen, these buttons function as up/down menu navigation buttons. 7 EXIT - Press to close an on-screen menu instantly. 8 TV/VIDEO - Repeatedly press to change the source you are viewing (ANT 1, ANT 2, VIDEO 1, VIDEO 2, VIDEO 3, DVI/HDCP, ColorStream HD1, ColorStream HD2, or IEEE/1394). 9 TouchFocus™ - Press to automatically adjust the color convergence (see page 50). 0 SD SmartMedia™ slot - Insert a memory card to view JPEG files from a digital camera (see page 80). !¡ VIDEO-3 - This set of A/V connections is referred to in this manual as "VIDEO 3" and includes standard A/V connection plus optional S-video. (The VIDEO 1 and VIDEO 2 A/V connections are on the TV's back panel. See page 10.) !™ RESET - If the TV stops responding to the controls on the remote control or TV front panel and you cannot turn off the TV, press this button to reset the TV. Note: The RESET button is recessed, so you will need to use the end of a paper clip or similar object to press the button. !£ Ambient light sensor (ALS) - The ALS detects the room's ambient light and automatically adjusts the contrast. If you use the ALS feature (page 73), make sure you do not block the ALS on the front panel or it will not work properly. Copyright © 2003 TOSHIBA CORPORATION. All rights reserved. 9
-
 1
1 -
2
-
3
-
 4
4 -
 5
5 -
 6
6 -
 7
7 -
 8
8 -
 9
9 -
 10
10 -
 11
11 -
 12
12 -
 13
13 -
 14
14 -
15
-
16
-
17
-
18
-
19
-
20
-
21
-
22
-
23
-
24
-
25
-
26
-
27
-
28
-
29
-
30
-
31
-
32
-
33
-
34
-
35
-
36
-
37
-
38
-
39
-
40
-
41
-
42
-
43
-
44
-
45
-
46
-
47
-
48
-
49
-
50
-
51
-
52
-
53
-
54
-
55
-
56
-
57
-
58
-
59
-
60
-
61
-
62
-
63
-
64
-
65
-
66
-
67
-
68
-
69
-
70
-
71
-
72
-
73
-
74
-
75
-
76
-
77
-
78
-
79
-
80
-
81
-
82
-
83
-
84
-
85
-
86
-
87
-
88
-
89
-
90
-
91
-
92
-
93
-
94
-
95
-
96
-
97
-
98
-
99
-
100
 |
 |