Toshiba 61HX70 Owners Manual - Page 13
Using the remote control - owners manual
 |
View all Toshiba 61HX70 manuals
Add to My Manuals
Save this manual to your list of manuals |
Page 13 highlights
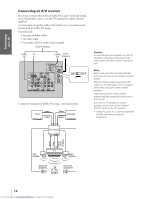
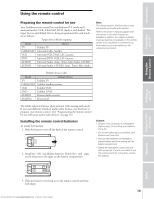
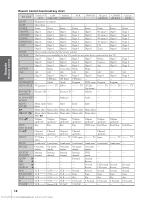
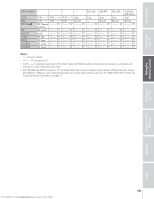
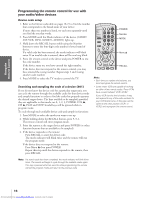
Introduction Connecting your TV Using the Remote Control Using the remote control Preparing the remote control for use Your Toshiba remote control has one dedicated TV mode and 5 universal modes: VCR, Cable/SAT, DVD, Audio1, and Audio2. The target devices and default devices being programmed for each mode are as follows: Target device/Mode mapping Mode Device TV Toshiba TV CABLE/SAT Universal Cable, Satellite VCR Universal VCR, DVD, LD, Cassette DVD Universal DVD, VCR, LD, Cassette AUDIO1 Universal Audio: Amp., Tuner, Misc.Audio, CD/MD AUDIO2 Universal Audio: CD/MD, Amp., Tuner, Misc.Audio Note: This remote control's functions may or may not operate your audio/video devices. Refer to the owner's manuals supplied with the devices to see which features are available. In addition, the original controllers may have features not available on this remote control. If you would like to continue to use these features, you may want to use the original remote control. Default device codes Mode Default device TV Toshiba TV CABLE/SAT Toshiba Satellite receiver VCR Toshiba VCR DVD Toshiba DVD AUDIO1 Pioneer Audio receiver AUDIO2 Pioneer LD The Mode selection button, when pressed, cycles among each mode. If you own different brands of audio/video devices, you first have to program your remote control. (See "Programming the remote control for use with your audio/video devices" on page 16.) Installing the remote control batteries To install the batteries: 1. Slide the battery cover off the back of the remote control. 2. Install two "AA" size alkaline batteries. Match the + and - signs on the batteries to the signs on the battery compartment. Caution: • Dispose of your batteries in a designated disposal area. Do not throw your batteries into a fire. • Do not mix battery types or combine used batteries with new ones. • Remove dead batteries immediately to prevent battery acid from leaking into the battery compartment. • Battery life expectancy is about one year with normal use. If you do not intend to use the remote control for a long time, remove the batteries. Setting up your TV Using the TV's Features Appendix Index 3. Slide the battery cover back on to the remote control until the lock snaps. 13 Downloaded from www.Manualslib.com manuals search engine
-
 1
1 -
2
-
3
-
4
-
5
-
6
-
7
-
 8
8 -
 9
9 -
 10
10 -
 11
11 -
 12
12 -
 13
13 -
 14
14 -
 15
15 -
 16
16 -
 17
17 -
 18
18 -
19
-
20
-
21
-
22
-
23
-
24
-
25
-
26
-
27
-
28
-
29
-
30
-
31
-
32
-
33
-
34
-
35
-
36
-
37
-
38
-
39
-
40
-
41
-
42
-
43
-
44
-
45
-
46
-
47
-
48
-
49
-
50
-
51
-
52
-
53
-
54
-
55
-
56
 |
 |
