Toshiba Satellite Pro A210 Maintenance Manual - Page 86
USER BREAK, CONTINUE, ABORT, ABORT ALL, Ctrl+D, Title Bar, Program Name and Its Version, Test Module
 |
View all Toshiba Satellite Pro A210 manuals
Add to My Manuals
Save this manual to your list of manuals |
Page 86 highlights
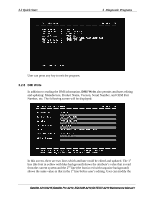
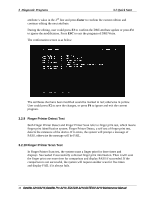
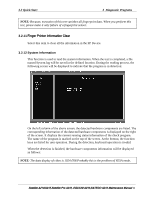
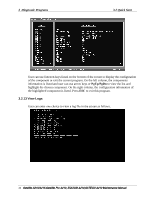
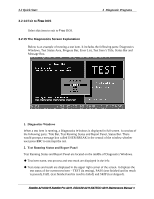
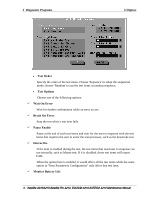
3 Diagnostic Programs 3.2 Quick Start ‹ The error list of each test module is displayed at the lower right corner of the screen. It would display the total error quantity found in the test, the most recent five error codes and description would be shown here. Detailed error report could be viewed with Logview.exe. ‹ When pressing ESC key during the test process, a User Break Windows will be popped up for the user to select. 3. USER BREAK Pressing ESC key to interrupt the test, USER BREAK message box would be prompted out in the central of Diagnostics Window for the user to select the following actions: ‹ CONTINUE---- Continue the test; ‹ SKIP---- Stop the sub-item of current test item to go to the next item's test; ‹ ABORT----Stop the current test item to test the next module. ‹ ABORT ALL---- Stop all the selected test items. User could use the hot key Ctrl+D to achieve the same operation. When the user calls ABORT ALL, the following message box will prompt for his selecting. 4. Title Bar: Title Bar located at the top of the window, it includes information as follows: ‹ Program Name and Its Version: Service Diagnostic Ver1.10; ‹ Test Module Name: Label the name and version of the test module. For example, in the above screen, the name of the test module is 'Memory Tester Build Date 2005.10.10'. ‹ Status Bar: Located at the bottom of the screen as follows: The status bar is used to indicate the current script setting and test status. It consists of two lines that includes the information as follows: ‹ Test Mode: TIMEBOUND or LOOPBOUND, e.g. LOOPBOUND in the above screen; ‹ Script File Name: Script file name, e.g. 'Quick.INI' in the above screen; 14 Satellite A210/A215,Satellite Pro A210, EQUIUM A210,SATEGO A210 Maintenance Manual
-
 1
1 -
2
-
3
-
4
-
5
-
6
-
7
-
8
-
9
-
10
-
11
-
12
-
13
-
14
-
15
-
16
-
17
-
18
-
19
-
20
-
21
-
22
-
23
-
24
-
25
-
26
-
27
-
28
-
29
-
30
-
31
-
32
-
33
-
34
-
35
-
36
-
37
-
38
-
39
-
40
-
41
-
42
-
43
-
44
-
45
-
46
-
47
-
48
-
49
-
50
-
51
-
52
-
53
-
54
-
55
-
56
-
57
-
58
-
59
-
60
-
61
-
62
-
63
-
64
-
65
-
66
-
67
-
68
-
69
-
70
-
71
-
72
-
73
-
74
-
75
-
76
-
77
-
78
-
79
-
80
-
 81
81 -
 82
82 -
 83
83 -
 84
84 -
 85
85 -
 86
86 -
 87
87 -
 88
88 -
 89
89 -
 90
90 -
 91
91 -
92
-
93
-
94
-
95
-
96
-
97
-
98
-
99
-
100
-
101
-
102
-
103
-
104
-
105
-
106
-
107
-
108
-
109
-
110
-
111
-
112
-
113
-
114
-
115
-
116
-
117
-
118
-
119
-
120
-
121
-
122
-
123
-
124
-
125
-
126
-
127
-
128
-
129
-
130
-
131
-
132
-
133
-
134
-
135
-
136
-
137
-
138
-
139
-
140
-
141
-
142
-
143
-
144
-
145
-
146
-
147
-
148
-
149
-
150
-
151
-
152
-
153
-
154
-
155
-
156
-
157
-
158
-
159
-
160
-
161
-
162
-
163
-
164
-
165
-
166
-
167
-
168
-
169
-
170
-
171
-
172
-
173
-
174
-
175
-
176
-
177
-
178
-
179
-
180
-
181
-
182
-
183
-
184
-
185
-
186
-
187
-
188
-
189
-
190
-
191
-
192
-
193
-
194
-
195
-
196
-
197
-
198
-
199
-
200
-
201
-
202
-
203
-
204
-
205
-
206
-
207
-
208
-
209
-
210
-
211
-
212
-
213
-
214
-
215
-
216
-
217
-
218
-
219
-
220
-
221
-
222
-
223
-
224
-
225
-
226
-
227
-
228
-
229
-
230
-
231
-
232
-
233
-
234
-
235
-
236
-
237
-
238
-
239
-
240
-
241
-
242
-
243
-
244
-
245
-
246
-
247
-
248
-
249
-
250
-
251
-
252
-
253
-
254
-
255
-
256
 |
 |
