Toshiba Satellite Pro L670 PSK3FC-03501L Users Manual Canada; English - Page 99
Using TOSHIBA Web Camera Application, Start, All Programs, TOSHIBA, Utilities, Web Camera Application
 |
View all Toshiba Satellite Pro L670 PSK3FC-03501L manuals
Add to My Manuals
Save this manual to your list of manuals |
Page 99 highlights
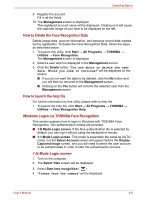
Operating Basics ■ Do not point the web camera directly at the sun. ■ Do not touch or press strongly on the web camera lens. Doing so may reduce image quality. Use an eyeglass cleaner (cleaner cloth) or other soft cloth to clean the lens if it becomes dirty. ■ Setting the [Size] to more than "800x600" will cause a larger amount of data to be written to the hard disk drive and may interfere with smooth recording. ■ When recording in dimly lit environments, select "Night Mode" which allows for brighter images with less noise. Using TOSHIBA Web Camera Application TOSHIBA Web Camera Application is pre-configured to start when you turn on Windows® 7; if you need to restart it go to Start → All Programs → TOSHIBA → Utilities → Web Camera Application. 1 2 5 3 6 4 1. Capture Still Images 2. Open/Close Preview Area 3. Delete Recorded File 4. Video Recording 5. Camera Resolution 6. Capture Settings Figure 4-3 Using the Software Capture Still Image Click to capture a still image, and see a preview of the captured image in preview area. Open/Close Preview Click to open Preview Area. One more to close Area Preview Area. Delete Recorded File Choose a thumbnail of recorded file and click this button to delete this file from hard disk. User's Manual 4-3
-
 1
1 -
2
-
3
-
4
-
5
-
6
-
7
-
8
-
9
-
10
-
11
-
12
-
13
-
14
-
15
-
16
-
17
-
18
-
19
-
20
-
21
-
22
-
23
-
24
-
25
-
26
-
27
-
28
-
29
-
30
-
31
-
32
-
33
-
34
-
35
-
36
-
37
-
38
-
39
-
40
-
41
-
42
-
43
-
44
-
45
-
46
-
47
-
48
-
49
-
50
-
51
-
52
-
53
-
54
-
55
-
56
-
57
-
58
-
59
-
60
-
61
-
62
-
63
-
64
-
65
-
66
-
67
-
68
-
69
-
70
-
71
-
72
-
73
-
74
-
75
-
76
-
77
-
78
-
79
-
80
-
81
-
82
-
83
-
84
-
85
-
86
-
87
-
88
-
89
-
90
-
91
-
92
-
93
-
 94
94 -
 95
95 -
 96
96 -
 97
97 -
 98
98 -
 99
99 -
 100
100 -
 101
101 -
 102
102 -
 103
103 -
 104
104 -
105
-
106
-
107
-
108
-
109
-
110
-
111
-
112
-
113
-
114
-
115
-
116
-
117
-
118
-
119
-
120
-
121
-
122
-
123
-
124
-
125
-
126
-
127
-
128
-
129
-
130
-
131
-
132
-
133
-
134
-
135
-
136
-
137
-
138
-
139
-
140
-
141
-
142
-
143
-
144
-
145
-
146
-
147
-
148
-
149
-
150
-
151
-
152
-
153
-
154
-
155
-
156
-
157
-
158
-
159
-
160
-
161
-
162
-
163
-
164
-
165
-
166
-
167
-
168
-
169
-
170
-
171
-
172
-
173
-
174
-
175
-
176
-
177
-
178
-
179
-
180
-
181
-
182
-
183
-
184
-
185
-
186
-
187
-
188
-
189
-
190
-
191
-
192
-
193
-
194
-
195
-
196
-
197
-
198
-
199
-
200
-
201
-
202
-
203
-
204
-
205
-
206
-
207
-
208
-
209
-
210
-
211
-
212
-
213
-
214
-
215
-
216
-
217
-
218
-
219
-
220
-
221
-
222
 |
 |
