Uniden ATLANTIS 270 English Owner's Manual - Page 17
MouN°NG ThE ChARGER - battery charger
 |
View all Uniden ATLANTIS 270 manuals
Add to My Manuals
Save this manual to your list of manuals |
Page 17 highlights
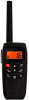
Mounting the Charger You can mount the charger on any flat surface. 1. Use the two holes at the base of the charger as a template to mark the drill holes. 2. Using a 1/8-inch (or 3 mm) drill bit, drill two holes 1/2 inch (13mm) deep. 3. Use the provided screws to attach the charger to the surface. Charging the Battery Your radio includes a charger and a rechargeable battery pack. Place your radio in the charger with the display facing forward. Make sure that the CHARGE LED on the charger turns orange. Cautions: xx Use only the battery and charger supplied with this radio. Using a different charger or battery can damage the radio and create a risk of fire or shock. xx The charger is not waterproof. If the charger falls into the water, unplug it before attempting to remove it from the water. After you remove the charger from the water, please contact Customer Service (see the back cover page for contact information). xx Wipe off dirt or shake water from your radio before placing in the charger if your radio gets dirty or wet. Important notes on charging the battery xx Charge the battery fully before using the radio. When the battery is completely charged, the CHARGE LED turns green. xx Don't use the charger when the ambient temperature is below 41° F (5° C) or above 104° F (40° C). xx If the radio is powered down, the battery can charge in about seven hours. (If the radio is powered on, the Uniden Atlantis 270 Radio Owner's Manual E-13
-
 1
1 -
2
-
3
-
4
-
5
-
6
-
7
-
8
-
9
-
10
-
11
-
 12
12 -
 13
13 -
 14
14 -
 15
15 -
 16
16 -
 17
17 -
 18
18 -
 19
19 -
 20
20 -
 21
21 -
 22
22 -
23
-
24
-
25
-
26
-
27
-
28
-
29
-
30
-
31
-
32
-
33
-
34
-
35
-
36
 |
 |
