Uniden CAM650 Safety Guide - Page 2
What's In The Box, Controls And Indicators, Installing The Cam650, Operation - gps
 |
View all Uniden CAM650 manuals
Add to My Manuals
Save this manual to your list of manuals |
Page 2 highlights
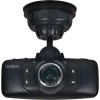
• 2.7" screen • G-Sensor with Collision Detection Mode • Recording to microSD card • GPS Built In WHAT'S IN THE BOX • Camera/Recorder • Car Adapter • MiniUSB-USB Cable • HDMI Cable • Owner's Manual • Windshield Mount If any items are missing or damaged, contact our Customer Care Line immediately at 800-297-1023. Never use damaged products! Need help? Get answers 24/7 at our website: www.uniden.com. Some state laws prohibit drivers from mounting anything on the windshield, or restrict mounting to specific areas of the windshield. It is the owner's responsibility to mount the CAM650 in compliance with local laws. 1. Slide the CAM650 onto the bracket hook on the top of the windshield mount until it locks into position. 2. Be sure the locking ring is set to UNLOCK. Press the suction cup base to the windshield. 3. Turn the locking ring to LOCK. Make sure the stand is locked to the windshield. 4. Connect the car adapter to the unit and to the cigarette lighter power jack. 5. Press POWER to turn the unit on and check the view. Adjust the angle if needed. 6. To unmount the stand, turn the locking ring to the UNLOCK position then lift the plastic flap on the base to release it from the windshield. CONTROLS AND INDICATORS Locking ring Power On/O Camera Shutter HDMI Jack Camera release latch OK Power on LED (Record start/stop Select item) USB AV out Mode or Menu microSD slot Lens Scroll up Scroll down INSTALLING THE CAM650 Installation Safety Warnings WARNING! Failure to comply with the following warnings could result in an accident or collision, resulting in death or serious injury. Do not obstruct the driver's view or the operation of the vehicle itself. Do not place it unsecured on the dashboard or in front/above an airbag. Do not mount the camera where it will become a distraction if it becomes loose. Do not attempt to operate the camera while driving. If you need to access the CAM650 to change settings, etc., pull off the road in a safe manner to do so. OPERATION SET UP THE CAM650 If you are recording (red dot on the screen is flashing), press REC OK to stop recording. You cannot enter the menus if CAM650 is recording. Select a mode and then use the menus for that mode to set up your camera. Press MODE to select a mode [Video, Still (photo), or Playback] and then press and hold MODE for a moment to display the menus for that mode. The menus for Video and Still have 2 options - that mode plus Setting. Playback has three options; you can delete or protect files on the microSD card (not included - class 10 microSD card recommended), or you can watch the recorded files in a slideshow. Press to toggle between the menus, and use ► and ◄ to scroll thorugh the menu selections. Press REC OK to select a menu option. Video Mode Press MODE until displays in the upper left corner of the screen. Press and hold MODE momentarily to display the Video menu options and press to toggle between the menus. Press ► and ◄ to scroll thorugh the menu selections. Press REC OK to select a menu option. VIDEO MENU Resolution Loop Recording Exposure Motion Detection SETTING MENU Date/Time Car/Driver ID Auto Power Off Key Click Sound - 2 - - 3 -
-
 1
1 -
 2
2 -
 3
3 -
 4
4 -
 5
5 -
 6
6
 |
 |
