Viking 24" Outdoor Refrigerated Drawers Installation / Use and Care Instructio - Page 6
Installing The Anti Tip Device For Freestanding Installations
 |
View all Viking 24" Outdoor Refrigerated Drawers manuals
Add to My Manuals
Save this manual to your list of manuals |
Page 6 highlights
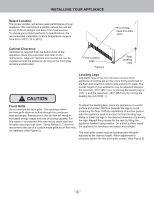
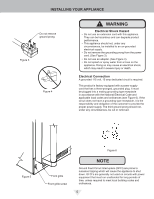
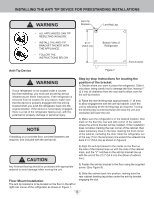
INSTALLING THE ANTI TIP DEVICE FOR FREESTANDING INSTALLATIONS ! WARNING Anti-Tip Bracket Leveling Leg • ALL APPLIANCES CAN TIP RESULTING IN INJURY. • INSTALL THE ANTI-TIP BRACKET PACKED WITH THE APPLIANCE. • FOLLOW THE INSTRUCTIONS BELOW 211»2" (54.6 cm) Bottom View of Refrigerator Front of cabinet Anti-Tip Device Figure 7 ! WARNING If your refrigerator is not located under a counter top (free standing), you must use an anti-tip device installed as per these instructions. If the refrigerator is removed from its location for any reason, make sure that the device is properly engaged with the anti-tip bracket when you push the refrigerator back into the original location. If the device is not properly engaged, there is a risk of the refrigerator tipping over, with the potential for property damage or personal injury. NOTE If installing on a concrete Àoor, concrete fasteners are required, (not included with the anti-tip kit). Step by step instructions for locating the position of the bracket: 1) Decide where you want to place the refrigerator. Slide it into place, being careful not to damage the Àoor, leaving 1" (2.5 cm) of clearance from the rear wall to allow room for the anti-tip bracket. 2) Raise the rear leveling legs approximately 1»4" (6 mm) to allow engagement with the anti-tip bracket. Level the unit by adjusting all the leveling legs as required. Turning the leveling leg counterclockwise will raise the unit and clockwise will lower the unit. 3) Make sure the refrigerator is in the desired location, then mark on the Àoor the rear and side corner of the cabinet where the anti-tip bracket will be installed. If the installation does not allow marking the rear corner of the cabinet, then make temporary lines on the Àoor marking the front corner of the cabinet, excluding the door. Slide the refrigerator out of the way. From the temporary line extend the sidewall line back 211»2" (54.6 cm) as shown in Figure 8. ! CAUTION Any ¿nished Àooring should be protected with appropriate material to avoid damage when moving the unit. Floor Mount Installation The anti-tip bracket is to be located on the Àoor in the left or right rear corner of the refrigerator as shown in Figure 7. 4) Align the anti-tip bracket to the marks on the Àoor so the side of the bracket lines up with the side of the cabinet mark, and the "V" notches on the anti-tip bracket line up with the end of the 211»2" (54.6 cm) line (Rear of cabinet line). 5) Fasten the anti-tip bracket to the Àoor using the supplied screw. (See Figure 8). 6) Slide the cabinet back into position, making sure the rear cabinet leveling leg slides under the anti-tip bracket engaging the slot. 6
-
 1
1 -
 2
2 -
 3
3 -
 4
4 -
 5
5 -
 6
6 -
 7
7 -
 8
8 -
 9
9 -
 10
10 -
 11
11 -
 12
12 -
13
-
14
-
15
-
16
-
17
-
18
 |
 |
