Viking VBI7360W Use and Care Manual - Page 10
Warning
 |
View all Viking VBI7360W manuals
Add to My Manuals
Save this manual to your list of manuals |
Page 10 highlights
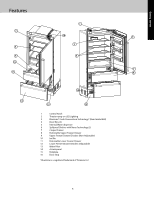
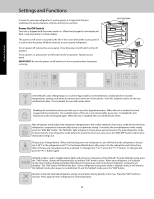
Freezer Freezer Dividers The freezer dividers separate the freezer into sections for easy food organization. Each drawer has two dividers which are removable but not interchangeable. Upper basket dividers are not adjustable. Lower basket dividers are adjustable. To remove dividers, push rear divider toward back of drawer until front tab releases from front drawer panel. Rotate slightly and pull up. To replace, place rear tab in back of drawer, push and lower front of divider into slot on front panel WARNING If the lower freezer basket dividers are removed, there is enough space for children to crawl inside. To prevent accidental child entrapment, DO NOT allow children to play inside drawer. Freezer Drawers Both freezer drawers are removable. Pull drawer all the way out. Remove clip on both sides of drawer. Lift drawer up and out. Rear Tab 12 Clip Operation Automatic Ice Maker The ice maker is located above the upper freezer drawer on the left hand side. After the refrigerator reaches normal temperature, the ice maker fills with water and begins operating. Under normal conditions, the ice maker will produce seven to nine batches of ice per 24 hour period. Note: Allow 24 to 48 hours after installation before looking for ice in your ice drawer. You should discard the first three full drawers of ice produced by your refrigerator, and should also throw out the first drawer full of ice your refrigerator produces after extended periods of non-use. During ice production, the ice maker arm raises and lowers. When the ice bin is full, the ice maker arm automatically turns the ice maker off. To manually stop ice production, raise the ice maker arm. You will hear a definite click when you have the arm in the right position. The ice maker won't produce any more ice until you lower the ice maker arm. CAUTION To avoid damage to ice maker, observe the following: • DO NOT force ice maker arm down or up past stop position. • DO NOT place or store anything in ice bucket. Ice Bin Removal To remove the ice bin, pull top freezer drawer open. Raise handles on both sides and pull up. When replacing the ice bin, lower handles before closing drawer. 10 Handles down On Position Ice Maker Arm Off Position Handles up
-
 1
1 -
2
-
3
-
4
-
 5
5 -
 6
6 -
 7
7 -
 8
8 -
 9
9 -
 10
10 -
 11
11 -
 12
12 -
 13
13 -
 14
14 -
 15
15 -
16
-
17
-
18
-
19
-
20
 |
 |
