Viper 5002 Owner Manual - Page 10
system maintenance - installation
 |
View all Viper 5002 manuals
Add to My Manuals
Save this manual to your list of manuals |
Page 10 highlights
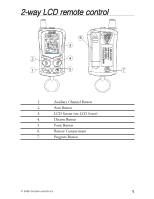
of trouble-free operation. Due to the complexity of this system, it must be installed by an authorized dealer only. Installation of this product by anyone other than an authorized dealer voids the warranty. All dealers are provided with preprinted dealer certificates to verify that they are authorized. This owner's guide should help you to get the most out of your system. Please take the time to read it prior to using the system. ➜ system maintenance This system needs no specific maintenance beyond remote control battery replacement. The 2-way remote is powered by a 1.5V AAA battery. The 1-way remote is powered by a pair of 3V, CR2016 batteries. Battery Level Indicator (2-way remote) The Battery Level indicator has four level indicators that serve as a visual indication of battery charge. When the battery reaches a low charge level that requires replacement, the remote control will generate a single notification chirp, and the Battery Level indicator will flash continuously. FULL REPLACE EMPTY Battery Replacement (2-way remote) Gently pull the end of the battery door away from the top of the remote control then slide the door up to expose the battery and remove the expired battery. Place the new battery into the remote © 2006 directed electronics 5
-
 1
1 -
2
-
3
-
4
-
 5
5 -
 6
6 -
 7
7 -
 8
8 -
 9
9 -
 10
10 -
 11
11 -
 12
12 -
 13
13 -
 14
14 -
 15
15 -
16
-
17
-
18
-
19
-
20
-
21
-
22
-
23
-
24
-
25
-
26
-
27
-
28
-
29
-
30
-
31
-
32
-
33
-
34
-
35
-
36
-
37
-
38
-
39
-
40
-
41
-
42
-
43
-
44
-
45
-
46
-
47
-
48
-
49
-
50
-
51
-
52
-
53
-
54
-
55
-
56
-
57
-
58
-
59
-
60
-
61
 |
 |
