Vivitar IPC-112 User Manual - Page 6
Initial Camera Setup - capture cam
 |
View all Vivitar IPC-112 manuals
Add to My Manuals
Save this manual to your list of manuals |
Page 6 highlights
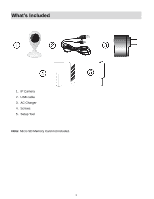
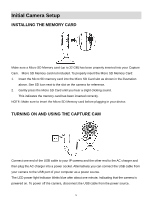
Initial Camera Setup INSTALLING THE MEMORY CARD Make sure a Micro SD Memory card (up to 32 GB) has been properly inserted into your Capture Cam. Micro SD Memory card not included. To properly insert the Micro SD Memory Card: 1. Insert the Micro SD memory card into the Micro SD Card slot as shown in the illustration above. See SD icon next to the slot on the camera for reference. 2. Gently press the Micro SD Card until you hear a slight clicking sound. This indicates the memory card has been inserted correctly. NOTE: Make sure to insert the Micro SD Memory card before plugging in your device. TURNING ON AND USING THE CAPTURE CAM Connect one end of the USB cable to your IP camera and the other end to the AC charger and then plug the AC charger into a power socket. Alternatively you can connect the USB cable from your camera to the USB port of your computer as a power source. The LED power light indicator blinks blue after about one minute, indicating that the camera is powered on. To power off the camera, disconnect the USB cable from the power source. 5
-
 1
1 -
 2
2 -
 3
3 -
 4
4 -
 5
5 -
 6
6 -
 7
7 -
 8
8 -
 9
9 -
 10
10 -
 11
11 -
 12
12 -
13
-
14
-
15
-
16
-
17
-
18
-
19
-
20
-
21
-
22
-
23
-
24
-
25
-
26
-
27
-
28
-
29
-
30
-
31
 |
 |
