Weber Q 200 Owner Manual - Page 6
result in a fire or explosion which can - gas grills
 |
View all Weber Q 200 manuals
Add to My Manuals
Save this manual to your list of manuals |
Page 6 highlights
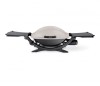
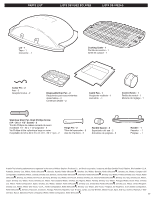
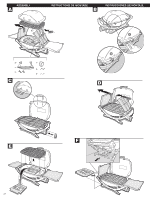
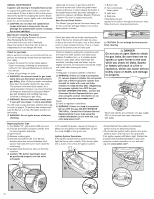
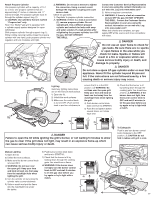
Attach Propane Cylinder Use propane cylinders with a capacity of 14.1 oz or less. Use propane cylinders that are approximately 3" inches in diameter and 11" inches in length. The propane cylinder must fit through the cylinder support ring (1). ƽ CAUTION: Use cylinders that are marked "Propane fuel" only. Note: Your Weber® gas grill is equipped with a cylinder supply system designed for vapor withdrawal. Slide propane cylinder through support ring (1). While holding carrying handle closest to propane cylinder with one hand, push propane cylinder into regulator and turn clockwise until tight. 1) ƽ WARNING: Do not use a wrench to tighten the connection. Using a wrench could damage the regulator coupling and could cause a leak. Check for gas leaks: 1) Regulator to propane cylinder connection. ƽ WARNING: If there is a leak at connection (1), remove propane cylinder. Do not operate grill. Use a different propane cylinder and recheck for leaks with soap and water solution. If a leak persists after retightening the propane cylinder, turn OFF the gas. DO NOT OPERATE THE GRILL. Contact the Customer Service Representative in your area using the contact information on our web site. Log onto www.weber.com®. 2) Valve to-regulator connections. ƽ WARNING: If there is a leak at connection (2) turn OFF the gas. DO NOT OPERATE THE GRILL. Contact the Customer Service Representative in your area using the contact information on our web site. Log onto www.weber.com®. When leak checks are complete, turn gas supply OFF at the source and rinse connections with water. ƽ DANGER Do not use an open flame to check for gas leaks. Be sure there are no sparks or open flames in the area while you check for leaks. Sparks or flames will result in a fire or explosion which can cause serious bodily injury or death, and damage to property. ƽ DANGER Do not store a spare LP-gas cylinder under or near this appliance. Never fill the cylinder beyond 80 percent full. If the instructions are not followed exactly, a fire 1 ). causing death or serious injury may occur. 2). 5). Lighting ensure that it is in the OFF 6) Check that the burner is lit 1). Summary lighting instructions are on the fold out work surface. position.) ƽ WARNING: Do not lean over the open grill. Keep your face and body at by looking down through the cooking grate. You should see a flame. ƽ WARNING: If the 1) Open the lid. least one foot away from the burner does not light, turn 2) Unfold the work surfaces. matchlight hole when lighting the burner control knob to 3) Make sure the control knob the grill. OFF and wait 5 minutes to 6). is turned OFF. (Push control knob in and turn clockwise to 4) Push burner control knob down and turn to START/HI. let the gas clear before you try again or try to light with 5) Push the red ignition button a match. 2). several times, so it clicks each time. 3). OFF 4). START/ HI ƽ DANGER Failure to open the lid while igniting the grill's burner, or not waiting 5 minutes to allow the gas to clear if the grill does not light, may result in an explosive flame-up which can cause serious bodily injury or death. To Extinguish Push in and turn burner control knob clockwise to the OFF position. ƽ CAUTION do not fold in tables until grill is cold. Manual Lighting 6) Push burner control knob down 1) Open the lid. and turn to START/HI. 2) Unfold the work surfaces. 7) Check that the burner is lit by 3) Make sure the burner control knob looking down through the cooking is turned OFF. grate. You should see a flame. ƽ WARNING: Do not lean over the open grill. Keep your face ƽ WARNING: If the burner does not light, turn the burner control START/ HI and body at least one foot away knob to OFF and wait 5 minutes from the matchlight hole when to let the gas clear before you 2). lighting the grill. try again or try to light with a 4). 4) Turn the cylinder on by turning the match. 5). cylinder valve counterclockwise. 5) Strike a match and put the flame OFF into the matchlight hole under the igniter. 3). 5). 6). 1). 2). pg6
-
 1
1 -
 2
2 -
 3
3 -
 4
4 -
 5
5 -
 6
6 -
 7
7 -
 8
8 -
 9
9 -
 10
10 -
 11
11 -
 12
12 -
13
-
14
-
15
-
16
 |
 |
