Weider 175 English Manual - Page 10
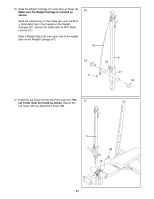
the Front Leg 19. Secure the Pad Tubes by sliding
 |
View all Weider 175 manuals
Add to My Manuals
Save this manual to your list of manuals |
Page 10 highlights
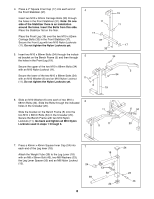
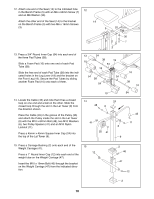
12. Attach one end of the Seat (14) to the indicated hole 12 in the Bench Frame (5) with an M6 x 63mm Screw (7) and an M6 Washer (30). Attach the other end of the Seat (14) to the bracket on the Bench Frame (5) with two M6 x 16mm Screws (3). 14 5 30 7 3 13. Press a 3/4Ó Round Inner Cap (54) into each end of the three Pad Tubes (38). Slide a Foam Pad (10) onto one end of each Pad Tube (38). Slide the free end of each Pad Tube (38) into the indicated holes in the Leg Lever (18) and the bracket on the Front Leg (19). Secure the Pad Tubes by sliding another Foam Pad (10) onto each of them. 13 54 10 38 19 54 18 54 54 38 54 10 38 10 10 54 14. Locate the Cable (45) and note that it has a closed loop on one end and a ball on the other. Slide the closed loop through the slot in the Lat Tower (9) from the direction shown. Place the Cable (45) in the groove of the Pulley (35) and attach the Pulley inside the slot in the Lat Tower (9) with the M10 x 62mm Bolt (48), two M10 Washers (6), two Pulley Spacers (41) and an M10 Nylon Locknut (11). Press a 45mm x 45mm Square Inner Cap (24) into the top of the Lat Tower (9). 14 24 48 6 41 6 35 41 9 45 11 15. Press a Carriage Bushing (2) onto each end of the 15 Weight Carriage (47). 12 Press a 1Ó Round Inner Cap (12) into each end of the weight tube on the Weight Carriage (47). Insert the M10 x 19mm Bolt (46) through the bracket on the Weight Carriage (47) from the indicated direction. 2 46 47 12 2 10
-
 1
1 -
2
-
3
-
4
-
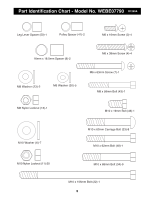 5
5 -
 6
6 -
 7
7 -
 8
8 -
 9
9 -
 10
10 -
 11
11 -
 12
12 -
 13
13 -
 14
14 -
 15
15 -
16
-
17
-
18
-
19
-
20
-
21
-
22
 |
 |
