Weider Be Pro 265 Bench Enc Manual - Page 8
do not tighten the Screw yet., Attach the Crossbar 3 to the Right Upright, in the same way.
 |
View all Weider Be Pro 265 Bench manuals
Add to My Manuals
Save this manual to your list of manuals |
Page 8 highlights
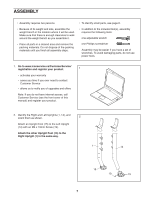
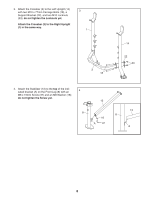
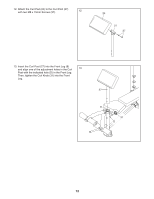
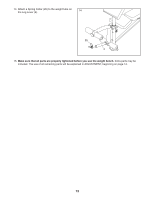
3. Attach the Crossbar (3) to the Left Upright (14) with two M10 x 77mm Carriage Bolts (18), a Support Bracket (22), and two M10 Locknuts (33); do not tighten the Locknuts yet. Attach the Crossbar (3) to the Right Upright (1) in the same way. 3 1 3 18 14 22 33 4. Attach the Stabilizer (13) to the top of the indicated bracket (A) on the Front Leg (8) with an 4 M8 x 15mm Screw (37) and an M8 Washer (16); do not tighten the Screw yet. 13 13 8 8 16 A 37 A 8
-
 1
1 -
2
-
 3
3 -
 4
4 -
 5
5 -
 6
6 -
 7
7 -
 8
8 -
 9
9 -
 10
10 -
 11
11 -
 12
12 -
 13
13 -
14
-
15
-
16
-
17
-
18
-
19
-
20
 |
 |

8
4.
Attach the Stabilizer (13) to the
top
of the indi-
cated bracket (A) on the Front Leg (8) with an
M8 x 15mm Screw (37) and an M8 Washer (16);
do not tighten the Screw yet.
3
3
18
22
33
14
1
3.
Attach the Crossbar (3) to the Left Upright (14)
with two M10 x 77mm Carriage Bolts (18), a
Support Bracket (22), and two M10 Locknuts
(33);
do not tighten the Locknuts yet.
Attach the Crossbar (3) to the Right Upright
(1) in the same way.
4
16
37
13
8
A
8
13
A