Weider Cjxt3 Master Trainer User Manual - Page 10
completely
 |
View all Weider Cjxt3 Master Trainer manuals
Add to My Manuals
Save this manual to your list of manuals |
Page 10 highlights
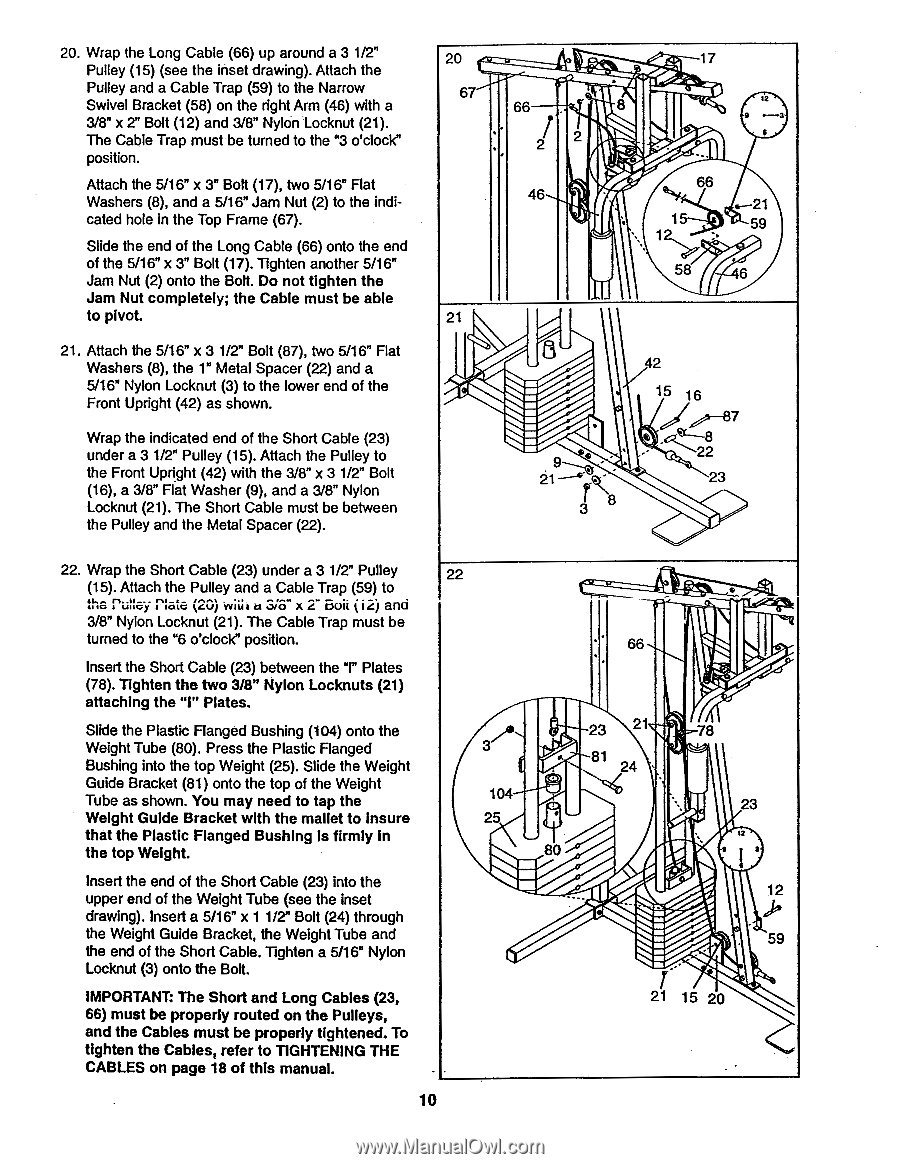
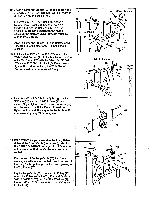
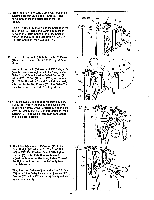
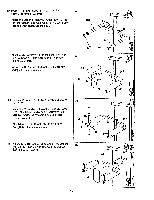
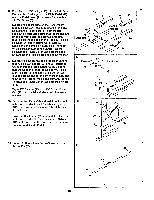
20. Wrap the Long Cable (66) up around a 3 1/2" Pulley (15) (see the inset drawing). Attach the Pulley and a Cable Trap (59) to the Narrow Swivel Bracket (58) on the right Arm (46) with a 3/8" x 2" Bolt (12) and 3/8" Nylon Locknut (21). The Cable Trap must be turned to the "3 o'clock" position. Attach the 5/16" x 3" Bolt (17), two 5/16" Flat Washers (8), and a 5/16" Jam Nut (2) to the indicated hole in the Top Frame (67). Slide the end of the Long Cable (66) onto the end of the 5/16" x 3" Bolt (17). Tighten another 5/16" Jam Nut (2) onto the Bolt. Do not tighten the Jam Nut completely; the Cable must be able to pivot. 21. Attach the 5/16" x 3 1/2" Bolt (87), two 5/16" Flat Washers (8), the 1" Metal Spacer (22) and a 5/16" Nylon Locknut (3) to the lower end of the Front Upright (42) as shown. Wrap the indicated end of the Short Cable (23) under a 3 1/2" Pulley (15). Attach the Pulley to the Front Upright (42) with the 3/8" x 3 1/2" Bolt (16), a 3/8" Flat Washer (9), and a 3/8" Nylon Locknut (21). The Short Cable must be between the Pulley and the Metal Spacer (22). 20 67 21 66 8 2 2 46 17 12 66 4,-21 59 6 42 15 16 7 21- 23 3 8 22. Wrap the Short Cable (23) under a 3 1/2" Pulley (15). Attach the Pulley and a Cable Trap (59) to th Pulley Plate (20) 37c3" x 2" Boit i 2) and 3/8" Nylon Locknut (21). The Cable Trap must be turned to the "6 o'clock" position. Insert the Short Cable (23) between the 1" Plates (78). Tighten the two 3/8" Nylon Locknuts (21) attaching the "I" Plates. Slide the Plastic Flanged Bushing (104) onto the Weight Tube (80). Press the Plastic Flanged Bushing into the top Weight (25). Slide the Weight Guide Bracket (81) onto the top of the Weight Tube as shown. You may need to tap the Weight Guide Bracket with the mallet to insure that the Plastic Flanged Bushing is firmly in the top Weight. Insert the end of the Short Cable (23) into the upper end of the Weight Tube (see the inset drawing). Insert a 5/16" x 11/2" Bolt (24) through the Weight Guide Bracket, the Weight Tube and the end of the Short Cable. Tighten a 5/16" Nylon Locknut (3) onto the Bolt. IMPORTANT: The Short and Long Cables (23, 66) must be properly routed on the Pulleys, and the Cables must be properly tightened. To tighten the Cables, refer to TIGHTENING THE CABLES on page 18 of this manual. 22 10423( 10 66 23 21 **-- 81 24 78 23 *2 I 12 J. 59 21 15 20
-
 1
1 -
2
-
3
-
4
-
 5
5 -
 6
6 -
 7
7 -
 8
8 -
 9
9 -
 10
10 -
 11
11 -
 12
12 -
 13
13 -
 14
14 -
 15
15 -
16
-
17
-
18
-
19
-
20
-
21
-
22
-
23
-
24
-
25
-
26
-
27
 |
 |