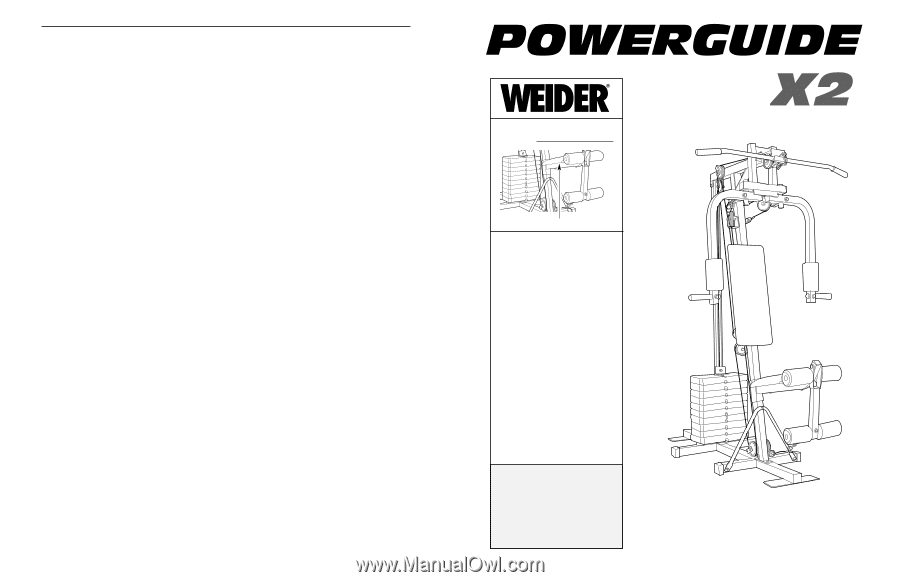
Weider Power Guide X2 User Manual
Weider Power Guide X2 Manual
 |
View all Weider Power Guide X2 manuals
Add to My Manuals
Save this manual to your list of manuals |
Weider Power Guide X2 manual content summary:
- Weider Power Guide X2 | User Manual - Page 1
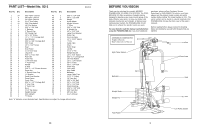
The NAME of the product (WEIDER® POWERGUIDE X2 HOME GYM SYSTEM). • The SERIAL NUMBER of the product (see the front cover of this manual). • The KEY NUMBER and DESCRIPTION of the part(s) (see the PART LIST on page 18 of this user's manual). Part No. 123331 R0497A Weider is a registered trademark of - Weider Power Guide X2 | User Manual - Page 2
home gym system. 1. Read all instructions in this manual and in the accompanying literature before using the home gym system. 2. It is the responsibility of the owner to ensure that all users of the home gym system with pre-existing health problems. Read all instructions before using. ICON assumes - Weider Power Guide X2 | User Manual - Page 3
Bolt 5/16" Jam Nut 3/8" Jam Nut User's Manual Note: "#" indicates a non-illustrated part. Specifications are subject to change without notice. 18 BEFORE YOU BEGIN Thank you for selecting the versatile WEIDER® POWERGUIDE X2 HOME GYM SYSTEM. The POWERGUIDE X2 offers a selection of weight stations - Weider Power Guide X2 | User Manual - Page 4
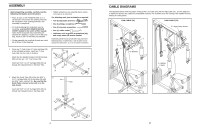
, carefully read the following information and instructions: • Place all parts of the POWERGUIDE X2 in a cleared area and remove the holes in the Base (38). 1 36 37 39 40 35 37 38 36 2. Attach the Guide Tube (34) to the two 5/16" x 2 2 1/2" Carriage Bolts (35) in the Base (38) with two - Weider Power Guide X2 | User Manual - Page 5
TROUBLE-SHOOTING AND MAINTENANCE Inspect and tighten all parts each time you use the home gym system. Replace any worn parts immediately. The home gym system REPLACEMENT PARTS on the back cover of this user's manual. 16 3. Slide nine Weights (45) onto the Guide Tube (34). 3 Make sure that the - Weider Power Guide X2 | User Manual - Page 6
(41) to the two 5/16" x 2 1/2" Carriage Bolts (35) in the Base (38) with two 5/16" Nylon Locknuts (1). Attach the Main Upright (41) to the Guide Tube (34) with a 5/16" x 2 3/4" Bolt (7) and a 5/16" Nylon Locknut (1). Insert the 4" Weight Pin (50) under the seventh Weight (45). 7 36 7 34 1 41 19 - Weider Power Guide X2 | User Manual - Page 7
ADJUSTMENT The instructions below describe how each part of the home gym system can be adjusted. Refer to the EXERCISE CHART accompanying this user's manual to see how the home gym system should be set up for each exercise. IMPORTANT: When attaching the lat bar or nylon strap, make sure that the - Weider Power Guide X2 | User Manual - Page 8
locate and correct the problem before using the home gym system (see CABLE DIAGRAMS on page 17 of this user's manual). IMPORTANT: If the cables apply them to the home gym system in the locations shown in the drawing below. 30 POWERGUIDE X2 BENCH PRESS/ 200 LBS MULTI-GYM WEIGHT DECALS 12.5 LBS - Weider Power Guide X2 | User Manual - Page 9
25. Press a 1 1/2" Inner Cap (19) into the Leg Lever (20). Lubricate a 5/16" x 2 1/4" Bolt (80). Attach the Leg Lever (20) to the Seat Frame (18) with the Bolt and a 5/16" Jam Nut (81). Do not overtighten the Jam Nut; the Leg Lever must be able to pivot freely. Insert the 5/16" x 2" Eye Bolt (21) - Weider Power Guide X2 | User Manual - Page 10
18. Route the Low Cable (70) on the indicated side of 18 the "V" Brace (42). Route the Low Cable into the groove in a 3 1/2" Thin Pulley (4). Attach th ePulley an d a Cable Trap (69) to the LArge Pivot Bracket (52) with a 3/8" x 1 3/4" Bolt (68) and a 3/8" Jam Nut (82). Be sure the Cable Trap - Weider Power Guide X2 | User Manual - Page 11
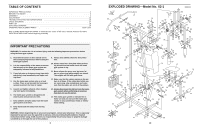
Pin (56)-1 4" Weight Pin (50)-1 4 1/2" "L" Pin (61)-2 Plastic Bushing (79)-2 1" Round Cap (9)-4 REMOVE THIS PART IDENTIFICATION CHART FROM THE MANUAL! This chart is provided to help you identify the small parts used in assembly. Note: Some parts may have been preassembled for shipping purposes - Weider Power Guide X2 | User Manual - Page 12
PART IDENTIFICATION CHART-Model No. X2-1 RR00149977AA This chart is provided to help you identify the small parts used in assembly. The number in parenthesis below each part refers to the
-
 1
1 -
 2
2 -
 3
3 -
 4
4 -
 5
5 -
 6
6 -
 7
7 -
8
-
9
-
10
-
11
-
12
 |
 |
USER’S MANUAL
home gym s
home gym s
QUESTIONS?
As a manufacturer, we are com-
mitted to providing complete cus-
tomer satisfaction. If you have
questions, or find that there are
missing or damaged parts, we
will guarantee complete satisfac-
tion through our Customer
Service Department.
Please CALL:
0345-089009
or WRITE:
ICON Lifestyle Ltd
Greenwich House
223 North Street
Sheepscar
Leeds LS7 2AA
West Yorkshire
Model No. X2-1
Serial No.
Serial Number Decal (Under Seat)
ORDERING REPLACEMENT PARTS
To order replacement parts, write or call:
Consumer Products Distribution
Greenwich House
223 North Street
Sheepscar
Leeds LS7 2AA
West Yorkshire
Tel: Country Code: 0345-089009
Fax: 0113-2411120
To help us assist you, please be prepared to give the following information:
•
The MODEL NUMBER of the product (X2-1).
•
The NAME of the product (WEIDER
®
POWERGUIDE X2 HOME GYM SYSTEM).
•
The SERIAL NUMBER of the product (see the front cover of this manual).
•
The KEY NUMBER and DESCRIPTION of the part(s) (see the PART LIST on page 18 of this user’s manual).
Part No. 123331 R0497A
Weider is a registered trademark of ICON Health & Fitness, Inc. © 1997 Printed in the USA
CAUTION
Read all precautions and instruc-
tions in this user’s manual
before using this equipment.
Save this user’s manual for
future reference.