Weider Pro 305 English Manual
Weider Pro 305 Manual
 |
View all Weider Pro 305 manuals
Add to My Manuals
Save this manual to your list of manuals |
Weider Pro 305 manual content summary:
- Weider Pro 305 | English Manual - Page 1
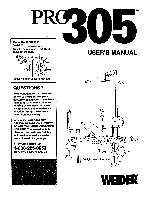
EBR E305G 51 305 Model No. W Serial No. Write the serial number in the space above for reference. 0 o, Serial Number Decal (under seat assistance, free of charge to you. CUSTOMER HOT LINE: 1-800-225-0653 Mon.-Fri., 6 a.m.-6 p.m. MST USER'S MANUAL 0 o • o, *Weights are not included. WEIDER - Weider Pro 305 | English Manual - Page 2
PRO 305 TROUBLE-SHOOTING AND MAINTENANCE PART LIST EXPLODED DRAWING ORDERING REPLACEMENT PARTS 2 3 4 5 11 14 14 15 Back Cover Note: A PART IDENTIFICATION CHART is attached to the center of this manual or repairs not provided by an ICON authorized service center, for products used for commercial or - Weider Pro 305 | English Manual - Page 3
- Weider Pro 305 | English Manual - Page 4
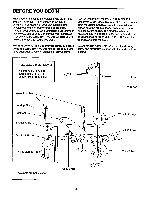
number can be found on a decal attached to the WEIDER° PRO 305 (see the front cover of this manual). For your benefit, read this manual carefully before Before reading further, please review the drawing using the WEIDER• PRO 305 Weight Bench. If you below and familiarize yourself with the parts - Weider Pro 305 | English Manual - Page 5
the center of this manual. Note: Some small parts may have been preattached for shipping. If a part is not in the parts bag, check to see if it has been pre-attached. • Tighten all parts as you assemble them, unless instructed to do otherwise. • As you assemble the WEIDER PRO 305, be sure that all - Weider Pro 305 | English Manual - Page 6
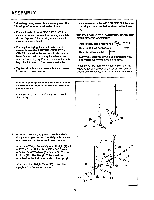
side. 3 Dumbbell Rack 26 1 33 28 2 26 1 28 33 4. Press a 2 1/2" Square Bushing (23) onto the top of each Upright (1). 4 Insert a Weight Rest (22) into each Upright (1). Align one set of holes in a Weight Rest with the holes in the Upright. Insert a Locking Pin (24) through the Upright and the - Weider Pro 305 | English Manual - Page 7
. 8. Press 2" Square Caps (31) into the Leg Lever (45) in the indicated locations. 7 25 26 33 1 1 56 • 19 31 4 8 t-?..„,.-31 45 -11-31 9. Attach a Weight Tube (30) to the Leg Lever (45) with the 5/16" x 2 1/2" Bolt (39), a 1/2" x 17/32" Spacer (27), two 5/16" Washers (33), and a 5/16" Nylon - Weider Pro 305 | English Manual - Page 8
11. Attach the Seat (41) to the Frame (3) with four 11 1/4" x 1/2" Screws (17). Do not tighten the Screws until all four Screws are inserted. Be sure that the Seat is turned as shown. \ .. 41 . Wide End 3 17 i ! 0 12. Attach the Backrest (15) to the Backrest Rail (16) with four 1/4" x 1/2" - Weider Pro 305 | English Manual - Page 9
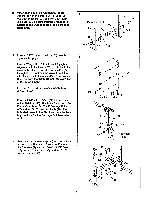
(14) to the indicated end of the Cable (13). 16. Press a 1" Round Cap (29) into each end of the weight tube on the Weight Carriage (37). Slide a Weight Stop (36) onto each end of the weight tube. Thread the 5/16" Nut (52) onto the 5/16" Eye Bolt (51). Attach the Eye Bolt to the - Weider Pro 305 | English Manual - Page 10
the weight bench as shown. 19 LAT TOWER ot ADJUSTABLE RACK PRO 305 LEG weight bench have been properly tightened. Before using the lat tower, pull the cable a few times to be sure that the cable moves smoothly over the pulleys. If the cable does not move smoothly, find and correct the problem - Weider Pro 305 | English Manual - Page 11
USING THE PRO 305 The instructions below describe how each part of the weight bench can be adjusted. Refer to the exercise information accompanying your weight set (not included) to see the correct form for each exercise. ADJUSTING THE BACKREST O The Backrest (15) has a level position and four - Weider Pro 305 | English Manual - Page 12
the Leg Lever. The long end of the "U" Hook must be inserted into the Frame. *Weights are not included. 45 Weight N 45 0 36 30 01 49 0 3 USING THE LAT TOWER To attach the Lat Tower (5) to the weight bench, insert the lower end of the Lat Tower into the Frame (3). The Lat Tower must - Weider Pro 305 | English Manual - Page 13
USING THE DUMBBELL RACK The WEIDER PRO 305 is equipped with a dumbbell rack. To use the dumbbell rack, place your dumbbells (not included) into the slots on the back of the Crossbar (2). 0 2 EXERCISING WITH THE LEG LEVER To perform leg extensions, sit on the bench with your feet under the lower - Weider Pro 305 | English Manual - Page 14
each time you use the weight bench. Replace any worn parts immediately. The weight bench can be cleaned using a damp cloth and mild non-abrasive detergent. Do not use solvents. If any parts need to be replaced, see ORDERING REPLACEMENT PARTS on the back cover of this manual. PART LIST Model No - Weider Pro 305 | English Manual - Page 15
EXPLODED DRAWING Model No. WEBE30551 6 7 10 9 11 9 10 R0995A 6 15 16 17 21 .9‹ 22 18 20 28 8 12 13 21 22 5 26 14 51 2 23 55 23 37 29 54 36 53 1 25 2 17 53 0 23 4*0 2§''. 28 33 0 41 26 5 ' 1° 40 2-1V 24 28 19 ro 31 Y. 29 23 1 26 2 ! I 26 19 32 56 26 50 24 25 - Weider Pro 305 | English Manual - Page 16
give the following information: 1. The MODEL NUMBER of the product (WEBE30551). 2. The NAME of the product (WEIDER' PRO 305 Weight Bench). 3. The SERIAL NUMBER of the product (see the front cover of this manual). 4. The KEY NUMBER and DESCRIPTION of the part(s) (see the PART LIST on page 14 of this - Weider Pro 305 | English Manual - Page 17
REMOVE THIS PART IDENTIFICATION CHART FROM THE MANUAL This chart is provided to help you identify the small parts used in assembly. Important: Some parts may have been pre-assembled for shipping purposes. - Weider Pro 305 | English Manual - Page 18
i !\,\\\\ 1/4" x 1/2" Screw (17)-8 5/16" x 2 1/2" Bolt (39)-1 - 1" Angled Cap (38)-1 0 Cable Clip (14)-1 M\\\\\\\\\\ 5/16" x 3" Bolt (35)-1 - 0 3/8" x 3" Bolt (11)-2 1/2" x 3/4" Spacer (42)-2 O 5/16" x 3 1/4" Bolt (28)-9 - 1/2" x 5/8" Spacer (10)-4 0 1/2" x 17/32" Spacer (27)-1 0 - Weider Pro 305 | English Manual - Page 19
r r 2" Square Cap (31)-7 r 2 1/2" Square Bushing (23)-4 1 3/4" Square Cap (34)-1 r /-* 2 1/2" Drilled Bushing (57)-1 1 1/2" x 2 1/2" Cap (32)-6 3/4" Round Cap (50)-6 O 1" Round Cap (29)-7 Weight Stop (36)-3
-
 1
1 -
 2
2 -
 3
3 -
 4
4 -
 5
5 -
 6
6 -
 7
7 -
8
-
9
-
10
-
11
-
12
-
13
-
14
-
15
-
16
-
17
-
18
-
19
 |
 |
EBE30551
RG305
Model
No.
W
Serial
No.
Write
the
serial
number
in
the
space
above
for
reference.
0
o,
Serial
Number
Decal
(under
seat)
QUESTIONS?
As
a
manufacturer,
we
are
com-
mitted
to
providing
complete
customer
satisfaction.
If
you
haVe
questions,
or
find
that
there
are
missing
or
damaged
parts,
we
will
guarantee
you
complete
sat-
isfaction
through
direct
assis-
tance
from
our
factory.
TO
AVOID
UNNECESSARY
DELAYS,
PLEASE
CALL
DIRECT
TO
OUR
TOLL
-FREE
CUSTOMER
HOT
UNE.
The
trained
techni-
cians
on
our
customer
hot
line
will
provide
immediate
assis-
tance,
free
of
charge
to
you.
CUSTOMER
HOT
LINE:
1-800-225-0653
Mon.
-Fri.,
6
a.m.-6 p.m.
MST
USER'S
MANUAL
o,
0
*Weights
are
not
included.
o
•
WEIDER