Weider Pro 350se English Manual - Page 9
Adjusting the Weight Bench
 |
View all Weider Pro 350se manuals
Add to My Manuals
Save this manual to your list of manuals |
Page 9 highlights
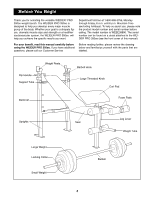
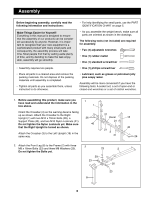
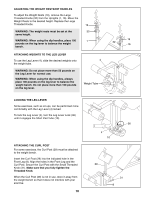
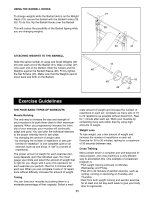
11. Press four 25.4mm Square Inner Caps (13) into the 11 seat brackets on the Frame (2). Attach the Seat (11) to the seat brackets on the Frame (2) with four M8 x 40mm Bolts (25) and four M8 Washers (20). 12. Attach the Curl Pad (41) to the Curl Post (29) with 12 two M6 x 16mm Screws (42). Insert the Curl Post (29) into the Front Leg (8). Align one of the adjustment holes in the Curl Post with the adjustment hole in the Front Leg. Tighten the Small Threaded Knob (31) into the Front Leg. 13. Make sure that all parts are properly tightened before using the weight bench. The use of all remaining parts will be explained in Adjusting the Weight Bench below. 11 13 20 41 8 2 20 13 25 42 29 31 Adjusting the Weight Bench This section explains how to adjust the weight bench. See the EXERCISE GUIDELINES on page 11 for important information on how to get the most benefit from your exercise program. Also, refer to the accompanying exercise poster to see the correct form for each exercise. Inspect and tighten all parts each time you use the weight bench. Replace any worn parts immediately. The weight bench can be cleaned with a damp cloth and a mild, non-abrasive detergent. Do not use solvents. ADJUSTING THE BACKREST The Backrest (6) can be used in a level position, an inclined position, or a declined position. To use the Backrest in a level position, first lift the Backrest. Insert the Support Tube (7) into the lowest set of adjustment brackets on the Uprights (1, 16). Lay the Backrest Tubes (5) on the Support Tube. To use the Backrest (6) in an inclined position, first lift the Backrest. Insert the Support Tube (7) into one of the two upper sets of adjustment brackets on the Uprights (1, 16). Lay the Backrest Tubes (5) on the Support Tube. To use the Backrest (6) in a declined position, lift the Backrest and remove the Support Tube. Lay the Backrest Tubes on the Crossbar (3). 1 6 7 5 16 3 9
-
 1
1 -
2
-
3
-
 4
4 -
 5
5 -
 6
6 -
 7
7 -
 8
8 -
 9
9 -
 10
10 -
 11
11 -
 12
12 -
 13
13 -
 14
14 -
15
-
16
 |
 |
