Weslo 850 Instruction Manual - Page 5
Conditioning Guidelines, Warning, Assembly
 |
View all Weslo 850 manuals
Add to My Manuals
Save this manual to your list of manuals |
Page 5 highlights
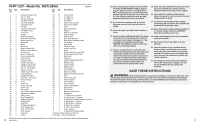
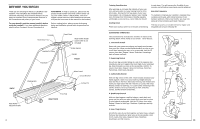
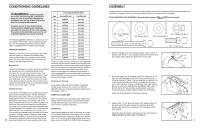
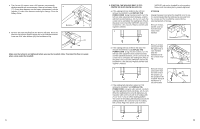
CONDITIONING GUIDELINES WARNING: Before beginning this or any exercise program, consult your physician. This is especially important for individuals over the age of 35 or individuals with pre-existing health problems. The pulse sensor is not a medical device. Various factors, including your movement, may affect the accuracy of heart rate readings. The sensor is intended only as an exercise aid in determining heart rate trends in general. The following guidelines will help you to plan your exercise program. Remember-these are general guidelines. For more detailed information about exercise, obtain a reputable book or consult your physician. EXERCISE INTENSITY Whether you want to burn fat, strengthen your cardiovascular system, or increase your athletic performance, you can tailor your exercise to your specific goals. The key to achieving the desired results is to exercise with the proper intensity. Burning Fat To burn fat effectively, you must exercise at a relatively low intensity level for a sustained period of time. During the first few minutes of exercise, your body uses easily accessible carbohydrate calories for energy. Only after the first few minutes of exercise does your body begin to use stored fat calories for energy. If your goal is to burn fat, set the speed control on the console to FAT BURN to help you maintain the proper intensity level. (See pages 7 and 8.) Aerobic Exercise If your goal is to strengthen your cardiovascular system, your exercise must be "aerobic." Aerobic exercise is activity that requires large amounts of oxygen for prolonged periods of time. This increases the demand on the heart to pump blood to the muscles, and on the lungs to oxygenate the blood. The proper intensity level for aerobic exercise can be found by using your pulse as a guide. As you exercise, your pulse should be kept at a level between 70% and 85% of your maximum possible heart rate. This is known as your training zone. You can find your training zone in the table at the top of this page. Training zones are listed according to age and physical condition. During the first few months of your exercise program, keep your pulse near the low 12 end of your training zone as you exercise. After a few Training Zone (Beats/Min.) Age Unconditioned Conditioned 20 138-167 25 136-166 30 135-164 35 134-162 40 132-161 45 131-159 50 129-156 55 127-155 60 126-153 65 125-151 70 123-150 75 122-147 80 120-146 85 118-144 133-162 132-160 130-158 129-156 127-155 125-153 124-150 122-149 121-147 119-145 118-144 117-142 115-140 114-139 months of regular exercise, your pulse can be gradually increased until it is near the middle of your training zone as you exercise. You can measure your pulse using the pulse sensor. Exercise for about four minutes, and then measure your pulse immediately. If your pulse is too high or too low, adjust the intensity of your exercise. It may also be helpful to set the speed control on the console to AEROBIC to help you maintain the proper intensity level. (See pages 7 and 8.) Performance Training If your goal is high performance athletic conditioning, set the speed control on the console to PERFORMANCE to help you maintain the proper intensity level. (See pages 7 and 8.) WORKOUT GUIDELINES When exercising, wear appropriate attire. Always wear athletic shoes for foot protection. Each workout should include three basic parts: (1) a warm-up, (2) training zone exercise, and (3) a cool-down. Warming Up Warming up prepares the body for exercise by increasing circulation, delivering more oxygen to the muscles and raising the body temperature. Begin each workout with 5 to 10 minutes of stretching and light exercise to warm up (see SUGGESTED STRETCHES on page 13). ASSEMBLY Set the treadmill in a cleared area and remove all packing materials. Do not dispose of the packing materials until assembly is completed. Refer to the drawings below to identify small parts used in assembly. TOOLS REQUIRED FOR ASSEMBLY: One adjustable spanner (not included). 3/8" x 1 1/2" Washer (28)-1 3/8" Washer (80)-2 5/16" Flange Nut (48)-2 5/16" Washer (50)-2 5/16" x 2 3/4" Bolt (49)-2 3/8" x 1" Bolt (2)-3 1. Raise the Upright (11) to the vertical position. Insert a 3/8" x 1" 1 Bolt (2), with the 3/8" x 1 1/2" Washer (28), into the lower end of the Upright. Finger tighten the Bolt into the Frame (59). 11 2 28 59 2. If there are plastic ties in the upper ends of the Handrails (1), cut them off. Insert the upper end of one of the Handrails into the Console Housing (3). (Note: The two Handrails are identical. Due to the manufacturing process, there is a dimple near the lower end of each Handrail. It makes no difference which side the dimples are on when the Handrails are assembled.) Insert a 3/8" x 1" Bolt (2), with a 3/8" Washer (80), up into the plate under the Console Housing, and finger tighten the Bolt into the Handrail. Attach the other Handrail (1) in the same manner. 2 80 2 1 3 80 2 3. Insert a 5/16" x 2 3/4" Bolt (49), with a 5/16" Washer (50), into the lower end of the right Handrail (1) and the Frame (59). 3 Reach under the Frame and tighten a 5/16" Flange Nut (48) onto the Bolt. Attach the other Handrail (1) (not shown) in the same manner. Tighten all Bolts used in steps 1 through 3. 1 59 49 48 50 5
-
 1
1 -
 2
2 -
 3
3 -
 4
4 -
 5
5 -
 6
6 -
 7
7 -
 8
8
 |
 |
